


How to Choose Art Size for Wall: Formulas That Work
You've found artwork you love, but the size menu has stopped you. The smaller version feels safer for the budget, the larger one looks impressive online, and neither tells you what it will look like above your sofa. Holding a tape measure against the wall helps, but it doesn't show how the piece will feel from your favorite chair.
Choosing art size means matching the finished framed dimensions, the room's proportions, and the viewer's position. A useful formula narrows the options. A full-size wall test tells you which option belongs in the room, while a resolution check keeps an enlarged photograph from becoming a disappointing print.
How to Measure the Wall and Furniture in Order
Start with a tape measure, pencil, low-tack painter's tape, and a sheet of paper. Record dimensions in the same unit throughout, and label width and height rather than relying on memory. When comparing artwork listings, distinguish the image size from the finished outside frame size.
Build a usable measurement sheet
Measure the wall edge to edge at the intended hanging height. Then subtract windows, doors, shelving, and zones that must remain clear, including light fixtures and controls. Measuring only between decorative trim can hide the wall's actual boundaries, so record the full wall and the usable area separately.
Measure the furniture at its widest point. On a sofa, use the outside edges of the arms, not the legs or seat cushions. Record side tables separately, and include them in a combined furniture span only if they're intended to form one visual composition beneath the art.
Record the vertical limits. Note ceiling height, the top of the sofa back or console, and the lowest acceptable position for the artwork's bottom edge. This reveals whether a tall piece will fit comfortably or force the entire arrangement upward.
Mark the viewing positions. Identify the doorway, the seat you use most, and the main walking path. Note anything that blocks the view, such as a tall chair back, monitor, lamp, or reception counter.
Choose a single-piece or grouping approach. Measure the largest artwork you already own, including its frame, and sketch its orientation. This helps you decide whether it can anchor the composition or belongs on a different wall.
Consolidate the measurements. Put usable wall width, furniture width, vertical clearance, and viewing positions on the same sheet. Add a quick sketch showing off-center furniture or architectural obstacles, because dimensions alone won't explain those relationships.
Use this visual checklist while measuring:
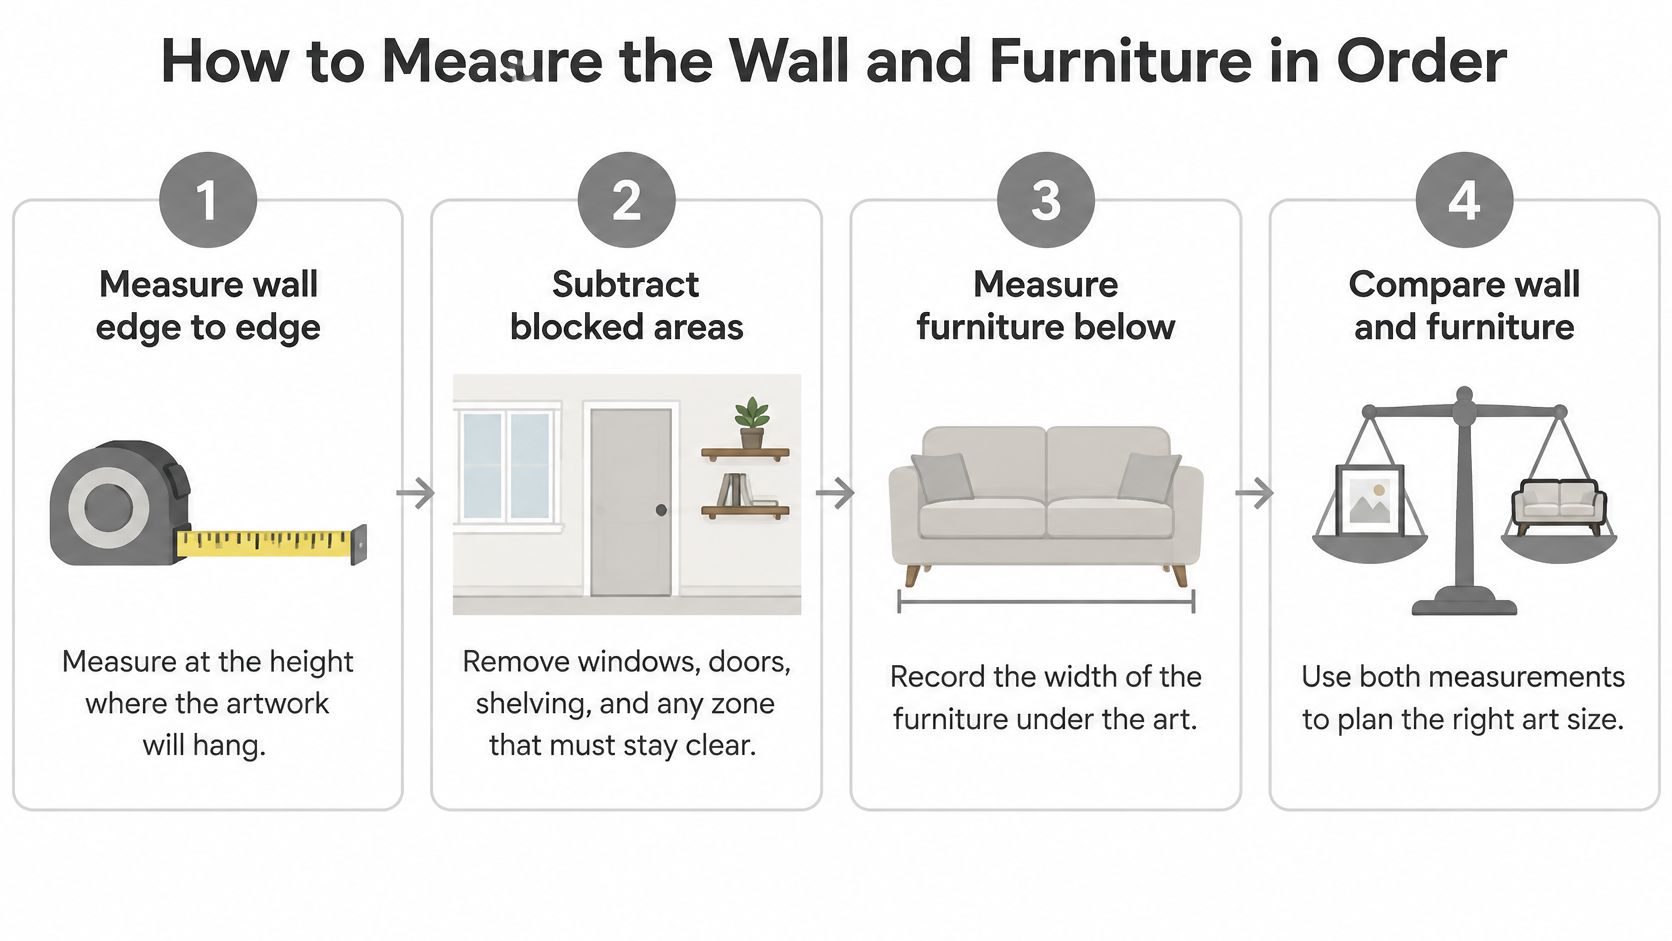
Measurement check: Sofa leg width and wall trim are easy reference points, but they aren't necessarily the boundaries you need.
Your finished sheet should show what's available, what sits beneath the art, and where people will view it. Keep those details beside you when comparing sizes, rather than shopping from a wall photograph alone.
Quick Size Ratios for Sofas, Consoles and Walls
For a 72-inch sofa, start with artwork spanning about 48–54 inches, following Lowe's recommendation that art above furniture measure approximately two-thirds to three-quarters of the furniture's width. That span means the complete framed piece or the full grouping, including its gaps, not just the printed image.
The table applies that furniture formula to common examples. Its empty-wall examples use the guide's broader range, with a deliberately narrower starting range for the smaller focal wall.
Artwork width by furniture or wall width
Situation | Rule | Artwork width |
|---|---|---|
Sofa 72 in wide | 2/3 to 3/4 of furniture width | 48–54 in |
Sofa 84 in wide | 2/3 to 3/4 of furniture width | 56–63 in |
Console 48 in wide | 2/3 to 3/4 of furniture width | 32–36 in |
Empty wall 96 in wide (8 ft) | 60–75% of usable wall width | About 58–72 in |
Empty wall 120 in wide | 50–75% of wall width | 60–90 in |
Use furniture as the anchor when furniture sits below the artwork. A small console against an expansive wall doesn't automatically need a wall-filling painting. That choice can make the console look incidental rather than part of an intentional arrangement.
For an unfurnished wall, use the unobstructed architectural area instead. A reception wall interrupted by a doorway should be treated differently from an uninterrupted wall of the same overall width.
Width isn't the whole decision
The same Lowe's guide describes pieces under 24 inches tall as suitable for smaller walls, pieces over 32 inches tall as useful above major furniture, and pieces above 40 inches as oversized statement works. Treat these as scale categories, not instructions to fill every available inch.
A tall ceiling may support a deeper composition, while a low ceiling can favor a horizontal format. A broad black frame can make a piece feel more substantial than a slim pale frame with identical outside dimensions.
Choose a range first. Don't turn a proportional guideline into a requirement to buy an awkward size.
For multiple works, plan the outside silhouette before choosing individual frame sizes. These gallery layout design considerations are useful when arranging different formats into a coherent whole.
Write down your furniture width and usable wall width before shopping. The table then becomes a comparison tool, not another reason to guess.
Where to Hang Art and Who Will See It
Begin with a centerline, not a top edge. Christie's reports that modern and contemporary artworks are typically displayed with their centers about 1.55 meters, approximately 61 inches, above the floor. This gives you a starting position, but it doesn't settle the question for every room.
Eye-level hanging lets viewers encounter an individual work without searching across a crowded wall. In a home or office, however, the viewer might be sitting, approaching from an angle, or looking past furniture.
Match the size to the approach
A hallway rewards close inspection. Smaller drawings, intimate photographs, and detailed works can suit that experience because people can approach them without needing to understand the whole composition from across a room.
A large living room creates a different problem. Fine detail may be invisible from the main seat, even if the frame fits neatly between the windows. Choose dimensions that let the subject remain legible from the intended viewing position, not merely from directly beneath the artwork.
In a lobby, check both the entrance view and the waiting chairs. A dramatic piece behind a reception desk may work for arriving visitors but disappear behind screens or furniture for seated guests.
Check seated and standing sightlines
A museum-accessibility paper highlights the importance of accommodating seated and shorter visitors rather than assuming everyone experiences a display from standing adult eye level. Apply that principle by sitting in the actual chair and checking whether the artwork feels comfortably visible without tilting your head.
Living and dining rooms: Let the seated experience influence placement, especially where people spend time facing the work.
Offices and reception areas: Check visibility over monitors, counters, and chair backs.
Public-facing spaces: Keep the approach clear, and consider whether projecting frames or sculptural pieces interfere with circulation.
A visually balanced installation isn't automatically a comfortably viewable installation.
Above a sofa, connect the artwork visually to the furniture without placing its lower edge where someone's head could contact it. For more placement detail, use this guidance on picture-hanging height.
Standing eye level remains a useful benchmark. In a room used mainly while seated, a lower placement may serve the people who spend time there better.
How to Test Art Size With Paper Before Drilling
A print can look substantial in a shop and undersized once it's surrounded by your living room. A full-size paper template removes that uncertainty before you buy a frame or make holes.
Make the template match the outside dimensions of the finished artwork, including its frame. Use kraft paper, joined sheets, or a printed mock-up, then attach it with low-tack tape after testing the tape on an inconspicuous area.
This is the kind of full-size check to make on the actual wall:
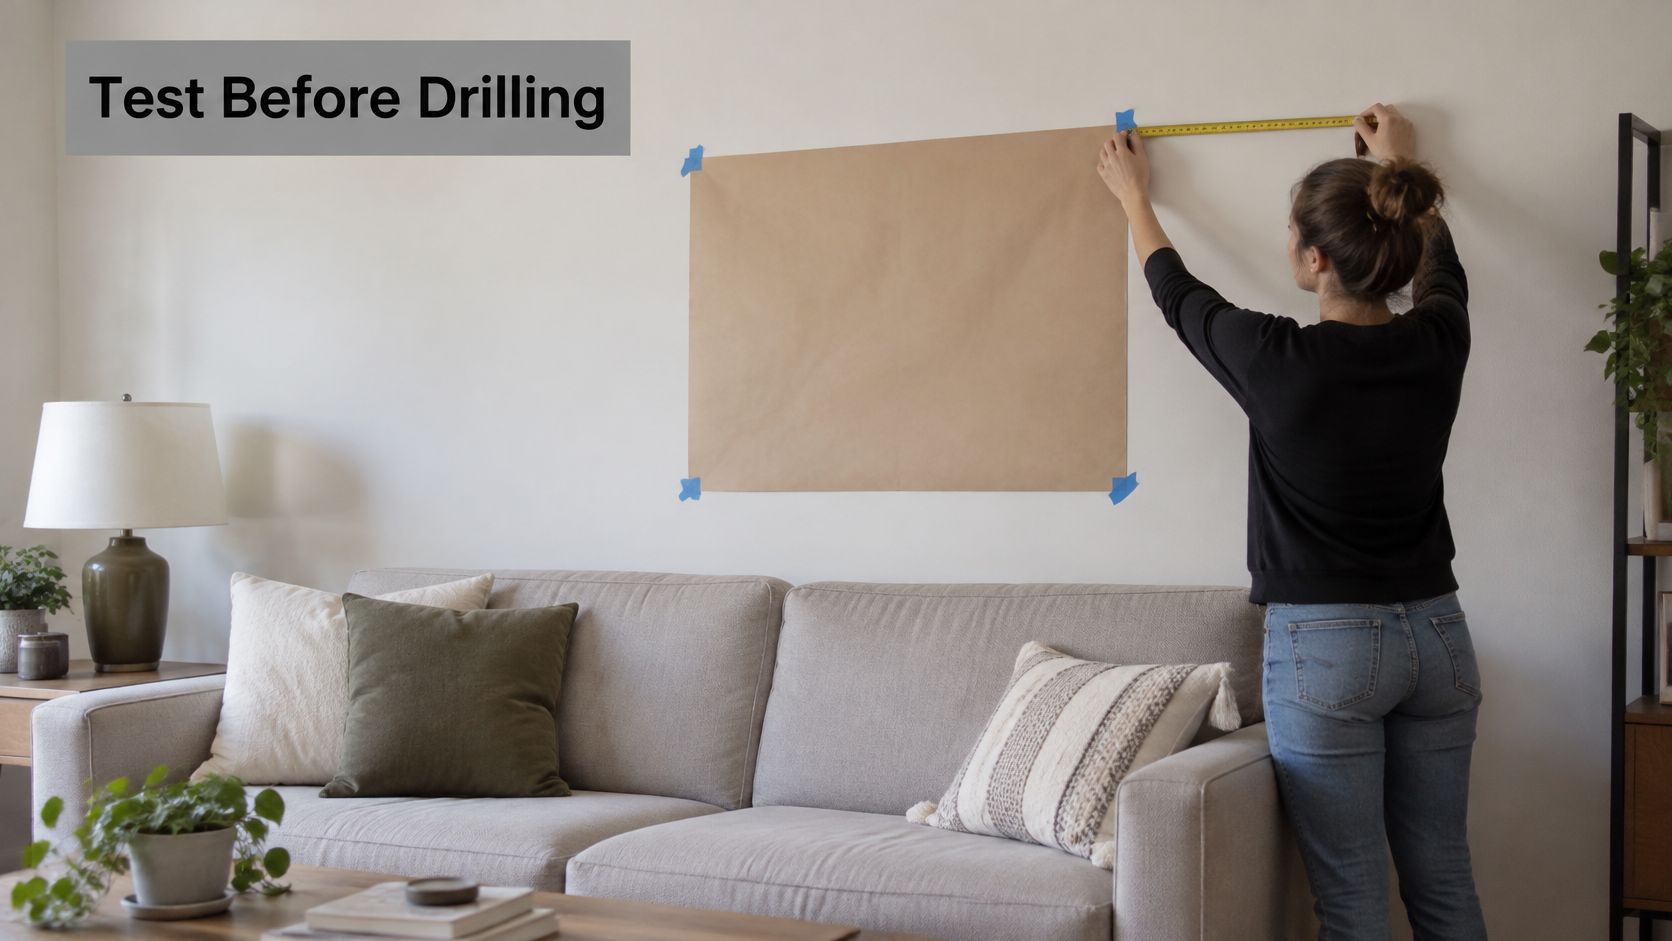
Test the whole composition
For a grouping, cut a separate template for every frame. Set the intended gaps, then evaluate the outside boundary of the arrangement. Center the composition on the furniture beneath it when that furniture is the visual anchor, rather than automatically centering it between the wall's ends.
Mixtiles' wall-art size guide recommends evaluating a full-size template from normal viewpoints for at least a day; it also notes that a single piece smaller than roughly 16 × 20 inches can lose presence in larger rooms. Use that as a warning against underscaling, not a reason to reject a small original you love.
Keep the paper in place while you use the room normally. Check the doorway view, your usual seat, and the route people walk through. Daylight and evening lamps may reveal glare or shadows that weren't apparent during setup.
The video offers another visual reference for planning placement:
Read what the template tells you
Blank kraft paper tests the outline, not the artwork's full visual weight. Mark a dark frame border with removable tape, or attach a small image preview to remind yourself whether the chosen work is pale, densely patterned, or strongly colored.
It disappears from the main seat: Try a larger outline or a wider arrangement.
It crowds the furniture: Reduce the footprint or change the orientation before raising it.
It feels heavy on one side: Adjust the grouping's balance rather than forcing every frame into a symmetrical pattern.
It competes with architecture: Preserve breathing room around openings, lights, and strong trim details.
High ceilings, dark frames, and dense collections can justify departures from a simple ratio. If the composition overwhelms the wall, try a smaller piece or distribute the artwork into a more open grouping. Record the final outside dimensions and placement on your measurement sheet.
Pixel Limits for Large Prints on Walls
A large print made from a low-resolution file can look acceptable across a room and soft at arm's reach. A size that suits the wall may still exceed the file's useful print size. Enlarging the image doesn't restore missing detail.
WhiteWall's image-quality guide gives an example of a 24-megapixel image remaining suitable at approximately 200 PPI, enlarged to about 76 by 51 centimeters and viewed from roughly two meters. The important relationship is between image detail, print dimensions, and viewing distance, not megapixels alone.
Calculate the file requirement
PPI means pixels per inch. The table shows arithmetic requirements using the stated print dimensions and comparison densities. Treat the lower-density column as a distant-viewing test option, not a promise that every file will print acceptably.
Pixel requirements for common print sizes
Print size | Pixels at 200 PPI | Pixels at 100 PPI |
|---|---|---|
20 × 30 in | 4,000 × 6,000 | 2,000 × 3,000 |
30 × 20 in (approximately 76 × 51 cm) | 6,000 × 4,000 | 3,000 × 2,000 |
40 × 30 in | 8,000 × 6,000 | 4,000 × 3,000 |
60 × 40 in | 12,000 × 8,000 | 6,000 × 4,000 |
These are calculated pixel dimensions, not universal quality thresholds. A sharply captured original and a heavily compressed download can produce different results even when their pixel dimensions match.
Let access determine the quality check
In a narrow corridor, people can inspect the surface closely, so favor the higher-density option and examine a sample at the intended enlargement. In an open-plan office or lobby, a lower-density print may be satisfactory from the main viewing area, but check whether visitors can also walk right up to it.
Source file: Use the original photograph or scan, not a screenshot or messaging-app copy.
Medium and subject: Fine photographic detail, reproduced brushwork, and textile texture reveal enlargement differently.
Lighting and finish: Inspect a sample under lighting similar to the installation, especially with glossy surfaces.
For artwork based on album imagery or music photography, Striped Circle's print quality tips for music fans offer a relevant additional resource. Compare the proposed format with these fine-art print-size considerations before ordering.
Divide the file's pixel width by the planned print width in inches, then repeat for height. Compare the results with the table and request a representative print sample if quality is uncertain.
Confirm Your Size Before You Hang Anything
Before drilling, make sure the measurement sheet, paper layout, and print order describe the same finished dimensions. A paper test based on image size won't protect you from a frame that extends beyond the available space. Check the order confirmation for matting, frame width, orientation, and any cropping.
For an existing original, record its actual outside dimensions rather than a remembered catalog size. For a grouping, keep a sketch of the approved arrangement so individual pieces don't drift into a different layout during installation.
Check agreement before installation
Use a short final review rather than reopening every design decision:
Size agreement: The selected frame matches the tested outline.
Position agreement: The approved location leaves controls, doors, and furnishings usable.
Image agreement: The crop and print quality suit the intended display.
Access agreement: The piece can be moved into position without an improvised lift over furniture.
A piece wider than the usable wall needs a different location or a revised composition. Don't solve that mismatch by overlapping a doorway, crowding a switch, or assuming an installer can make the architectural constraint disappear.
Gather the installation details
Our contact form asks how many art pieces need installing, whether ladders or scaffolding are required, whether installation involves drilling into hard surfaces, and the dimensions of the largest piece. Add those answers to your measurement sheet before contacting us.
Those details affect how the work is planned. A collection needs a coordinated layout; a high placement needs suitable access; masonry or tile requires a different drilling approach from a typical painted wall. Include a clear photograph of the wall and mention fragile finishes or obstacles around the intended location.
We support projects in Denver, Boulder, Aurora, Highlands Ranch, Castle Rock, Fort Collins, Vail, Aspen, and surrounding communities. When calling about your project, have the sheet and wall photographs ready so you can explain both the desired result and the installation conditions.
Final decision: Keep the ratios as starting points. Let the full-size test on the actual wall determine the composition.
Write the installation answers beside your confirmed dimensions, then request a quote. You'll have a specific plan to discuss instead of an approximate size and a photograph with no scale.
Colorado Art Services offers art placement, layout, and installation for homes and commercial spaces, with a free estimate for art hanging, display, and installation services. Bring your wall measurements, template dimensions, and installation details to Colorado Art Services, and call to request a quote before you hang anything.
Comments