


Hanging Pictures on Walls Height by Situation
Center a framed picture on an open wall 57 to 60 inches (145 to 153 cm) above the finished floor, measuring to its middle, not its top edge. Furniture, seating, and the scale of the artwork can change that mark.
A museum's eye-level standard is an average, not a measurement of everyone who'll enter the room. The Delaware Art Museum generally places the center of two-dimensional work at 58 inches, describing that position as averaged eye level. At home, the better question is who will look at the picture, and where they'll be when they do.
Hanging Pictures on Walls Height at a Glance
Start with the center of the finished framed object. That includes the frame, but not a loose hanging wire or other movable hardware sticking above it.
Use this situation table to choose your reference before you make a hook mark. The distinction matters: some situations use a floor-to-center measurement, while others use the space above furniture.
Picture Center Heights by Wall Situation
Situation | Target | What to measure |
|---|---|---|
Single picture, open wall, standing viewers | 57 to 60 in (145 to 153 cm) | Center of the framed artwork |
Practical home default | About 60 in (152 cm) | Center of the framed artwork |
Museum-style two-dimensional work | About 58 in | Center of the framed artwork |
Living room, dining room, or office where people sit | About 55 in (140 cm) | Center of the framed artwork |
Wheelchair users as the primary viewers | About 43 to 51 in | Center aligned with seated eye level |
Art directly above furniture | 6 to 8 in gap above the furniture top | Gap, not a fixed floor height |
Gallery wall or grouped arrangement | Group's visual center at 57 to 60 in | Center of the whole composition |
High ceiling or very large work | Lower to middle viewing field | Center judged by scale and viewing distance |
These are starting positions, not competing rules that you must satisfy simultaneously. On a bare hallway wall, the floor gives you a useful reference. Above a headboard, the headboard becomes the more useful reference.
For a rectangular picture, find the center halfway between the outer top and bottom edges. Don't measure only the exposed print inside the mat. A broad frame is part of what you see on the wall, so leaving it out changes the final placement.
Choose the Reference Before the Hardware
Before reaching for a pencil, make these decisions:
Identify the viewing position. Will people walk past the picture, sit opposite it, or look at it from a nearby chair?
Check the furniture relationship. A sofa or sideboard may determine the frame's bottom edge more clearly than a floor measurement does.
Judge the complete arrangement. For grouped pictures, look at the outer shape and visual balance of the collection, not each frame in isolation.
Practical rule: Choose where the picture belongs first. Calculate where the hook belongs afterward.
Subject matter can help you plan the arrangement without changing the measuring method. For example, Volkswagen Memorabilia's resource on styling walls with VW-inspired art is useful when considering a themed display. Whether you're arranging automotive prints, family photographs, or scenic views, measure the complete framed objects and judge them from the place where people will look.
The ceiling is usually a poor starting reference. Empty wall above a picture doesn't automatically mean the picture needs to move upward.
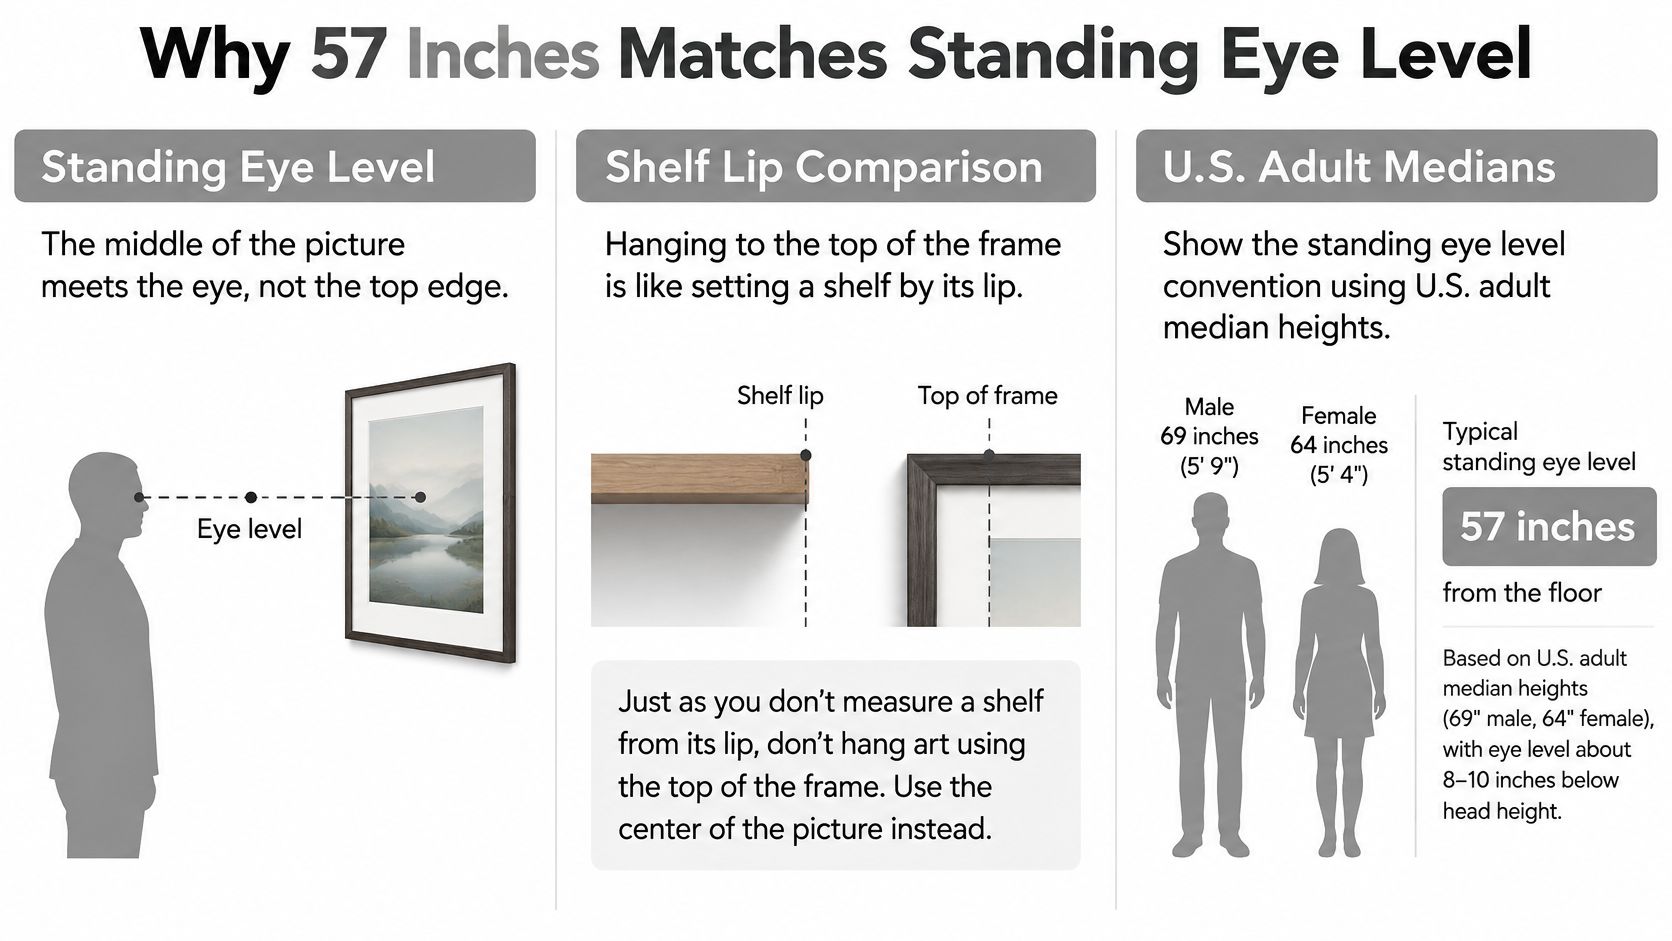
Why 57 Inches Matches Standing Eye Level
The standing-eye-level convention makes more sense when you separate a comfortable viewing zone from an individual person's exact eye height. They aren't the same thing.
The NC State Ergonomics Center's U.S. adult anthropometric summary reports median standing eye heights of 64.57 inches for men and 59.72 inches for women. Its standing-eye-height ranges, from the fifth to the ninety-fifth percentile, are 60.47 to 69.02 inches for men and 55.94 to 64.02 inches for women.
Those differences explain why a universal mark can only be a compromise. A picture doesn't need to sit directly opposite every viewer's pupils to be comfortable to see.
This illustration shows the centerline idea rather than a personalized measurement.
The Middle Matters More Than the Top
Choosing picture height by its top edge is like positioning a shelf by its lip without considering what you need to reach. You've selected a convenient edge, but not necessarily the part that matters.
With artwork, the eye takes in the image across its surface. A shared centerline lets differently sized pictures occupy a consistent viewing band, even though their tops and bottoms don't line up.
This is especially useful in a hallway. People can look from one picture to another without repeatedly shifting their gaze between a low frame and a high one. Aligning every top edge can produce the opposite result when frame heights differ substantially.
Sitting Changes the Measurement Reference
The same anthropometric summary gives median seated eye heights of 31.65 inches for men and 29.45 inches for women. These seated measurements describe the body relative to the sitting surface, not a ready-made artwork center measured from the floor. You must account for the chair or wheelchair before comparing a seated viewer's eyes with a wall mark.
That distinction prevents a common mistake: treating every eye-height figure as though someone measured it upward from the room's floor.
Standing spaces favor a consistent viewing band along the wall.
Seated spaces call for a check from the actual chair, with the viewer sitting naturally.
Shared spaces need a compromise that works for their regular occupants, including children and people with different mobility needs.
The useful lesson isn't that everyone should match a gallery average. It's that you should choose a viewing position before choosing a height.
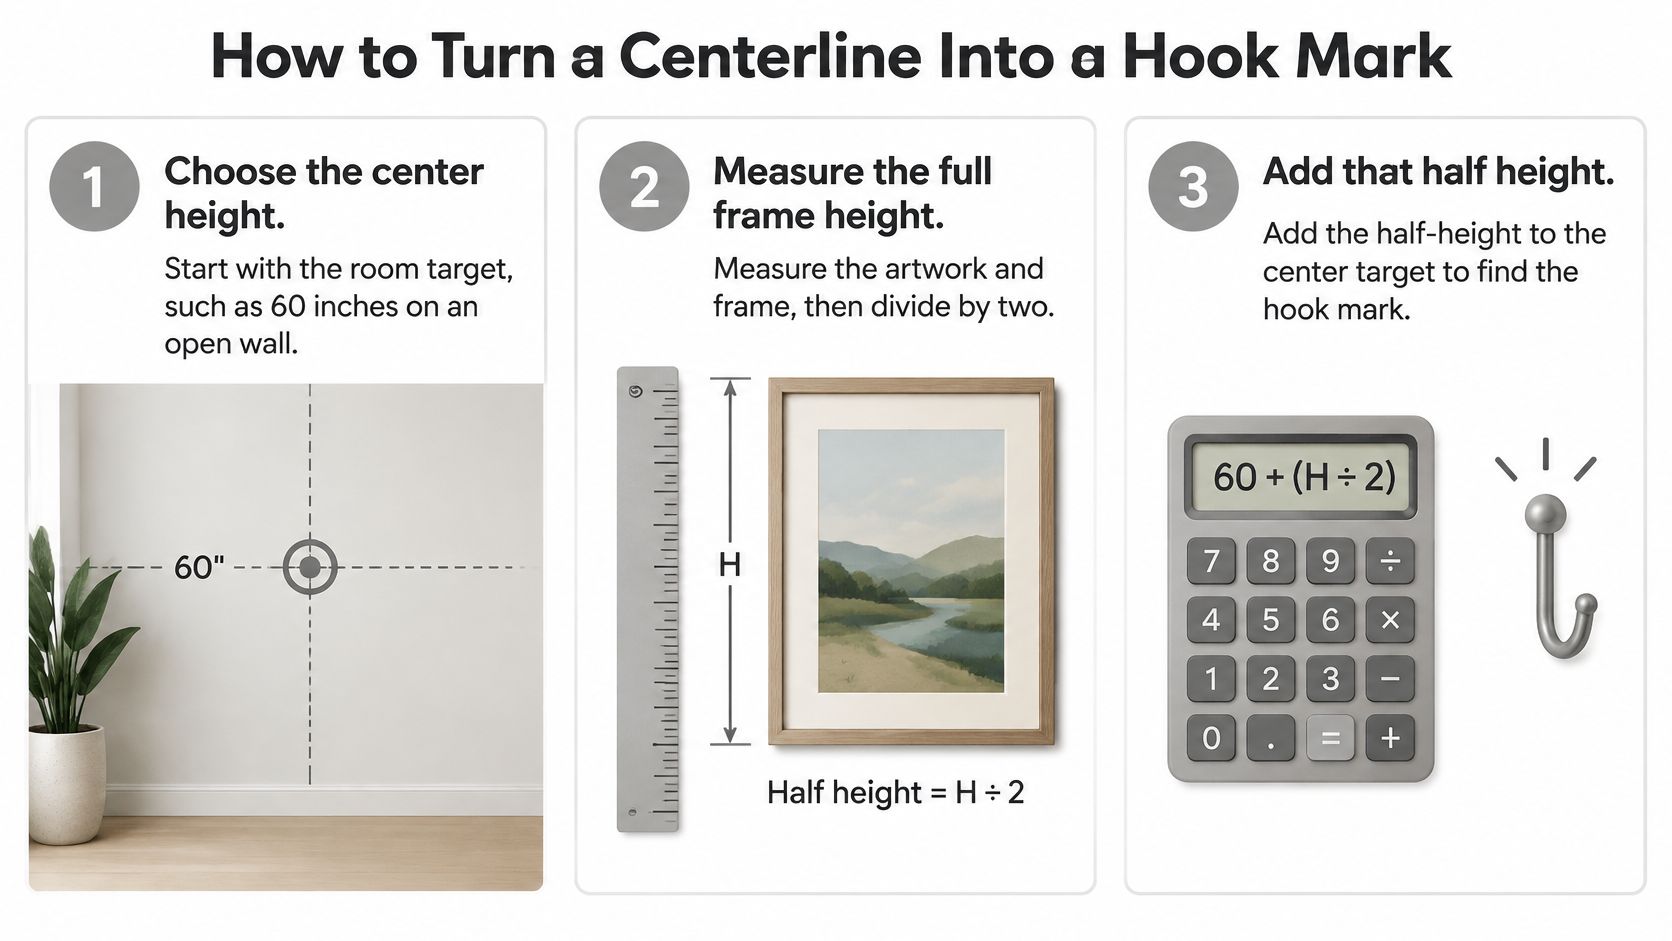
How to Turn a Centerline Into a Hook Mark
The center mark is not the hook mark. The hook normally sits above the picture's center but below its top edge, and the frame's hanging hardware determines the difference.
The Frame Calculator art-hanging guide gives this worked example: a 30-inch-tall frame with a 60-inch centerline has its top edge at 75 inches; if the taut wire sits 3 inches below the top, the support point is approximately 72 inches above the floor.
The subtraction is important. Adding half the frame height gets you to the frame's top, not to the hook.
Measure in This Order
Choose the center height. Mark your selected viewing center on low-tack painter's tape. Measure upward from the finished floor, not from the top of the baseboard.
Measure the full outside height of the frame and divide it in half. Include the frame molding. Measuring only the glass or image opening will give you the wrong midpoint.
Find the top edge. Add the half-height to your chosen centerline. In the published example, the frame's half-height is added to the target center to locate the upper edge.
Pull the hanging wire upward to its working position, then measure down from the frame's top to the point where the hook will support it. For direct-mounted D-rings, measure to their actual bearing points instead.
Subtract the hardware drop. Deduct that top-to-support distance from the top-edge height. This gives the wall support point, not necessarily the nail entry point.
Mark the support position, verify horizontal placement, and preview the frame before drilling. If the hardware permits a paired attachment, check the spacing and level between the support points.
This visual outlines the measuring sequence. Complete the hardware-drop subtraction before making your final mark.
Check What the Hook Actually Supports
A picture hook may have a cradle below its nail hole. Your calculated height belongs at the cradle where the wire rests, so hold the hook against the mark before locating the nail or screw.
Slack wire creates another measuring error. If you measure the wire while it lies loosely against the frame's back, it won't represent where it sits under the picture's weight. Pull it into the same shape it will have when supported, without stretching or damaging it.
The finished height is determined by the frame and its loaded hardware together, not by the pencil mark alone.
For an additional hands-on walkthrough, the Stahl Home Center picture hanging guide offers a companion to the measuring process. Keep your measurements written on the paper template or painter's tape so you don't confuse the center, top edge, and support point.
The reusable formula is simple: center height plus half the frame height, minus the hardware drop.
Furniture Gaps and Grouped Picture Walls
Above furniture, begin at the bottom edge of the frame, not its center. Rossetti Art's picture-height guide recommends a 6-to-8-inch gap above furniture, alongside an open-wall centerline of 57 to 60 inches.
These measurements solve different problems. The centerline helps someone view a picture on an otherwise open wall. The gap helps connect a picture to the sofa, console, sideboard, or headboard beneath it.
A Sofa Becomes the Measuring Reference
Say you're hanging a wide picture above a sofa. Position a paper outline above the back, then sit down and check whether someone leaning back could contact the frame.
A large frame may need more clearance than its appearance alone suggests. Don't force a tight arrangement if cushions, heads, or moving furniture could strike it.
Then step back. If the picture looks detached from the sofa, adjust the template before touching the drill. Our guide to hanging art above a sofa addresses that furniture-to-picture relationship in more detail.
For a bed, measure from the headboard rather than the mattress. A tall headboard already occupies much of the wall, so chasing an unrelated floor-to-center mark can place the artwork awkwardly.
A Group Gets a Shared Center
For a grouped display, treat the arrangement as a single shape. Individual frame centers can sit above and below the viewing line while the whole composition remains balanced.
Consider a grouping with a tall photograph beside smaller prints. Centering every frame independently would turn the arrangement into a row. Instead, lay the pieces on a protected floor, adjust the spacing, and study the outside outline.
Trace the frames. Cut paper templates to their exact outside dimensions.
Transfer the arrangement. Tape the templates to the wall and preserve the gaps you chose.
Check the visual balance. A dark, substantial frame may attract more attention than a similarly sized pale print.
Mark each support separately. Matching frame tops don't guarantee matching hardware positions.
Before drilling: View the templates from the doorway and from the main seat. An arrangement should work from where people use the room, not only from directly in front of the wall.
A formal grid benefits from level rows and consistent gaps. A mixed arrangement can be less regular, but it still needs a clear overall shape rather than scattered frames filling leftover space.
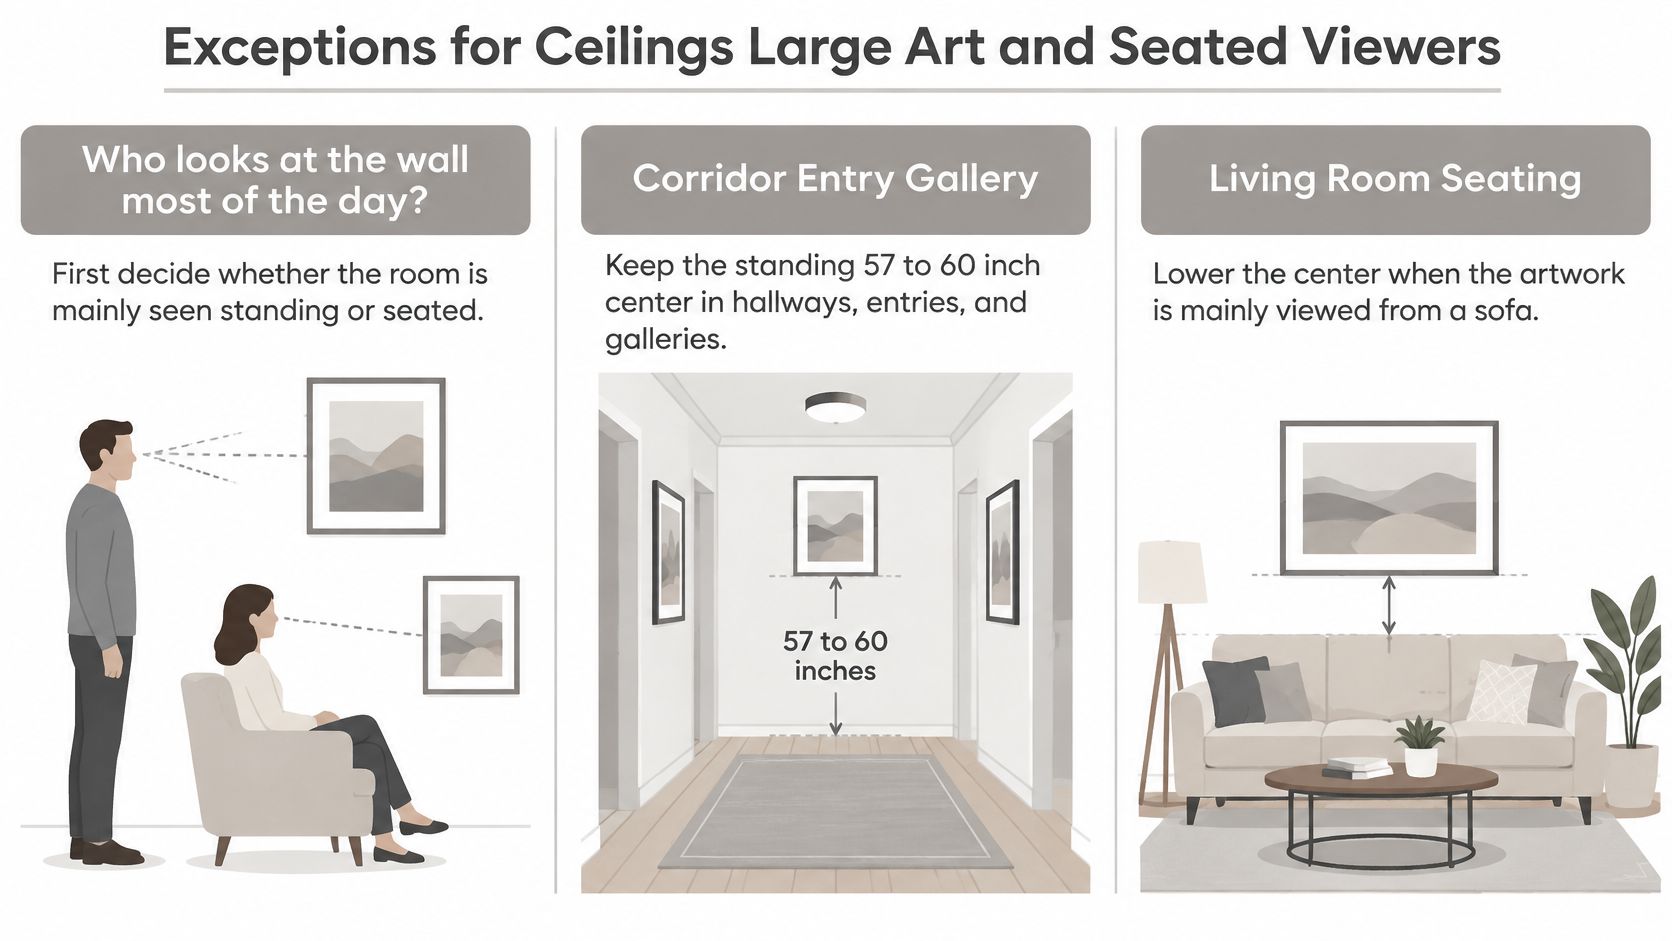
Exceptions for Ceilings Large Art and Seated Viewers
Eye level isn't one universal mark. A wall that looks comfortable from a standing position can feel too high from a wheelchair or a low lounge chair.
WhiteWall's photo-arrangement guidance identifies wheelchair users' seated eye level as approximately 43 to 51 inches and supports adapting placement to the viewer. Treat that range as a prompt to test the actual sightline, not as a substitute for asking the person who uses the space.
This visual separates standing circulation spaces from rooms mainly viewed while sitting.
Put the Viewer Before the Architecture
In a corridor, people usually look while walking or standing. In a dining room, they spend much of their time looking from a chair. Choose the dominant viewing position rather than averaging every possible use of the room.
For a shared workplace, check the mockup from both standing and seated positions. For a child's reading nook, kneel or sit at the child's usual viewing position instead of judging the arrangement only as an adult.
Use this decision order:
Viewer first. Identify who uses the room most and how they look at the wall.
Furniture next. Preserve clearance and connect the artwork to the objects below it.
Scale last. Check whether the artwork's size suits the wall and viewing distance.
In mixed-use rooms, move the same paper template between alternative heights. Keep the horizontal position unchanged so you can judge the height difference without also judging a different layout.
Tall Walls Don't Require High Pictures
A cathedral ceiling doesn't move the viewer's eyes upward. Raising a small frame to fill empty space usually makes it harder to inspect and leaves it disconnected from the occupied part of the room.
Keep the artwork within a comfortable lower-to-middle viewing field. A large canvas can extend well above and below that field while its center remains accessible to the viewer.
Our guidance on hanging pictures on vaulted walls helps distinguish usable display space from wall area that's merely tall. The goal isn't to fill every stretch of plaster.
Staircases need a different check because viewers change elevation as they climb. Let the arrangement rise with the steps, and assess it from the treads and landing rather than measuring every frame from the floor at the bottom.
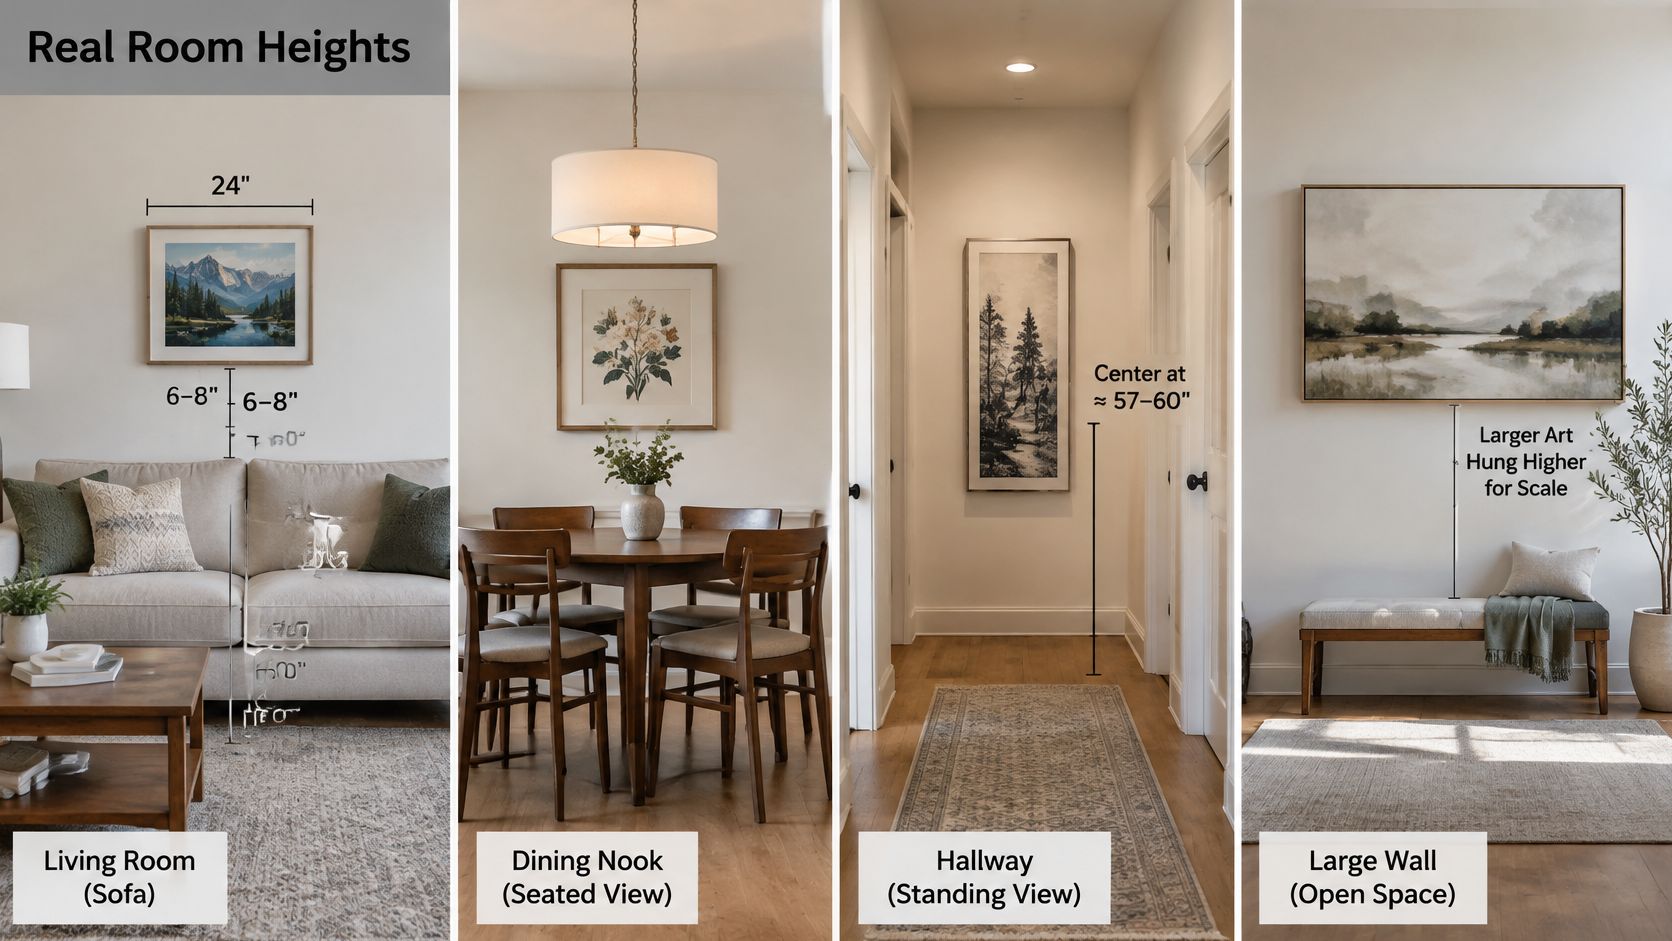
Heights That Work in Real Rooms
Room examples make the difference between a viewing mark and a convenient empty space easier to recognize. These are placement scenarios, not fixed dimensions for every home.
The illustration offers a room-by-room comparison.
A Living Room and an Entry Hall
In a Denver living room, a framed picture sits above a sofa opposite the main chairs. The homeowner starts with a furniture gap, then checks the paper template while seated. The mistake avoided is judging the picture only while standing beside it.
In an entry hall without furniture, a portrait uses the open-wall centerline. The homeowner checks it while approaching from the front door, not with their face close to the glass. The mistake avoided is aligning its top with a nearby doorframe because that edge is easy to see.
The rooms may belong to the same home, but they don't need identical frame heights.
A Dining Room and a Staircase
A dining-room print faces the table. Try the template lower than the hallway arrangement, then sit in a dining chair with a natural posture. Check that the artwork remains visible above chair backs and table objects without requiring an upward gaze.
On a stair wall, matching frames rise along the flight. Judge each against the local standing position, then inspect the rhythm from the landing. Keeping every frame level with the bottom floor would ignore how people move through the space.
For another visual walkthrough, use the video below while comparing the proposed placement with your own viewing position.
A Large Canvas Under a Tall Ceiling
A substantial canvas occupies a tall living-room wall. Instead of pushing it toward the ceiling, the homeowner positions its central area where someone across the room can comfortably inspect it.
The canvas itself fills the vertical space. Its placement doesn't have to do that work as well.
Before approving any room's mark, stand or sit in the actual viewing spot. Check the whole frame, nearby furniture, and the route people take through the room.
Choose a DIY Mark or a Professional Install
A correct viewing height doesn't make an attachment safe. Decide where the artwork belongs and what will hold it there as separate questions.
Colorado Art Services' picture-hanging materials guide explains that anchor pull-out values aren't guaranteed working loads. Wall condition, substrate thickness, installation quality, and load direction affect performance, so don't choose hardware from a headline capacity alone.
Make the Installation Decision
A reasonable DIY job is a manageable piece, a known wall construction, suitable hardware, and a position you can reach safely.
Professional help is appropriate for heavy, oversized, deep, valuable, or high-mounted work, especially on masonry, fragile plaster, or an unknown substrate.
Check the full assembly. Weigh the finished object, inspect the wall, select the mounting system, calculate the support position, and verify level and resistance to pivoting.
Our comparison of DIY and professional art installation can help you judge the access and handling requirements before committing.
In earthquake-prone settings, cultural-heritage seismic guidance recommends avoiding simple vertical wires, using properly anchored receiving hooks with upward-bent tips, and securing the lower portion of mirrors where possible. Those measures supplement, rather than replace, a weight-and-substrate assessment.
We have over 15 years of picture-hanging and art-handling experience throughout greater Denver, and our team handles artwork regardless of size, weight, or delicacy. Mark the proposed center with tape today, but leave the lifting and drilling unstarted if you can't safely control the piece.
Colorado Art Services offers a free estimate for art hanging, display, and installation, including help with placement and secure mounting. Visit Colorado Art Services and tell us how many pieces need installing, whether ladders or scaffolding are needed, whether hard surfaces require drilling, and the dimensions of your largest piece.
Comments