


Picture Hanging Board Guide for Safe, Level Installs
You're standing in front of a blank wall with a frame in one hand, a drill in the other, and one question that matters more than the rest: what's going to hold this safely, stay level, and not chew up the wall when you change your mind later? That's the core job of a picture hanging board, whether you're hanging a single heavy piece in a condo, building a clean office rotation, or lining up a gallery wall that has to look intentional from across the room.
The common mistake is treating it like a single product. In the field, it's a system: the board or rail, the fastener, the wall substrate, and the suspension hardware all have to agree with each other, or the weak link shows up fast. A good install balances load, reversibility, wall finish, and visual control, which is why the same setup that works beautifully on drywall can be the wrong answer for plaster, concrete, or a public hallway.
Why Your Wall Is Harder Than It Looks
A homeowner in Highlands Ranch can hold up a 24 by 36 frame and think the wall is the easy part. It isn't. A property manager in a Boulder office has the same problem in a different coat, because that lobby wall might need art to move next quarter without leaving a row of old holes behind. A gallery director in Denver runs into the same issue again when six works need to share one clean run and still look square after a week of foot traffic.
The wall is the deciding factor, not the frame. Drywall, plaster, masonry, and finished architectural surfaces all behave differently, and the hanging method has to match that behavior if you want the piece to stay put and the surface to survive. That's why a picture hanging board is better understood as a small system than as a single accessory.
Practical rule: If the wall is weak, fancy hardware won't save the install. Better fasteners into the right substrate beat bigger promises on the box.
There's also a trade-off between convenience and control. Nail-and-hook hanging is fast, but it usually means more holes and less flexibility. Rail-and-cable or rail-and-rod setups take a little more planning up front, but they let you reposition artwork without repeatedly opening the wall, which is exactly why picture rails became so useful in historic interiors and why the idea still works now for lived-in homes, offices, and hospitality spaces.
The rest of the decision comes down to what you're hanging. A conservation backing for paper-based work is a different animal from a simple foam board. A glazed frame needs different load awareness than an unglazed canvas. Once you sort those differences, the right choice gets a lot clearer.
Anatomy of a Picture Hanging Board
The term gets used loosely, but there are really three layers in play. First is the wall-mounted rail or track, the part that carries the load and attaches to the building. Second is the backing board inside the frame, which keeps artwork flat, supported, and separated from the frame cavity. Third is the suspension hardware, the hooks, cables, rods, wires, or cleats that connect the frame to the rail or wall point.
Know which board you mean
If someone says “picture hanging board,” they may mean a wall rail, a framed backing board, or a display panel. That confusion causes bad purchases. The backing board inside a frame is about support and preservation, while the wall rail is about how the weight gets into the building. The hardware in between is what keeps the whole setup adjustable.
For paper-based work, conservation matters more than stiffness alone. A rigid, flat, acid- and lignin-free board with a minimum thickness of 4-ply is the safe baseline for the backing layer, and the artwork should be hinged rather than glued across the full surface. That keeps the paper from fighting the board as humidity changes.
The original picture rail is the historical version of this idea, a wall system that made hanging and rehanging easier without constantly making new holes. The modern equivalent adds more material choices and more load paths, but the logic is the same: move the suspension point, not the wall itself.
If you're comparing structural hanging options alongside frame hardware, the cleat approach described in this Colorado Art Services cleat guide is worth understanding because it solves a different problem than a rail does. A cleat is about locking a piece to the wall in a fixed position, while a rail is about adjustable suspension.
Comparing Rail Systems and Board Formats
Some installs need flexibility. Others need brute stability. A few need both, which is where the choice gets interesting. For exhibition work, I often separate systems by how much they let me change the layout later, how hard they bite into the wall, and how forgiving they are when the art changes size or weight.
System | Typical Load | Best Substrate | Artwork Type | Reversibility | Verdict |
|---|---|---|---|---|---|
Traditional wooden picture rail | Moderate, system dependent | Plaster or finished walls where the rail can be anchored cleanly | Framed art in older interiors | High | Best when you want a period look and easy rearrangement |
J-rail moulding | Light to moderate | Drywall or plaster with solid fixing points | Residential walls, lighter framed pieces | High | Good for clean lines and frequent changes |
Rail-and-cable system | Varies by hardware and anchors | Drywall, plaster, masonry with correct fixings | Offices, galleries, rotating displays | High | The most flexible choice for changing layouts |
Rail-and-rod system | Moderate to heavy | Strong wall substrates with reliable anchors | Framed art, signage, organized display runs | High | Better when you want a more rigid visual line |
Z-clip or French cleat system | Heavy pieces | Studs, structural framing, masonry anchors | Large, deep, or valuable work | Low to moderate | Best for fixed placement and serious load control |
Slotted hardboard or metal track | Light to moderate | Properly fixed into structure | Hook-compatible display setups | Moderate | Handy for repeat use, but only if the wall fixing is sound |
The verdict changes with the job. A homeowner building a salon wall wants flexibility and the ability to move pieces around as the room changes. An office that rotates quarterly art cares about a neat line and low wall damage. A gallery usually wants a system that survives repeated changeovers without forcing new holes each time, which is why rail-and-cable setups are so common in temporary shows and exhibition planning, especially when you're coordinating with custom exhibition stands that also need quick reconfiguration.
If your display is mostly about changing art without reworking the wall, a track system makes sense. The track hanging system overview is a useful way to think about that category because it emphasizes the wall rail as the reusable backbone. For a single heavy or glazed piece, though, I'd usually move away from “adjustable” and toward a cleat or a properly rated fixed suspension.
Mounting Hardware by Substrate
The best rail in the world fails if the fastener is wrong for the wall. That's the part DIY guides flatten too much, and it's where installers get called back after a tidy-looking wall starts shifting, cracking, or pulling loose.
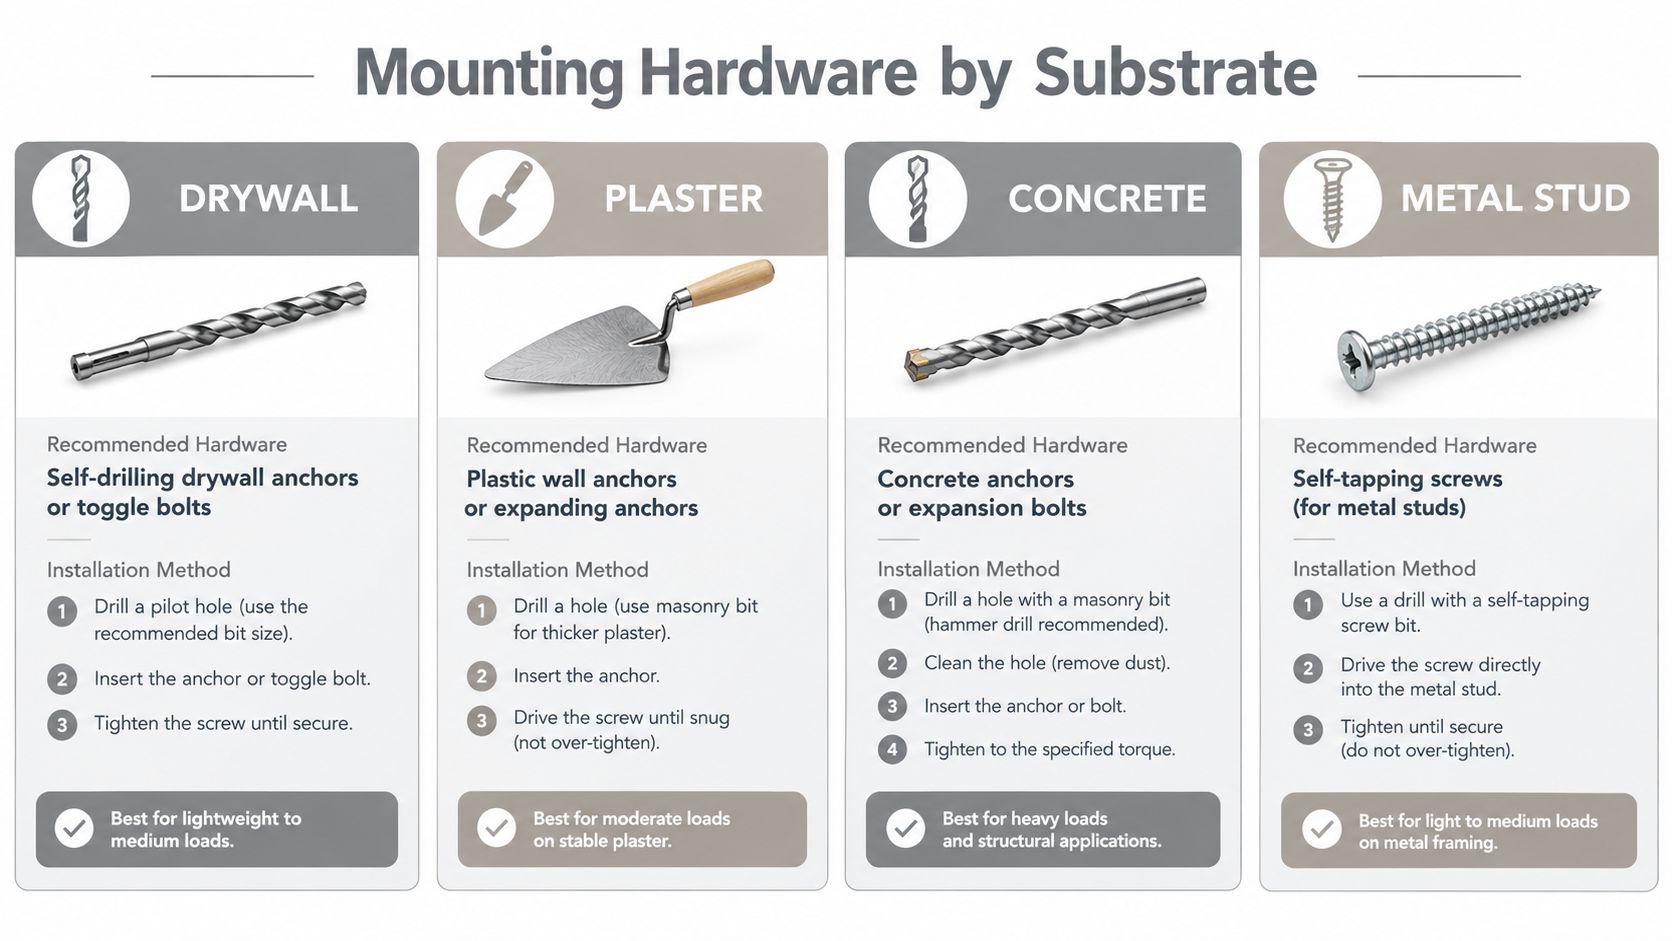
Match the fixings to the wall
Drywall with studs is the most forgiving case, but only if you hit structure. Use coarse-thread screws or appropriately rated snap-resistant anchors for the combined load, not just the frame alone. If there's a stud where the rail or cleat needs to land, I'd rather fasten there than trust a hollow-wall anchor to do the whole job.
Older plaster on lath is the wall that looks solid until it isn't. A pilot hole that's too aggressive can crumble the face, and a tired plaster field can fail around an anchor even when the hardware itself is fine. Where possible, find the lath or structural framing behind it and use the fixing that reaches something firm.
Poured concrete or CMU wants a masonry strategy. That usually means a hammer drill, a correctly sized bit, and an anchor that matches the hole depth and base material. If the hole is too wide, the anchor sits loose, and the load turns into movement instead of support.
Hollow masonry or brick veneer needs more judgment than people expect. In some cases, expansion anchors or chemical anchors are the right answer, but only if the depth and base material support them. Brick face is not the same thing as a sound fastening layer, and veneer that looks solid can still be a poor load path.
Drill for the wall you have, not the wall you wish you had.
The field sequence is straightforward. Locate framing or solid masonry, mark from a single level reference line, pre-drill to the fastener's specified diameter, set the anchor, and tighten to snug rather than stripped. For backing and conservation work, keep the board flat and rigid, with no adhesive contact to the image area when the work is paper-based, which is especially important if you're building the frame package itself, as outlined in picture hanging materials guidance.
Weight Distribution and Load Safety
A bigger hook rating doesn't automatically make an install safer. If the board or rail is attached to weak drywall, the failure just moves to the wall instead of disappearing. That's why the safest installs start with the structure, then work outward to the frame hardware.
Use more than one point when the piece deserves it
For heavy or valuable work, two-point wall suspension is the standard I trust. Put the hooks near the left and right sides of the frame so the load is shared and the piece resists rotation better than it would on a single central hook. That matters even more when the frame is deep, glazed, or has a center of gravity that sits forward of the wall.
The hardware has to be selected for the full assembly, not just the artwork. That means the frame, glazing, backing board, and art itself all count. I weigh the complete piece, divide by the number of suspension points, and then build in a safety margin instead of aiming for the edge of the rating.
Good habit: If the hanging point is the only thing keeping a heavy piece up, it should feel overbuilt, not convenient.
The wrong materials fail in predictable ways. Staples, bent tacks, fishing line, and ordinary string don't belong on load-bearing installs. They stretch, slip, or tear out when the wall moves, the building settles, or someone bumps the frame. A clean-looking install can still be unsafe if the connector isn't made for the job.
For public and institutional work, the risk profile changes again. Safety, durability, and tamper resistance matter as much as appearance, especially in schools, libraries, hospitals, and civic spaces where artwork can be reached, touched, or lifted. Anti-theft hardware that combines locking hooks with bottom retention is a practical answer when the piece has to stay put in a busy environment.
A sensible pre-installation checklist looks like this:
Wall type: drywall, plaster, concrete, or masonry veneer.
Stud locations: confirm where structure is, not where you hope it is.
Artwork weight: weigh the complete assembly, not just the art.
Center of gravity: note whether glazing or depth shifts the pull forward.
Hardware rating: verify the fastener and hanger are rated for the setup.
Safety factor: leave room instead of using the hardware at its limit.
Inspection date: plan the first check before you forget the install date.
The practical lesson is simple. More attachment points only help when the wall connection is strong enough to carry them. Otherwise, you've just spread the problem around.
Layouts for Galleries, Grids, and Salon Walls
The cleanest walls usually come from one reference line, not from measuring each frame in isolation. I've watched plenty of good layouts drift because someone hung the first piece by eye and then “matched” the rest to that mistake. Once the line is off, everything else is working uphill.
Start from one level reference
Use a laser or long level to set a single horizontal line at the chosen centerline height. In homes, a center around eye level is common, while commercial and gallery sightlines often sit a little higher. What matters more than the exact number is consistency across the whole wall.
For a grid, lay the frames on the floor first. Measure the full envelope, mark that shape on the wall from the reference line, and transfer each hanging point from the floor layout instead of eyeballing each piece separately. That keeps the spacing honest and prevents the outer frames from wandering.
For a salon wall, paper templates are still the best low-risk tool I know. Tape the templates to the wall, shift them until the visual weight feels balanced, then mark the actual suspension points only after the composition settles. If the room includes furniture, keep the artwork high enough that a sofa back, console, or chair doesn't visually swallow the bottom edge.
If you're rearranging a small room and need to keep the wall plan flexible, the clever storage tips for small homes article is a useful reminder that good wall use and good space use usually solve the same problem, which is keeping clutter from controlling the room.
Spacing matters, but rhythm matters more. Tight grids usually read best with narrow gaps, while looser salon walls need enough breathing room that the eye can separate one frame from the next. Mixed-height layouts also look better when you align tops or bottoms consistently rather than trying to force center-to-center symmetry across different sizes.
A quick sanity check before drilling helps more than people think. Step back, check the sightline from the doorway, and look at the wall from where people sit or stand. A layout that looks centered from a ladder can still look crooked from the sofa.
Later in the process, I'll often walk the room again after the art is up, because the lighting changes the read of the wall more than most clients expect. The visual balance has to work in the room, not just on paper.
Maintenance, Replacements, and When to Call a Pro
A good hanging board doesn't stop mattering after install day. It needs to be checked the way a return-visit installer would check it, because buildings move, cable tension changes, and paper-based work responds to moisture long after the wall is finished.
Inspect what actually fails
Start with the hardware. Gently load each frame and watch for shift, lift, or twist at the hook or rail connection. If a cable has loosened or a hook has drifted, retension it before the movement becomes obvious to everyone else in the room.
Then check the board itself. Look for moisture, foxing, or acid migration on backing boards, especially in basement-level rooms or spaces with HVAC swings. If the art has been reframed or rematted, swap the backing board instead of reusing a tired one, and keep the same conservation rule for paper-based pieces, a rigid, flat, acid- and lignin-free board with a minimum thickness of 4-ply.
Call a professional when the install stops being routine. That includes any piece that is unusually heavy, any wall with exterior exposure or persistent moisture, and any situation that requires engineered hardware such as cleats, French cleats, or seismic restraints. Public and commercial spaces deserve extra caution too, especially where the board sits within reach and needs locking or tamper-resistant hardware.
If the building use changes, inspect the wall again. A quiet hallway and a busy lobby do not ask the same thing from the same hardware.
Maintenance gets easier when someone keeps a simple record. A spreadsheet or room note with the artwork name, weight, hardware type, install date, and last inspection date makes handoffs clean for property managers, gallery registrars, and homeowners alike. It also keeps you from guessing when a frame was last checked, which is how small problems become wall repairs.
Colorado Art Services installs, hangs, and rehangs artwork with the same attention I'd want on my own wall, from single pieces to full layouts, heavy mirrors, and gallery walls. If you need a picture hanging board solution that fits your wall, your art, and the way the space actually gets used, visit Colorado Art Services and get the right hardware plan in place before the first hole goes in.
Comments