


Picture Hanging Strips Explained: A Practical Guide
Stop trusting the package. Most advice about picture hanging strips starts with the weight on the label and ends with a cheerful press and hang. That's backward. After two decades hanging work that can't fall, I start with a different question. What happens if this bond lets go at 2 a.m.? If the answer involves glass, an original, a mirror, or a person underneath, the label doesn't matter. You've already got your answer.
The Honest Promise and the Quiet Limits of Picture Hanging Strips
Damage-free is the most misunderstood phrase in home hardware. It describes the wall, under specified conditions, when you remove the strip correctly. It doesn't describe your artwork, your floor, or anyone sitting below the piece. A strip can release cleanly from painted drywall and still drop a framed print hard enough to crack the frame and tear the mat.
That distinction changes how you should shop. You're not buying a universal substitute for a nail. You're buying a temporary, removable bond that works inside a narrow envelope. The artwork, the wall, and the room all have to fit inside that envelope at the same time.
The Three Tests You Run Before You Peel Anything
The artwork test: Is it lightweight, replaceable, and flat against the wall? If it's valuable, glazed, deep, or irregular, strips are the wrong starting point.
The wall test: Is the surface smooth, sound, fully cured, and free of weak paint or texture? If the paint layer is fragile, the paint will fail before the adhesive does.
The consequence test: If it falls, does it land on carpet behind a sofa or on a bed, a desk, or a walkway? High consequence means mechanical hardware, no debate.
My rule in the field: If you would be upset, injured, or filing an insurance claim after a fall, don't hang it on adhesive.
Rental rules push people toward strips, and I understand that pressure. A landlord who bans holes doesn't change physics. In a rental, choose lighter, smaller, replaceable pieces for adhesive, and lean larger work on furniture or use an easel instead of forcing a heavy frame onto a bond it was never meant to carry.
Strips have a real place. They're excellent for temporary displays, seasonal prints, lightweight poster frames, and layouts you're still testing. They're poor insurance for anything you can't afford to drop. Hold that line and the rest of your decisions get simple.
How Picture Hanging Strips Actually Work
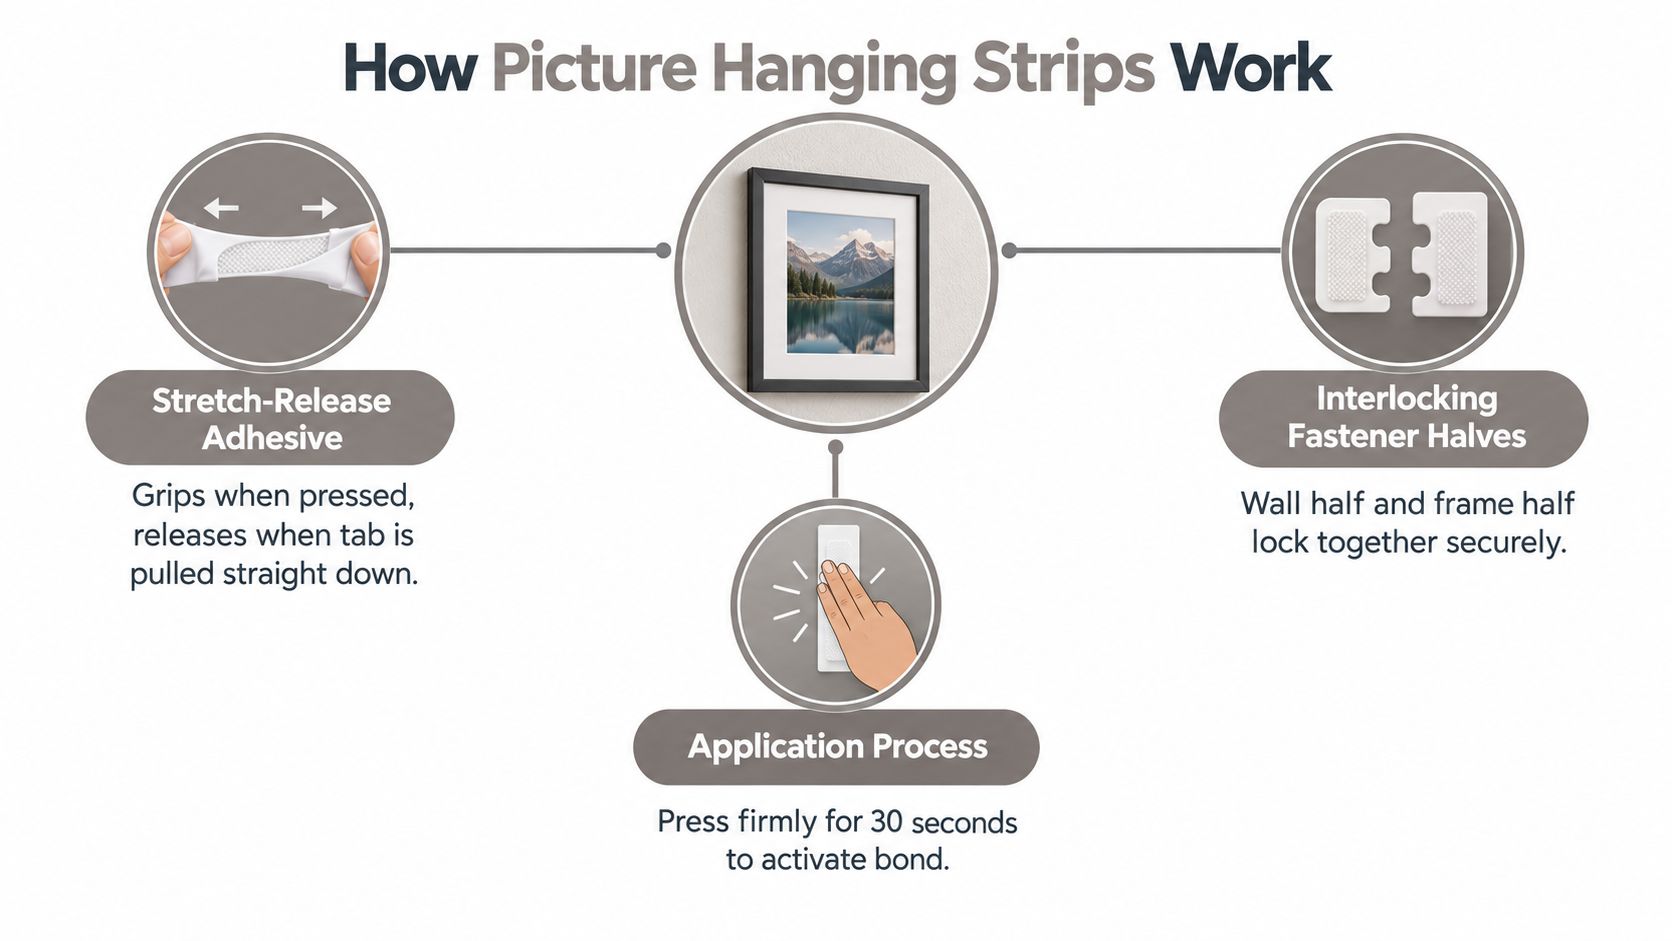
Picture hanging strips aren't double-sided tape with better marketing. They came out of 3M's stretch-release adhesive, a system that grips under pressure and lets go when you pull the tab straight down and stretch the adhesive until it releases. That history goes back to work by 3M scientist Karl Kreckel in the late 1980s, followed by Jim Bries leading a no-nails product effort in 1992, the first Command products in 1996, and dedicated picture hanging strips in 2005. By 1999, only three years after launch, the Command line was reportedly generating approximately $10 million in annual sales according to that same history.
Think of a climbing hold that only releases when you pull it in one exact direction. Press it flat and it holds. Pull it outward or twist it and you're fighting it. Stretch it lengthwise along the wall and it thins, loses contact, and comes away. That's why removal angle matters more than removal force.
Two Halves Doing Two Different Jobs
Each pair has a wall side and a frame side. The adhesive faces bond to their surfaces. The middle faces lock together with interlocking fasteners, so you can pull the frame away, re-press the wall strips, and click the frame back on. That separability is useful, but it's also a clue. You're relying on several small bonds sharing a load, not one anchor driven into structure.
Strength starts with contact. A pressure-sensitive adhesive needs to wet the surface, which means it needs clean, smooth, full contact without dust, grease, or texture breaking the bond line. Lab data helps explain why technique matters, since manufacturer testing reports peel adhesion of approximately 6 lb/in of strip width, static shear testing of 1,000 g at 22°C, and dynamic shear performance of 100 lb under specified test conditions. Those are laboratory measurements, not a promise for your hallway.
Shear is your friend: Weight pulling straight down along the wall loads the adhesive in shear, where it's strongest.
Peel is the enemy: A deep frame pushes its center of gravity away from the wall, which pries at the top edge of the strip.
Sharing is everything: Pairs placed symmetrically near the upper corners split the load. One crooked pair takes more than its share and starts the failure.
Once you picture shear versus peel, the rules stop feeling fussy. Clean walls, flat backs, and matched pairs aren't rituals. They're how you keep the load in the direction the adhesive can handle.
Reading the Load Ratings Without Fooling Yourself
A package rating isn't a single magic number. It's a combination of strip size, number of pairs, and maximum frame dimensions, tested on an ideal interior surface. Read all three parts or you're guessing.
The broader market proves how fragmented this category is. 3M's U.S. Command catalog lists 195 products across clips, hooks, and adhesive strips, with published capacities ranging from 0.5 pound to 20 pounds. In that catalog, 35 products are rated for 3 pounds and 34 for 5 pounds, while only four are rated for 20 pounds, according to the same listing. Most of what you'll find in a store lives in the light to medium range, not at the top end shoppers remember.
Picture Hanging Strip Capacity at a Glance
Strip Size | Rated Capacity | Max Frame Size | Typical Use |
|---|---|---|---|
Small, four pairs | 5 lb (2.3 kg) | 18 x 24 in | Small poster frames and lightweight prints |
Medium, four pairs | 10 lb (4.5 kg) | 18 x 24 in | Medium decorative frames with flat backs |
Extra-large | 15 lb (6.8 kg) | 24 x 36 in | Larger lightweight frames within package limits |
Those combinations come from one current U.S. specification listing four pairs of small strips at 5 lb and 18 x 24 in, four pairs of medium strips at 10 lb with the same dimensions, and an extra-large version at 15 lb and 24 x 36 in. Don't extrapolate from that table. Doubling the pairs doesn't automatically double safe capacity, because frame stiffness, wall flatness, and uneven tension between pairs prevent perfect load sharing.
How to Translate Your Frame Into a Decision
Weigh the complete assembled object on a bathroom scale, including glass, backing, and hardware you plan to leave on. Then choose a product whose labeled capacity exceeds that measured weight, not one that merely equals it. Check frame dimensions against the package maximum. A frame can be under the weight limit and over the size limit, and that still disqualifies it.
If you're close to the limit, you're over my limit. Adhesive doesn't reward optimism.
Ratings also assume you're not asking drywall and paint to do structural work they can't do. If you're weighing heavier pieces, read up on drywall load capacity and what hollow walls can safely support before you assume any hanger, adhesive or mechanical, will hold. The wall is part of the hanging system. Weak paint, moisture damage, or a crumbly patch job turns a correct strip choice into a failure anyway.
Strips Versus Traditional Hanging Hardware
Ask a different question before you compare holding power: what does failure look like, and can you live with it? Adhesive fails all at once. One humid week, one dusty patch of wall, and the frame is on the floor with the glass under it. Mechanical hardware usually telegraphs trouble. A nail bends, a hook sags, a tilted frame warns you something moved before anything lets go.
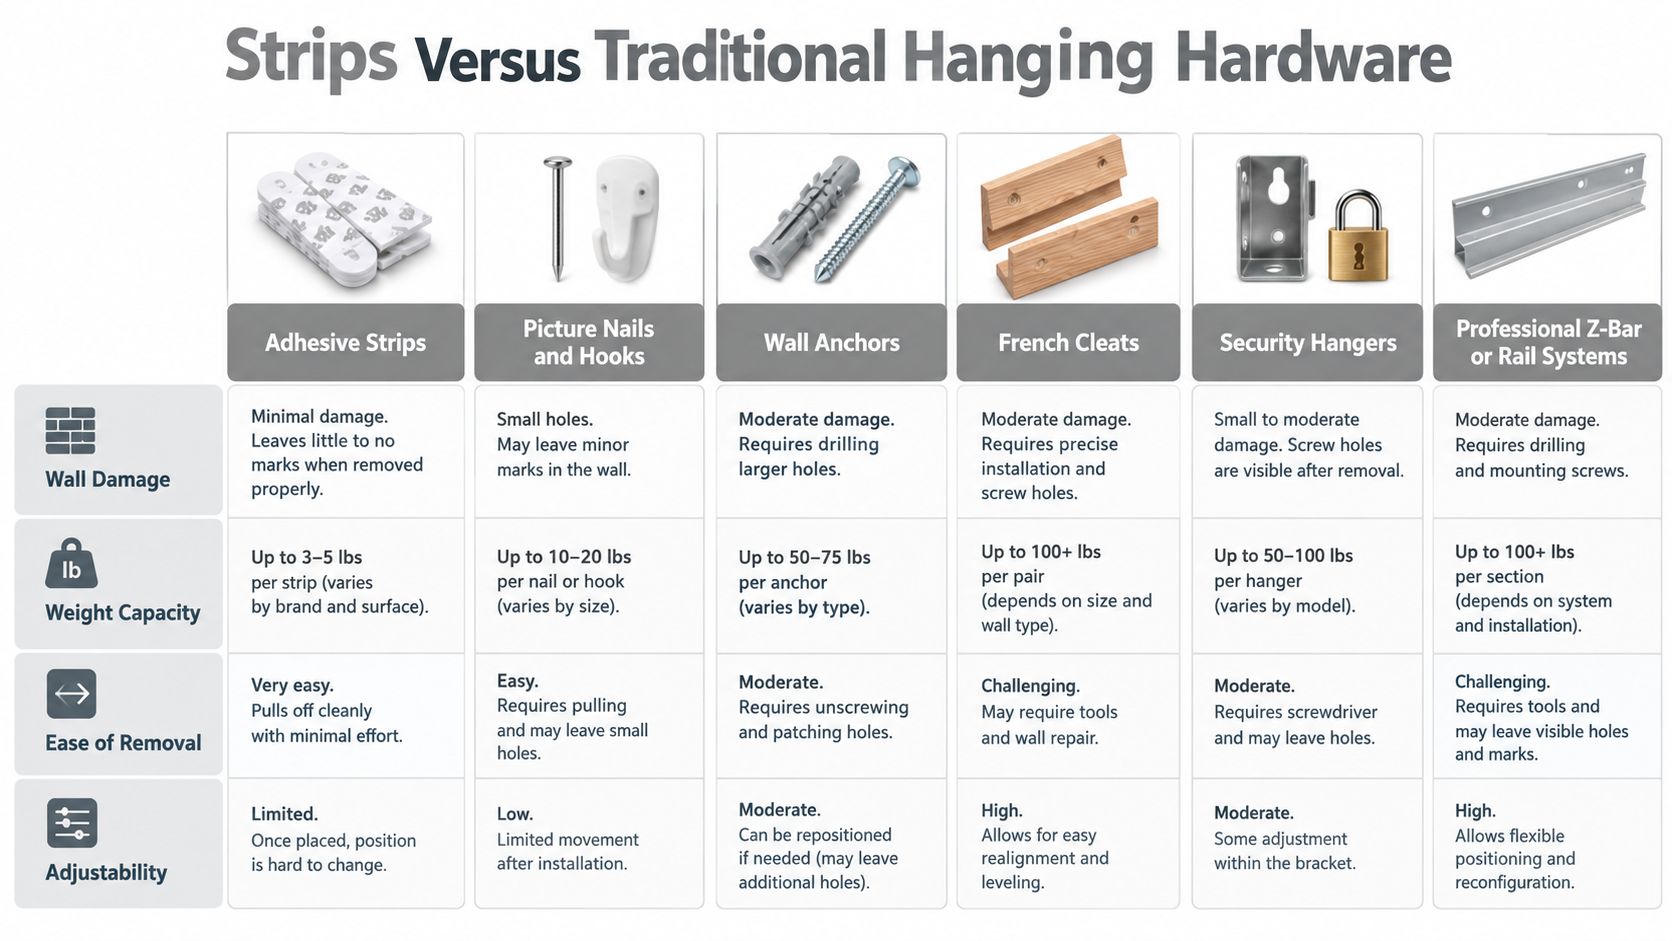
Picture nails and hooks are the honest baseline. The hole is small, the hold is mechanical, and the connection never relies on paint sticking to drywall. For a modest framed print, a hook driven at an angle tolerates sloppy walls better than adhesive ever will. Repositioning costs you another hole, and that is the price.
Wall anchors buy capacity when no stud is available. Toggle and expansion anchors spread the load inside the wall cavity, so they handle heavier frames and mirrors that strips should never carry. Drilling now and a bigger patch later are the cost. In return, the anchor ignores whether your paint cured last week or whether the previous owner skim-coated the wall with something chalky.
Hardware That Earns Its Holes
Some hardware exists because adhesive physically cannot do the job. French cleats and Z-bar rails spread weight across a wide span and hold big pieces flush, which is why I default to them for large or wide work. Security hangers lock the frame to the wall so it can't be lifted free, a requirement in offices, hotels, schools, and corridors where art gets touched. Rail systems take a different approach: anchor a track once, then hang and rearrange from cables indefinitely.
If you want a side-by-side look at these families before you buy, this primer on picture hanging materials and matching hardware to different wall types covers the pairings worth knowing.
Then there is projection, where strips lose outright. Shadow boxes, deep stretcher bars with uneven backs, and plate displays push weight outward and load adhesive in peel, the direction it resists worst. A mechanical hanger answers that torque by biting into the wall. An adhesive answers by releasing. For a heavy glazed piece over a sofa, a crib, or a hallway people brush past, pick the hanger whose failure you can walk away from.
Installing and Removing Strips the Right Way
A homeowner I consulted for cleaned her wall well, pressed her strips well, and hung a print immediately because guests were arriving that evening. It slid down inside two days, slowly enough to scuff the paint on the way. The strips had not failed as fasteners. She had loaded a bond that was still forming.
That story covers most failures I see. Installation is boring work, and skipped prep or skipped waiting causes far more damage than defective strips ever do.
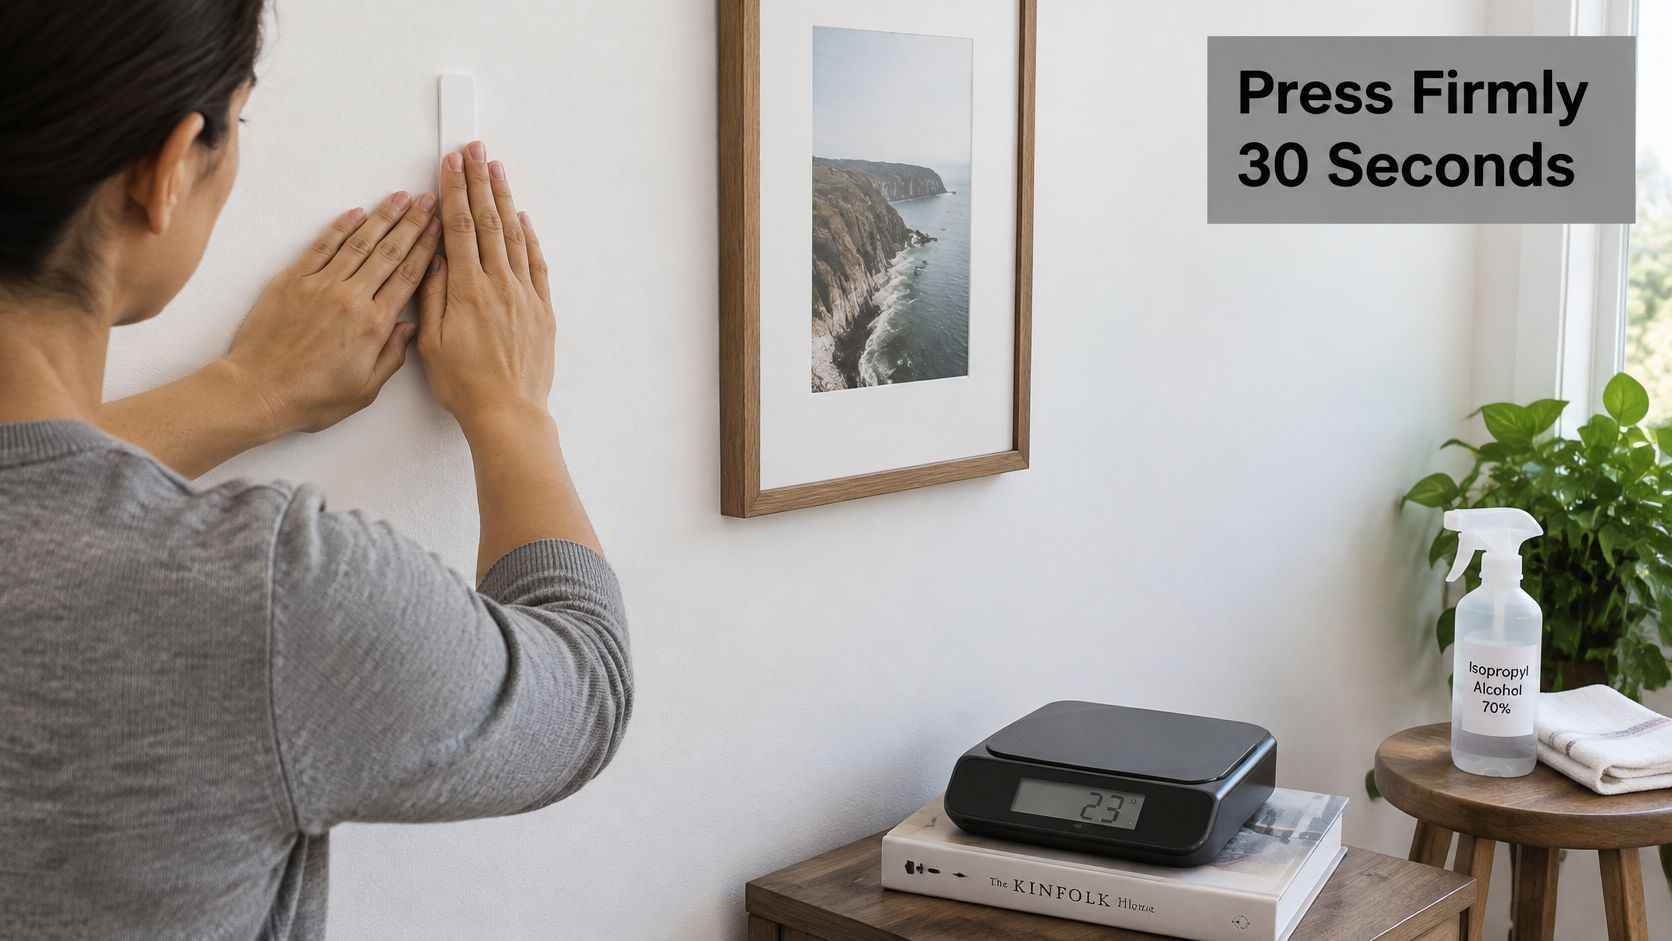
Weigh the piece first, then clean the wall and the frame back with isopropyl alcohol and let both surfaces dry. Household cleaners leave residue that weakens adhesion. Mark your placement lightly in pencil, because repositioning after full pressure compromises the bond you are trying to build.
The Sequence That Builds the Bond
Pair the strips first: Press the fastener halves together until they click, then apply each pair to the frame back near the upper corners, adding lower pairs only as the package directs.
Press hard and long: Manufacturer instructions call for pressing each strip firmly for about 30 seconds, removing the frame to re-press the wall-mounted strips, and waiting at least one hour before rehanging. Follow the sequence printed on your own package, since dwell times vary by product.
Rehang after the dwell: Click the frame back on only after the wait. The dwell lets the adhesive develop bond strength before it carries sustained load.
For layout help before anything touches the wall, these picture hanging tips for your home from Miller Waldrop Furniture & Decor cover measuring and placement in a way that pairs well with adhesive work, where your first placement needs to be your final one.
Watch the full press, separate, and re-press sequence once before your first attempt. The middle step is the one people skip.
Taking Them Off Without Taking the Paint
Removal succeeds through stretch. Hold the frame with one hand, pull the tab straight down slowly along the wall, and keep your other hand flat against the strip so it doesn't snap back. Pulling outward or at an angle invites paint damage.
If paint lifts anyway, stop forcing it. Work the remaining adhesive slowly and accept a small touch-up. That outcome usually means the paint bond was weaker than the strip bond from the start, and no careful technique fixes a wall that was never sound.
Climate, Walls, and Long-Term Reliability
Ask what the fall does before you ask what the package claims. A strip that holds a canvas in a quiet hallway can still be the wrong choice over a crib, because the rating never describes broken glass, a cracked frame, or a child standing under the release point.
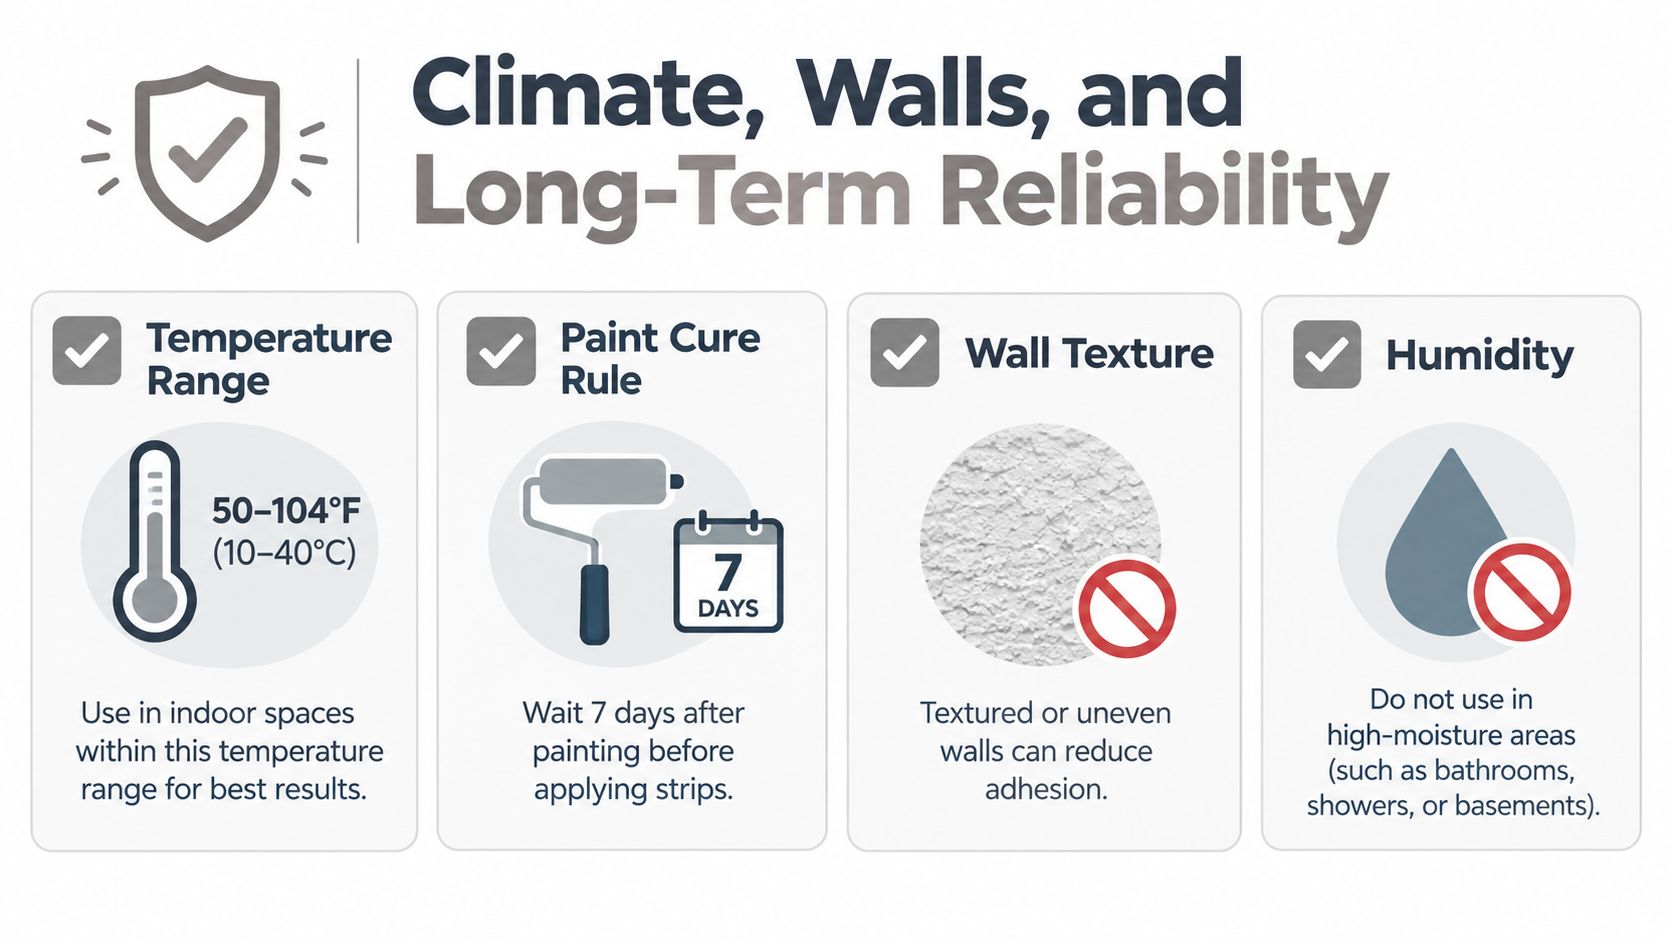
Manufacturer guidance cited earlier sets the indoor envelope at 50–104°F (10–40°C) and requires painted walls to cure for at least seven days before application. Fresh paint can feel dry and still move under load. Bond to that film early and the strip may hold while the paint lets go of the drywall.
The wall decides more than the strip does. I reject these conditions on sight:
Surface or condition | Why I pass |
|---|---|
Wallpaper or vinyl | The adhesive grips a surface layer that can peel under sustained load. |
Textured or orange-peel paint | High points get contact while valleys hold air, shrinking real bond area. |
Chalky, friable, or bubbling paint | The frame hangs from a paint film that is already failing. |
Cold exterior walls and steamy bathrooms | Temperature and moisture swings work the bond line every day. |
Colorado adds its own stress. Dry winters shrink and stiffen materials, summer storms raise indoor humidity, high-altitude sun warms south and west walls through glass, and HVAC registers push conditioned air across exterior-facing drywall. Strips still work here. Inspection becomes part of the install.
Skepticism check: Dramatic online claims about bond loss at exact humidity and temperature thresholds circulate constantly. One widely repeated purported 2023 wall-adhesion study reported a 41% average reduction in bond retention above 65% relative humidity and a 63% reduction below 60°F, but that claim traces to a commercial product listing context and should be independently verified before you rely on it. Treat manufacturer tested limits as data. Treat marketplace copy as marketing.
Keep a small record on the frame back: wall type, paint age, installation date, frame weight, and frame depth. At each seasonal change, look for edge lift, dust lines showing movement, or a frame that no longer sits flush. Check children's rooms and hallways more often, and keep adhesive-hung work away from beds entirely.
Empty buildings change the math. In second homes, rentals, and offices that sit vacant, inspect before occupancy, because nobody hears a frame fall when nobody is there.
Replace strips after repainting, after a nearby plumbing leak or other humidity event, and every time a piece comes down for a rehang. Fresh adhesive is cheap. Reframing isn't.
When Strips Are the Wrong Tool and What to Use Instead
Use this decision in order. Don't start with what you own. Start with what the piece demands.
Don't use strips for originals, irreplaceable objects, mirrors, or heavily glazed work. Manufacturer exclusions already rule out valuable or irreplaceable objects, and one product manual example specifies up to 16 pounds only when four pairs are used and the frame is no larger than 24 × 36 inches, a limit described in the product listing for Command narrow picture hanging strips. Even inside that kind of limit, the consequence of a mirror falling is broken glass at ankle height. Use mirror clips, a cleat, or anchored hardware rated for the piece.
Match the Problem to the Hardware
Heavy or oversized frame: Use a French cleat or Z-bar anchored into studs or proper wall anchors, so weight spreads across the wall.
Anything over a bed, crib, sofa, or desk: Use mechanical anchoring into structure. Adhesive has no backup if it releases.
Projecting or sculptural objects: Use a shelf, bracket, or custom mount that supports weight from below and resists torque.
Commercial or public spaces: Use security hangers or a rail system. Public contact, cleaning crews, and vibration punish adhesive bonds.
Brick, block, or concrete: Skip strips and learn the anchored approach in this guide to hanging art on concrete walls with proper masonry fixings.
Call a professional installer when the layout is a large grid, the wall is vaulted or above stairs, the piece needs two people to lift safely, or the surface is stone, tile, plaster, or paneling you're unsure how to anchor. Also call when the work is headed for a gallery, office, or model home where level, spacing, and repeatability matter across many pieces. A pro brings stud finding, anchor selection, laser layout, and the judgment to tell you when a wall shouldn't carry what you planned.
Strips still earn their drawer space. Use them for lightweight, replaceable, flat-backed decor on smooth cured walls, in low consequence spots, with a seasonal inspection habit. Use mechanical hardware for everything you'd protect with your own hands if the wall shook. That single distinction will keep your walls clean and your artwork off the floor.
If your piece is heavy, valuable, oversized, or headed above seating, skip the adhesive experiment and let Colorado Art Services anchor it properly with cleats, security hardware, and layout work matched to your wall. The team installs single pieces, full grids, mirrors, and commercial displays across the Denver Metro and Front Range. Visit Colorado Art Services to schedule an installation that won't depend on a bond line.
Comments