


Picture Hanging Kit How to Use It the Right Way
You've got the frame in one hand, a plastic bag of hooks in the other, and a label promising that the kit can support more weight than the artwork. The tempting move is to match those two numbers, drill a hole, and hope the wall cooperates. That's how crooked frames, stripped anchors, and avoidable falls begin.
Learning picture hanging kit how to use isn't really about opening the package in the right order. It's about reading the wall, weighing the artwork, understanding how the frame projects from the surface, and choosing hardware that works with all three. The kit should be the final decision, not the starting point.
Starting with the Wall and the Frame, Not the Kit
A framed print can look secure for several minutes before a weak fixing starts to pull free. The failure usually begins before the hook goes in: the wall has not been identified, the complete load has not been measured, or the frame's depth has been ignored. Start with those facts. The kit comes last.
Lift the finished piece carefully and establish its true installed weight, including the frame, glazing, mat, backing, and hanging hardware. If the weight is uncertain, use a luggage scale or household scale rather than relying on the artwork description. Then examine the back of the frame. A shallow profile with a rigid back transfers force differently from a deep frame hanging on flexible wire, even when the two pieces weigh the same.
The first-minute inspection
Check these points in order:
Artwork weight: Weigh the complete framed piece, not only the artwork.
Wall construction: Identify drywall, plaster, masonry, paneling, or an unknown surface.
Frame depth: Measure how far the piece will project and whether its center of gravity may pull it forward.
Existing hardware: Look for D-rings, wire, cleats, brackets, keyholes, or a small sawtooth hanger.
Mounting location: Check for studs, corners, trim, windows, doors, and possible wiring or plumbing.
These observations narrow the hardware choice quickly. A light print can suit a small fixing, while a large glazed frame with a deep wooden profile may need a stronger wall connection and a hanging method that controls forward movement. A substantial frame is not automatically safe because the hook packet shows a higher capacity. Those ratings come from stated test conditions. Real installations may involve damaged gypsum, uneven wall thickness, a poor pilot hole, or an outward pull caused by the frame. The distinction is explained in guidance on choosing picture hanging hardware.
Practical rule: Choose the wall-side fastener only after you know the substrate, the complete weight, and how the frame will pull against the wall.
The frame hardware also affects the final position. D-rings and wire allow adjustment but can let a deep frame lean forward. Cleats or brackets can hold the piece closer and distribute force more predictably when the frame suits them. Check the intended layout against studs, trim, and room features before committing to a hole.
For positioning guidance, perfectly hung pictures every time is a useful reference. Make the installation decision from the wall and the artwork's geometry first. Once those are clear, selecting the kit becomes a controlled final step.
Reading the Wall Before You Touch a Hook
Most retail kits assume drywall. That assumption is convenient, but drywall is also the surface that punishes guesswork because a fastener can appear secure while holding only a fragile layer of gypsum paper and powder. Before opening the hardware bag, test the wall and look for evidence of its construction.
A light tap that sounds hollow usually suggests a drywall cavity. A harder, more irregular thud may indicate plaster over lath or a solid backing. A gritty bite when a small pilot hole begins can point toward masonry, cement board, or a sound-dampened wall assembly. None of these tests is conclusive by itself, so treat them as clues rather than permission to drill in full.
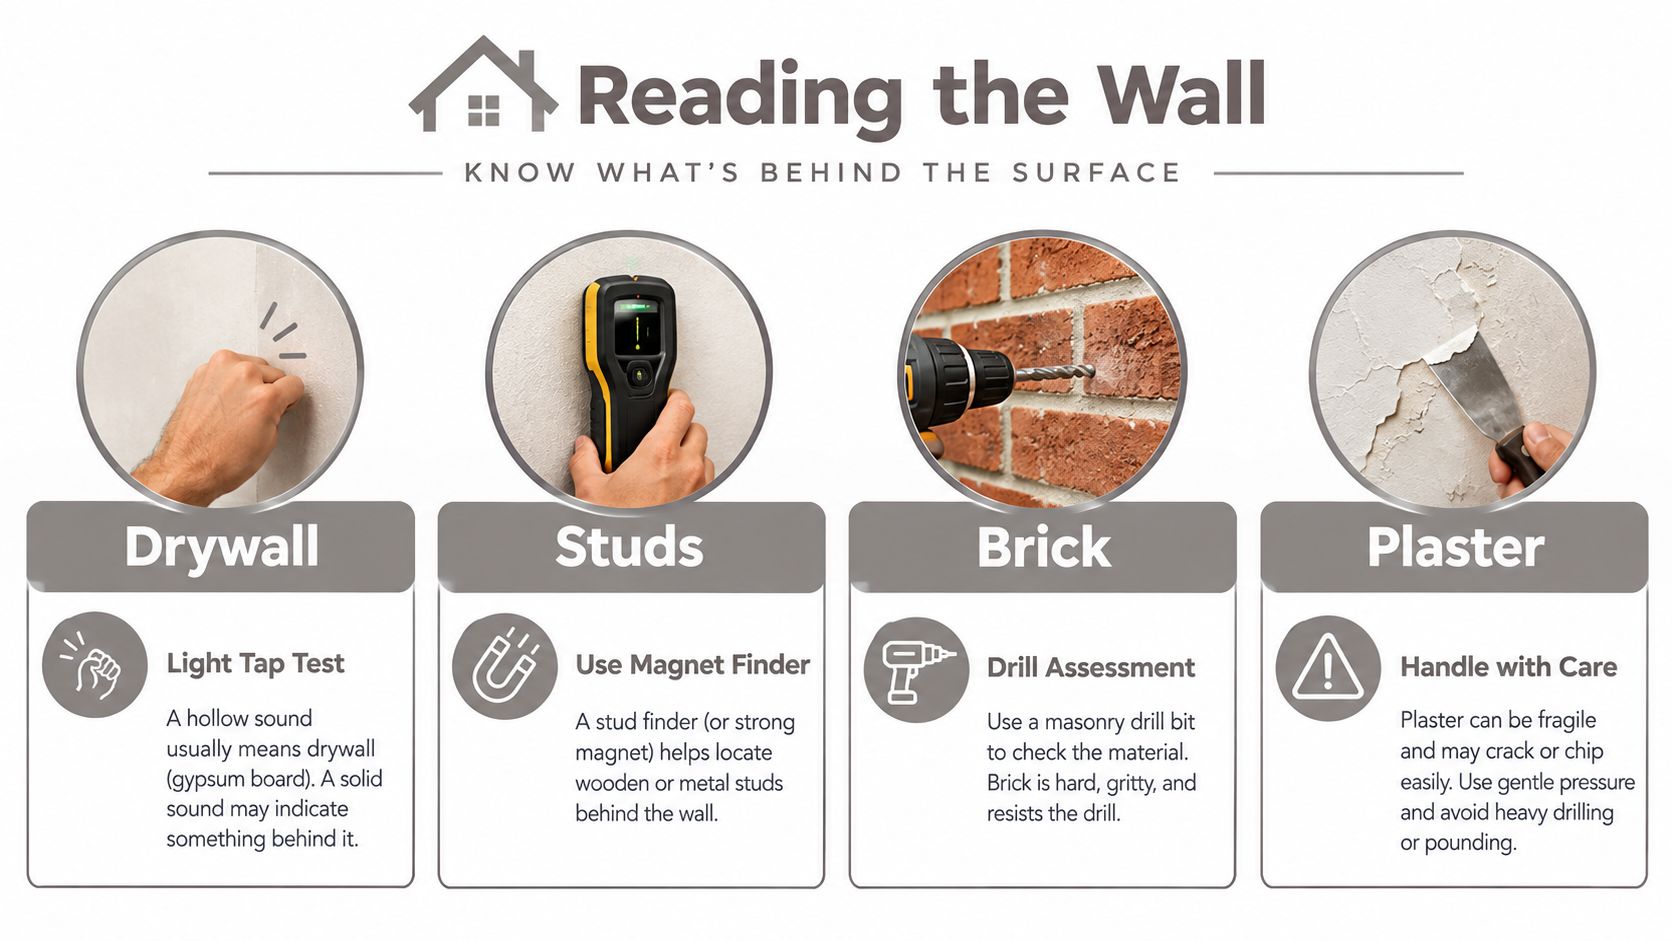
Find structure, then check whether it suits the layout
A stud gives a screw a much better structural path than unsupported drywall, but finding one doesn't automatically solve the installation. The stud may sit off-center from the desired artwork position, behind decorative trim, beside a window, or in a place that forces the frame away from the visual balance of the room. Use a stud finder, a magnet to locate drywall screws, or a small inspection method where appropriate. Confirm the result rather than trusting a single electronic reading.
Drywall thickness also matters. Anchor performance varies with the thickness and condition of the panel, the anchor design, the quality of the installation, and the direction of the load. A fire-rated or soundproofed wall may have different layers, while exterior walls can include sheathing or insulation that changes the available cavity depth.
Ask a few calibration questions before drilling:
Is the surface ordinary drywall, plaster, masonry, tile, paneling, or a wall covering over one of these?
Is there a stud exactly where the fastening point needs to land?
Could plumbing, electrical wiring, or a structural member be behind the mark?
Is the surface damaged, soft, damp, patched, or close to an edge?
Does the frame need to sit flush, or will wire create a gap and forward pull?
Never assume the wall is the wall you expect. Confirm the substrate, then select a fastener designed for that material. If the test results conflict, stop and investigate rather than forcing a drywall anchor into plaster or treating a hollow cavity like solid masonry.
Matching Anchors to the Job
A frame that looks light can still place a demanding load on a fastener. A wide piece twists, a deep frame pulls away from the wall, and a wire-backed frame can shift the force upward and outward. Choose the anchor after checking the wall, the artwork's weight, the frame's depth, and the hanging method. The kit should follow those conditions, not dictate them.
Plastic expansion anchors suit light work in sound drywall when the screw seats firmly and the frame stays close to the wall. A self-drilling threaded anchor installs quickly, but it depends on intact drywall and careful driving. A toggle assembly can spread the load across hollow drywall, provided the cavity has enough clearance and the toggle opens fully behind the panel. Masonry fasteners belong in brick, block, or concrete, with the screw and plug selected for that specific substrate.
Anchor Type | Best For Wall Types | Capacity Guidance | Failure Mode If Misused |
|---|---|---|---|
Plastic expansion sleeve | Sound drywall and light-duty frames | Light loads within the product rating | Pulling out, crushing the panel, or spinning |
Self-drilling threaded anchor | Standard drywall where a simple installation fits | Light to moderate loads within the product rating | Stripping, weak engagement, or damage from overdriving |
Toggle bolt or toggle assembly | Hollow drywall with adequate cavity clearance | Higher loads when installed and rated correctly | Failing to open, crushing the panel, or pulling outward |
Masonry screw or anchor | Brick, block, concrete, and other solid masonry | Depends on the substrate and fastener system | Cracking, shallow embedment, or loosening |
Treat the printed rating as a test result, not a promise for every wall. The rating assumes the stated substrate, screw, installation method, and direction of force. Damaged drywall, a hole near an edge, a loose anchor, or a frame that leans forward can reduce the actual holding power. A conservative installation leaves margin below the printed limit rather than loading the fastener to its maximum.
Match the method to the scenario
A small print may need only a suitable picture hook or a properly installed drywall anchor. A heavier frame often benefits from two attachment points, which can spread the load and help preserve level alignment. Both points must be placed accurately, and each fastener must suit the wall. For a deep frame or substantial mirror, use stud-mounted screws, a cleat, or hardware designed for the actual load instead of relying on a light retail hook.
Use this guide to compare picture-hanging anchors and their applications when reviewing fastener options. A piece that is exceptionally heavy, valuable, unusually deep, or positioned above people deserves a more deliberate mounting method. A basic kit may be the wrong tool even when its package lists a suitable rating.
Check for concealed failure before you finish. An anchor can hold the vertical load while the frame's upper edge pulls forward. A screw can feel tight after the anchor has spun behind the paper. Two attachment points can distribute weight, but they cannot correct a fastener chosen for the wrong wall. If the substrate remains uncertain, use a stud or suitable masonry fastening, or bring in an installer.
Measuring, Marking, and Leveling with Confidence
A good installation can fail visually even when the hardware holds. The frame may sit too high, drift to one side, or lean because the installer marked the wall from an assumed center rather than measuring the actual hanging point on the back.
Hold the frame in its intended position first. Have someone step back and check the composition, or use painter's tape to outline the top corners without making holes. Mark the planned top edge. Then turn the frame face down on a padded surface and measure from that top edge down to the point where the wire, D-rings, cleat, or bracket will engage the wall hardware. Transfer that distance to the wall. Don't guess from the frame's visual center.
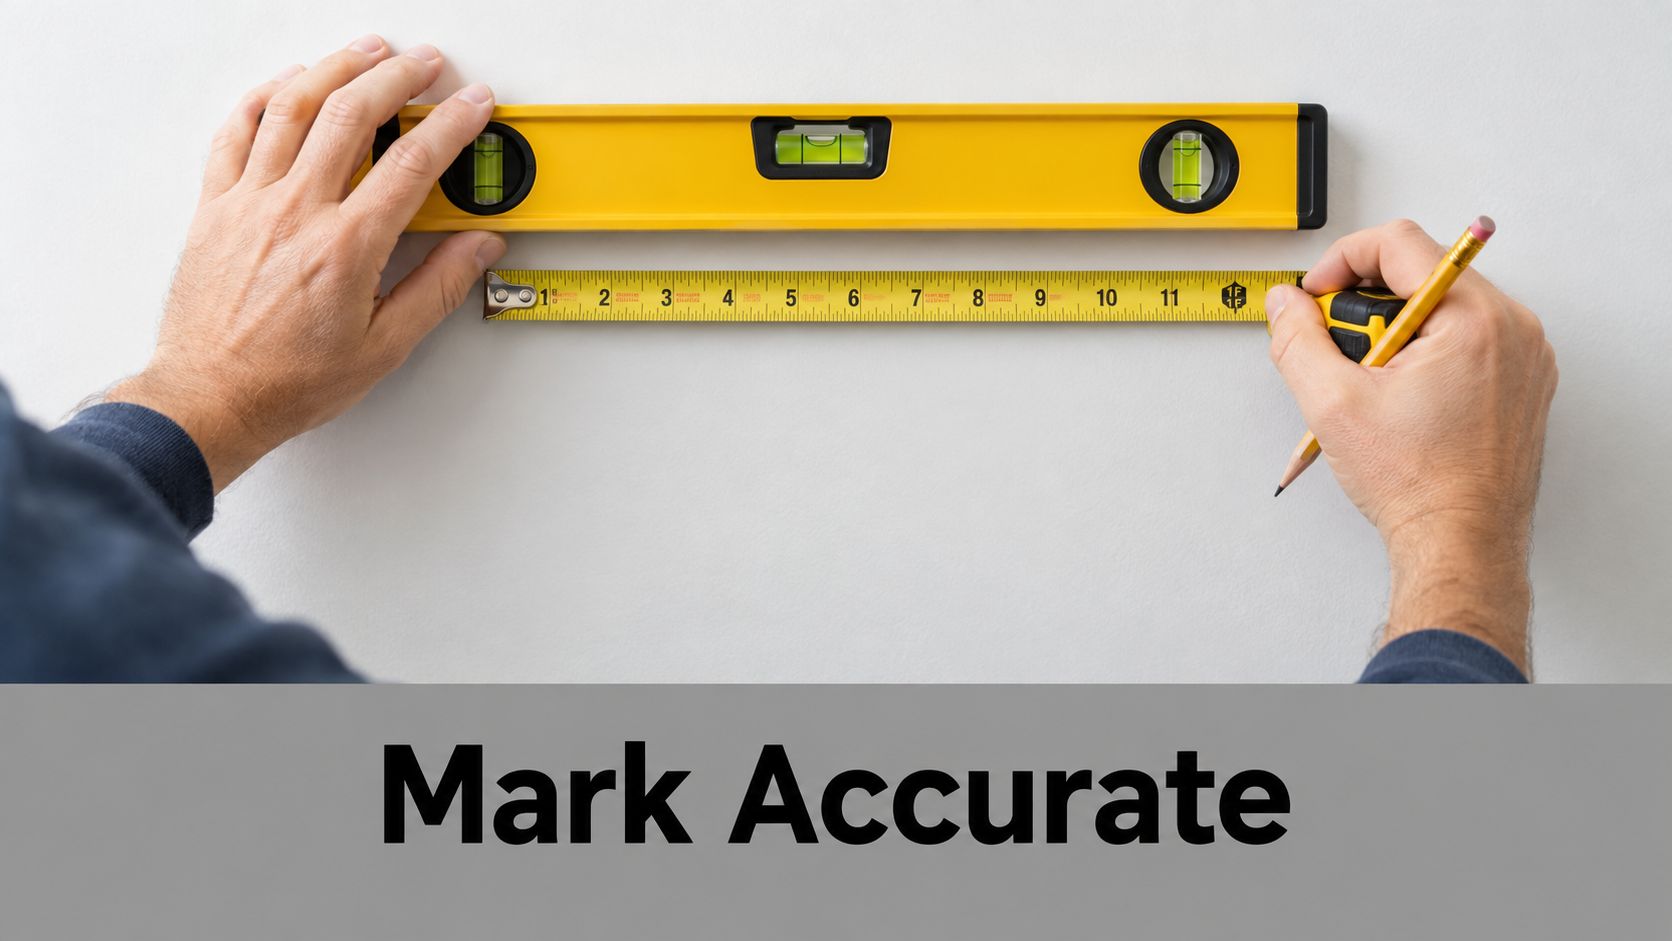
Make the hanging point repeatable
Wire-backed frames need a little more care. With the frame face down, place the D-rings at matching heights and keep the wire tension consistent while you measure the peak. A wire that's overly loose changes the installed height and lets the frame move. Wire pulled excessively tight can reduce the hook's purchase and make the frame harder to seat securely.
For two wall hooks, mark both points from a shared reference line rather than measuring each side independently. A laser level is efficient for a long run or a group of pieces, while a bubble level remains valuable for detecting a small twist across a rigid frame. A tool such as a picture-hanging laser level guide can help when the layout includes several pieces.
Use a chalk line when multiple frames must share an edge or baseline. Account for crown molding, chair rails, baseboards, and any wall feature that makes a mathematically level line look visually wrong. Dry-fit the frame with painter's tape, especially when the piece is wide, deep, or difficult to hold in place.
The mark on the wall should describe the hardware's actual engagement point, not where the frame appears to balance from the front.
Drill only after the frame position, attachment spacing, and hardware height agree. A pilot hole should be smaller than the anchor body when the instructions call for one. Drive the screw until the head seats correctly. Stop when the anchor is secure. More force isn't more security if it crushes drywall paper, strips the screw, or deforms the anchor.
Choosing Wire, D-Rings, Cleats, and Brackets
The hardware on the back of the frame determines how the load reaches the wall. It isn't interchangeable, and the kit that came with an expensive frame may be selected for convenience rather than the conditions of your installation.
Hardware | Best For | Weight Range | Watch Out For |
|---|---|---|---|
Braided picture wire with D-rings | Lightweight to moderate wood frames that benefit from small leveling adjustments | Use only within the wire and D-ring rating | Excessive slack, weak screws, and rotation on deep frames |
Fixed D-rings or two-point hangers | Rigid frames where direct engagement is preferable to wire flex | Moderate loads matched to the hardware | Inaccurate spacing and difficult final adjustments |
French cleat | Heavy or deep frames with a flat, strong back | Heavy-duty installations using suitable wall fastening | Poor stud alignment, incomplete engagement, and a cleat gap that tilts the frame |
Z-bar or bracket system | Panels, rigid boards, and canvas floater frames | Determined by the bracket and wall fastening | Incompatible frame backs, loose brackets, and sideways movement |
A braided wire and two D-rings work well on a modest wood frame when the frame back has enough material for secure screws. The wire allows small horizontal corrections, but it also creates a gap from the wall and permits rotation if the frame is deep or top-heavy. Fixed D-rings or keyhole-style hardware gives a more controlled connection for a rigid frame that needs to stay flat.
A French cleat suits a large glazed piece or a deep shadowbox with a broad, flat back. The frame-side and wall-side pieces interlock, but the wall rail still needs appropriate fastening. The cleat won't compensate for weak drywall or a wall rail installed out of level. For panels and canvas floater frames, a Z-bar or purpose-designed bracket can spread the load along the back without relying on a single central point.
A small sawtooth hanger is a convenience for lightweight work, not a universal solution. Don't assume the hanger shipped with a costly frame can carry the complete installed piece. Match the backer, depth, weight, and desired wall clearance to the hardware. This picture-hanging cleat resource provides additional context for cleat-based installations.
Why Rated for the Weight Is Not Enough
A properly rated plastic anchor can still pull through drywall when a door slams, someone bumps the frame, or the artwork projects far enough from the wall to create a mechanical advantage. That isn't necessarily a manufacturing defect. The printed rating generally describes a controlled pull under specified conditions, while a finished room introduces movement, vibration, changing tension, and imperfect wall material.
Three forces deserve particular attention. A static downward load pulls toward the floor, but a frame can also pull outward from the wall. A wire-backed frame increases that offset because the hook supports the wire peak while the lower portion of the frame rests away from the surface. A tall, narrow piece can have a center of gravity that rotates the top edge forward even when its total weight remains below the label.
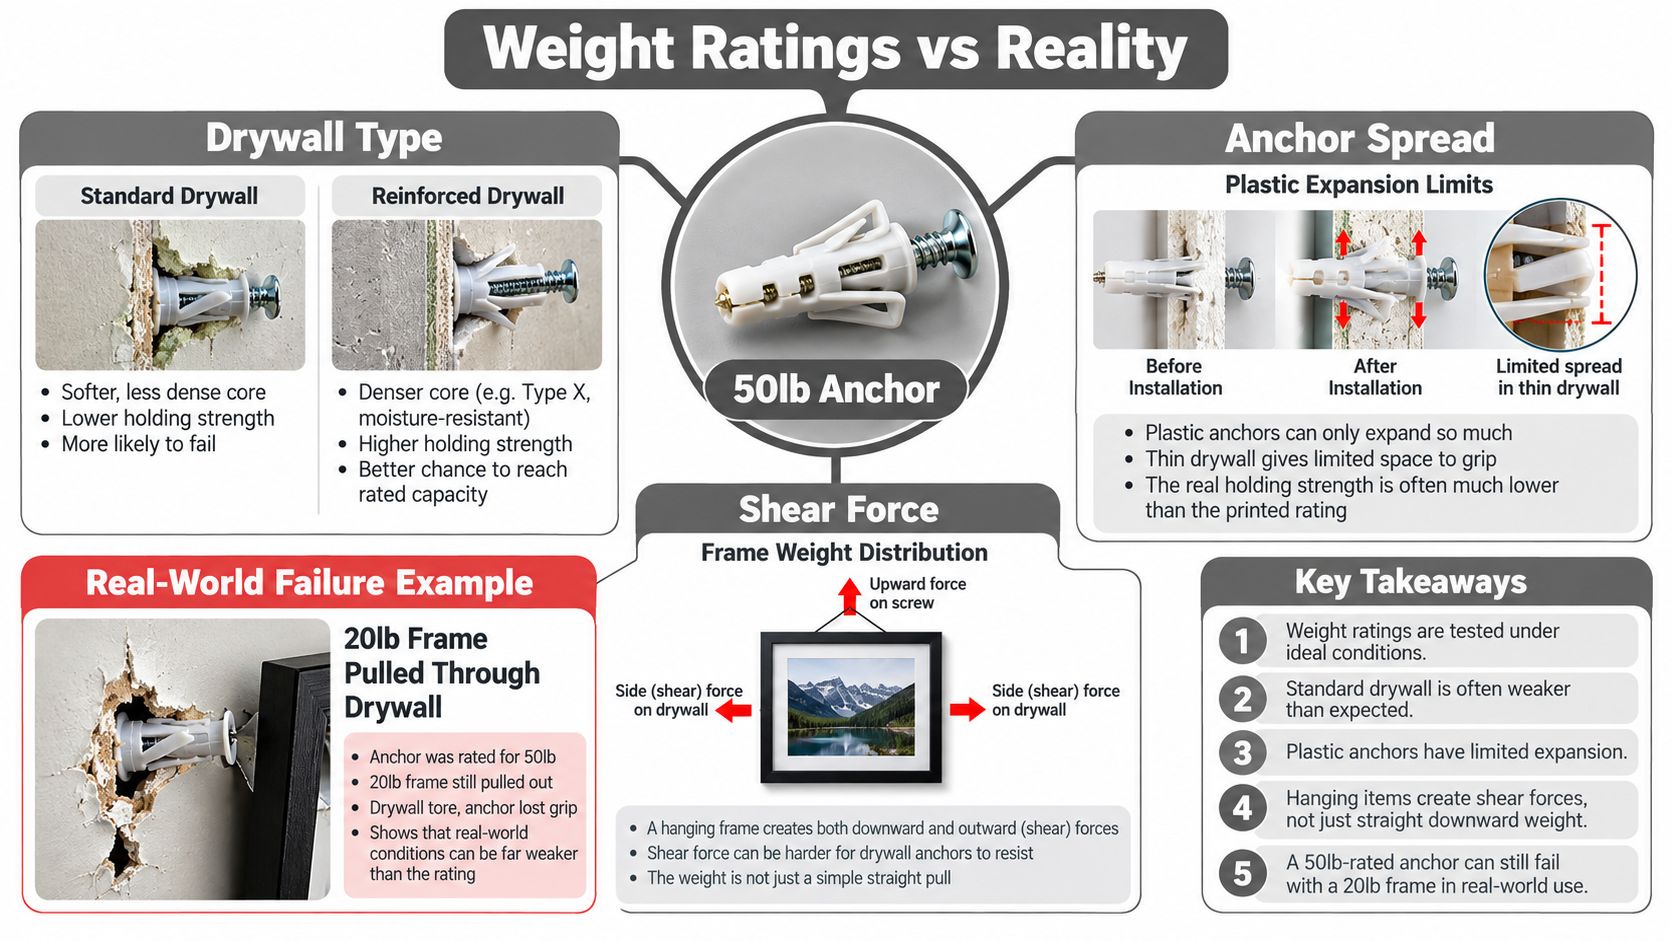
Read the back for warning signs
Look at the frame before deciding that the wall anchor is adequate:
Single-point hanger: A single hanger near the top can let a tall frame rotate or swing.
Deep cleat gap: A deep space between the wall and frame increases turning force and may need stabilizing contact.
Overstretched wire: A wire with little controlled slack can seat poorly, while excessive sag changes the hanging height.
Weak frame attachment: D-rings, brackets, or screws may be the first failure point, not the wall anchor.
Unbalanced load: Glass, heavy backing, or a deep object can shift the center of gravity forward.
The conservative quarter-rating approach is important because a 30-pound-rated anchor gives a working figure of about 7.5 pounds per anchor when treated as roughly 25% of the stated rating, as explained in consumer guidance on drywall anchors. That approach still isn't a substitute for a stud or a purpose-designed system when the piece is heavy or high-consequence.
Use two separated attachment points where the frame permits, keep the load centered, and add discreet anti-sway or anti-tip restraints when movement is likely. Weight rating is the starting line. Installation geometry, wall condition, and resistance to movement decide whether the finished piece stays there.
Final Checks Before You Let Go
Before you release the frame, inspect the complete installation: wall, anchor, frame hardware, and the forces acting on it. Confirm the fastening point first. If you meant to use a stud, verify that the screw entered it instead of trusting the finder alone. For an anchor, check that it sits flush, the screw engaged correctly, and tightening did not crush or tear the drywall surface.
Drive the screw firmly, not aggressively. The head should hold the hanger securely without cutting through the paper or deforming the anchor. Give the mounted point a controlled, gentle outward pull before lifting the artwork onto it. If the anchor telescopes, spins, or shifts, remove it and correct the installation.
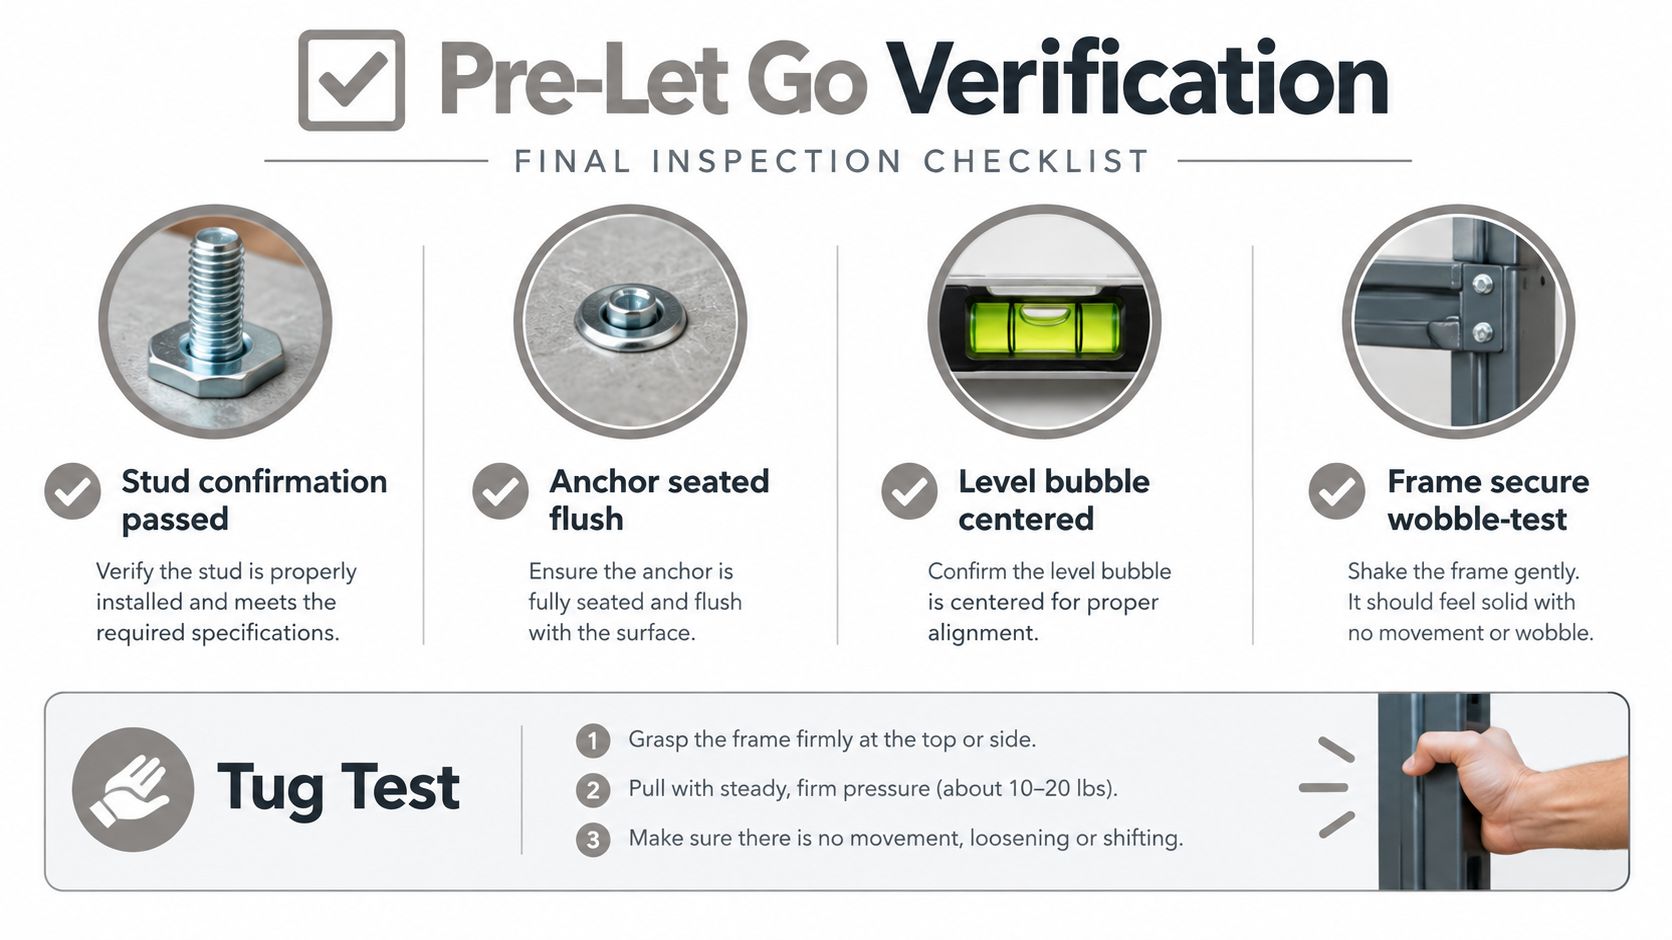
Check engagement, movement, and appearance
After hanging the frame, keep one hand on the bottom rail while you observe it briefly. Look for creep, settling, or a gradual change in level. Press lightly on the lower corners to reveal wobble. Do not jerk the frame or test it with force the installation was not designed to resist.
Check each point before you leave it:
Stud confirmation: Verify that the screw entered the intended structural member where the installation requires one.
Anchor seating: Confirm that the anchor remains flush and has not pulled through the wall surface.
Hardware engagement: Make sure the hook is closed around the wire, and that both D-rings, brackets, or cleat halves are fully engaged.
Level and alignment: Sight along the top edge, then use a bubble level to catch a subtle twist.
Stability: Test for controlled movement and add suitable lower-corner restraints where bumps or vibration are likely.
Picture-hanging guidance recommends closed-loop hangers, secure lower corners in earthquake-prone settings, and professional evaluation for objects above 50 pounds, as described in wall-anchor safety guidance. Extra care applies above beds, along circulation paths, near stairs, and in homes with children or pets. A frame can fall below a nominal weight limit and still be unsafe if it swings, tilts, or disengages.
Stop using a basic kit for plaster over lath, masonry requiring specialty shields, unknown construction, gallery walls, high placements, large mirrors, fragile glazing, or heavy work supported at one point. Professional art installers, including Colorado Art Services, can assess the substrate, choose suitable hardware, and install artwork, mirrors, and heavy pieces accurately. Knowing when to stop is part of using a picture hanging kit correctly.
Colorado Art Services provides residential and commercial art installation across the Denver Metro area and Front Range, including heavy-piece mounting, mirror hanging, high-placement work, and gallery-style layouts. For valuable, unusually heavy, high-up, or difficult-to-match pieces, contact the company for professional guidance and secure installation.
Comments