


Picture Hanging Height: How High to Hang Art in Every Room
About 57 to 60 inches (about 145 to 152 cm) above the finished floor is where the middle of a framed picture belongs in a typical room used by standing adults. Measure to the center of the frame, not the top edge and not the hanging wire. 58 inches is the midpoint most rooms settle on.
Older European salon exhibitions used a wall in a very different way. Paintings were packed frame to frame, from near the floor toward the ceiling, so density mattered more than one shared horizontal sightline. Modern galleries went the other direction: fewer pieces, more breathing room, and one consistent centerline a visitor can follow from work to work.
A standing adult's eyes sit near that band, so art centered there is met straight on, the way you meet someone's face across a room, instead of being looked at with the chin tipped up or down. A sofa beneath the frame, a seated audience, or a piece that is unusually tall or small is a reason to move the hook. Those changes are measured adjustments from the same 57-to-60-inch center, fitted to one room, one piece of furniture, or one viewer.
Standard Picture Hanging Height Chart
Read this chart the way a tailor reads a measurement card. The first row is the standard fit for a standing adult. Every row under it is an alteration for the furniture, the people in or the way that wall is used.
Situation | Where to measure | Target height | Notes |
|---|---|---|---|
Open wall, standing viewers | Center of frame to finished floor | 57–60 in (145–152 cm) | Standing baseline; 58 in is the practical midpoint |
Above a sofa or console | Bottom of frame to top of furniture | Frame bottom 8–10 in above furniture; center lands near 57–60 in | Set the gap first, then check the center against the baseline |
Above a bed | Bottom of frame to headboard top | Frame bottom 8–10 in above headboard; center lands near 57–60 in | Keep the piece narrower than the mattress width |
Seated-view room (dining, lounge, waiting area) | Center of frame to finished floor | 47–53 in (120–135 cm) | Matches seated eye level |
Wheelchair-accessible display | Center of frame to finished floor | 43–51 in; small items at or below 40 in | Test from both seated and standing positions |
Gallery wall or grid | Center of the whole grouping to finished floor | 57–60 in (145–152 cm) | Align the composite center, not the largest frame |
Tall ceilings or oversized artwork | Center of frame to finished floor | 57–60 in (145–152 cm) | Hold the centerline and scale the artwork instead |
The baseline is a sightline, not a construction rule. It describes where most standing adults look comfortably. When the room serves a seated group, a wheelchair user, or a cluster of frames, a different row replaces it.
The Target column records the center of the frame. A hook marked on that same number hangs the art low, because the wire sits above the middle.
On an open wall the center stays inside 57–60 inches (145–152 cm). 58 inches is the midpoint to mark first.
Furniture rows work in two steps, and the order matters. Set the gap before you chase the center. Leave 8–10 inches between the bottom of the frame and the top of a sofa, console, or headboard. On a bed, keep the frame narrower than the mattress so the piece reads as part of the bed. After the gap is set, find the middle of the frame and see whether it still falls near 57–60. A very tall frame can shove that middle well above the band. Then the last row applies: hold the centerline and choose a smaller piece instead of lifting the art toward a high ceiling.
A gallery wall uses the same standing band, measured on a different shape. Ignore the biggest frame. Treat the whole group as one block and put the middle of that block at 57–60 inches.
Rooms built for sitting leave the standing band on purpose. Dining, lounge, and waiting areas use 47–53 inches (120–135 cm). A display meant for a wheelchair user uses 43–51 inches, with small items at or below 40 inches, checked from a chair as well as from standing.
One wall gets one row. A sofa gap can still be checked against the standing band. Two different centerlines cannot both be the target.
Adjusting for Viewers, Artwork Size and Ceiling Height
A single painting can be correctly hung at three different heights in three different rooms. The measurement that decides which one is right isn't the wall. It's the eye that meets the piece.
Standing viewers versus seated viewers
The full standing band assumes people approach the art on their feet: hallways, entryways, open living room walls, stair landings. Rooms built around sitting are a different problem. A dining room, a lounge, an office waiting area or a consultation room puts viewers in chairs, and a centerline set for a standing adult leaves them staring at the bottom rail of the frame. Drop the center into the high 40s and low 50s of inches to match the seated eye line, which is the 47–53 inch (120–135 cm) band in the chart above. The art should feel like it belongs to the table, not to the ceiling above it.
Accessibility has actual numbers attached
Most consumer guidance treats standing adult height as the default and stops there. It leaves out the people who can't stand at all. Accessibility-focused museum work puts seated wheelchair eye level at approximately 43–51 inches and recommends keeping the center of small displayed items no higher than about 40 inches so a wider range of visitors can see them comfortably, as gallery accessibility guidance on hanging height sets out. No display should force a wheelchair user into a sharp upward stare.
That guidance changes how you brief a job. Before drilling, walk the sightline from a chair at seated height as well as from standing, and keep anything interactive, labels included, inside accessible reach. Lowering a piece often improves a room even when it breaks gallery convention by a wide margin. Healthcare suites, senior living corridors, lobbies and building common areas are exactly where this matters most, because one placement there has to serve visitors of very different heights and mobility.
Oversized frames and tall walls
A large framed piece can hold its center near the baseline only if two conditions survive: the bottom edge still clears the furniture below, and the top edge stays out of the daily path of heads, doors and light fixtures. When it can't, let the center ease down rather than shoving the whole piece upward. Tall ceilings tempt the opposite move, and it's the wrong one. Extra height above the art is a scale problem, not a height problem, so fill it with a larger composition, a stacked pair or a taller grouping instead of raising a smaller piece out of view. If the frame looks undersized for the wall, how to choose art size for a wall walks through sizing before you touch a drill.
Condition | Adjustment | Resulting center height |
|---|---|---|
Mostly standing viewers | Keep the baseline | 57–60 in (145–152 cm) |
Mostly seated viewers (dining, lounge) | Lower by about 4–10 in | 47–53 in (120–135 cm) |
Wheelchair users in the audience | Lower to seated eye level | 43–51 in; small items at or below 40 in |
Young children's room | Lower to the child's own eye line | The child's sightline, well below 57 in |
Ceiling higher than 10 ft | Hold the centerline | 57–60 in, filled with larger or taller art |
Oversized artwork above furniture | Let the furniture gap set the bottom edge | Center often lands 55–60 in if clearance allows |
Hanging Pictures Above Furniture
Above furniture, the floor stops being the reference point. The sofa, console, dresser or headboard becomes the anchor, and the gap between them is the number that governs the whole composition.
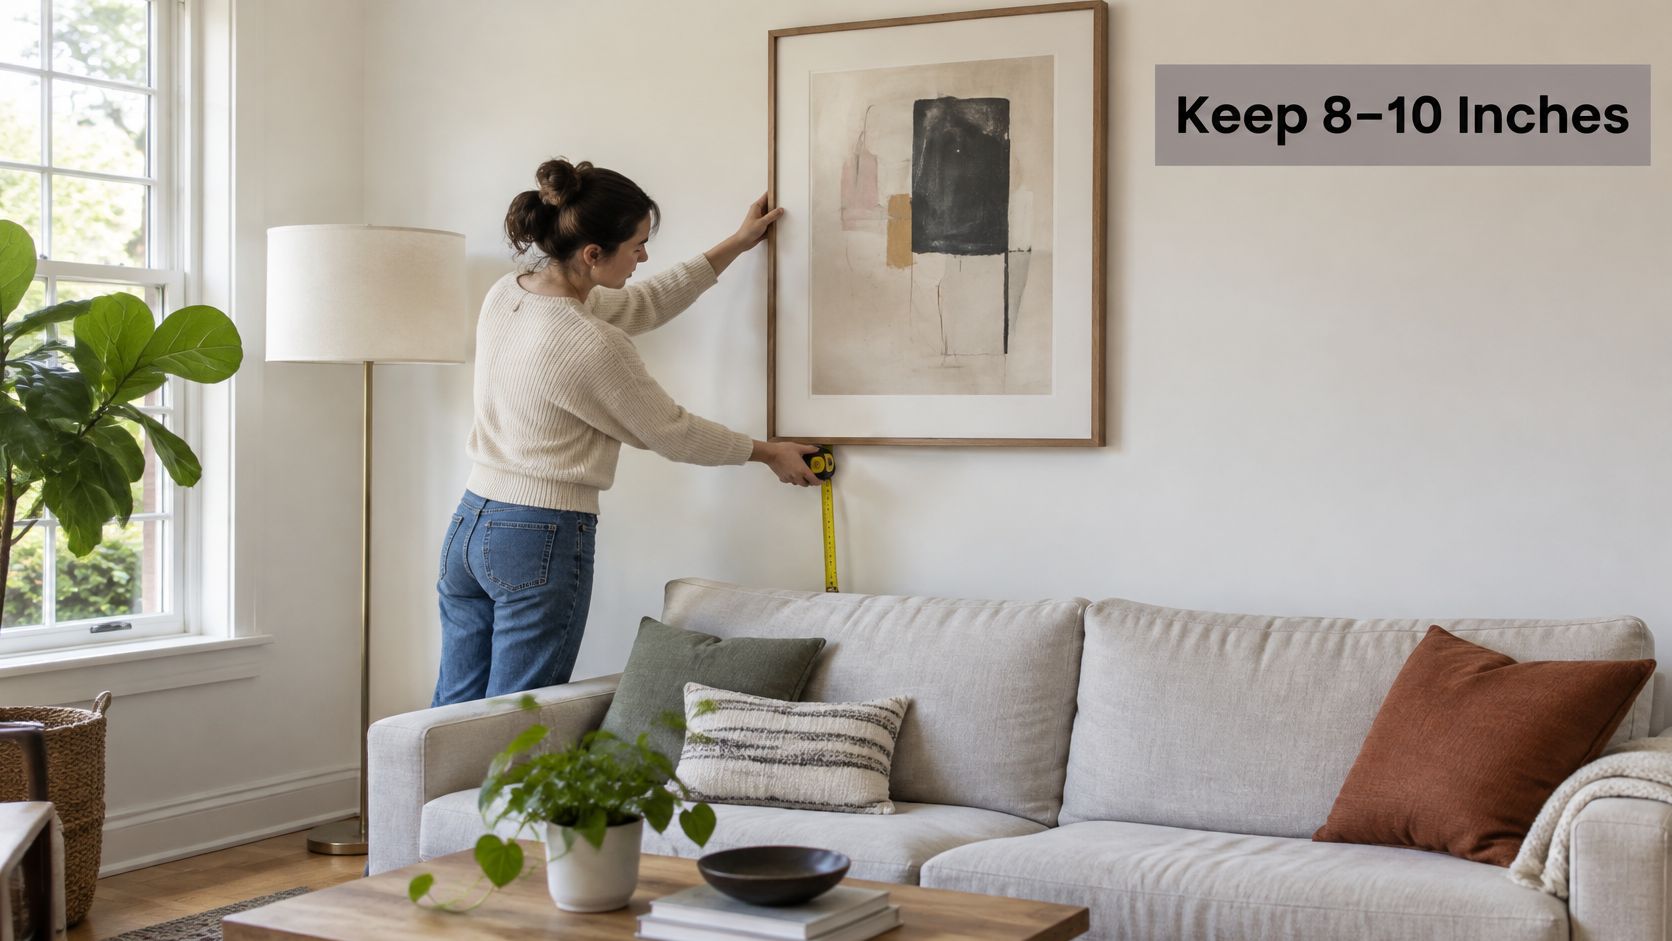
The working rule is a gap of 8–10 inches (20–25 cm) between the top of the furniture back and the bottom of the frame, the relationship guidance on hanging pictures correctly describes as the primary decision above sofas, consoles, beds and counters. Close enough that art and furniture read as one composition. Far enough that cushions, lamps and a leaning guest don't hit the frame. This is also where seated posture enters: a piece hung for a standing viewer can sit well above a sofa's seated sightline if you never check it from the cushion.
One worked example, start to finish
Say a sofa back measures 36 inches from the floor. Add a 10-inch gap and the bottom of the frame belongs at 46 inches. A 30-inch-tall framed piece then puts its center at 61 inches, right at the top of the baseline band and perfectly comfortable. Widen the gap to 12 inches and the center climbs to 63, which starts to feel like the art is floating away from the seating below it.
Now the useful diagnostic. If your furniture height plus the gap plus half the frame height puts the center much above 60 inches, the art is too small for what's under it. Don't raise the hook, change the piece: widen the frame, add a companion print, or build a three-piece grouping so the extra vertical space gets used by art rather than by empty wall.
Practical rule: Set the gap first, measure the center second, and only then decide whether the artwork is the right size.
Proportion matters as much as height. A single piece or a grouping should span roughly two-thirds to three-quarters of the furniture's width to avoid looking stranded. Above a bed, keep the arrangement narrower than the mattress so the whole thing reads as one unit with the headboard.
One more habit worth building: check the placement from the seat of the sofa, not from the doorway. Rooms are lived in at seated height, and a piece that reads beautifully on the way in can hang a full foot above the eye of everyone who sits down. For more on this specific case, hanging art above a sofa covers the measurements in room-by-room detail.
How to Measure and Mark the Hanging Height
The arithmetic here is short, and getting it right the first time saves spackle. Work through these six steps in order.
Choose the centerline for that wall. Use 58 inches as the default, then swap in the seated, accessible or furniture-led number where the room calls for it.
Measure the full framed height. Frame included, nothing cropped off. A 30-inch piece is the example here.
Halve it. 30 divided by 2 gives 15 inches.
Add the half-height to the centerline to get the top-of-frame elevation. 58 plus 15 puts the top of the frame at 73 inches.
Measure the hardware. If the piece hangs on wire, pull the wire up to the apex it will reach when the frame's weight rests on the hook, then measure from that apex to the top of the frame. Suppose that's 4 inches. Never measure slack wire, and never measure to the hook itself.
Subtract to find the hook height. 73 minus 4 gives 69 inches from the floor to the hook.
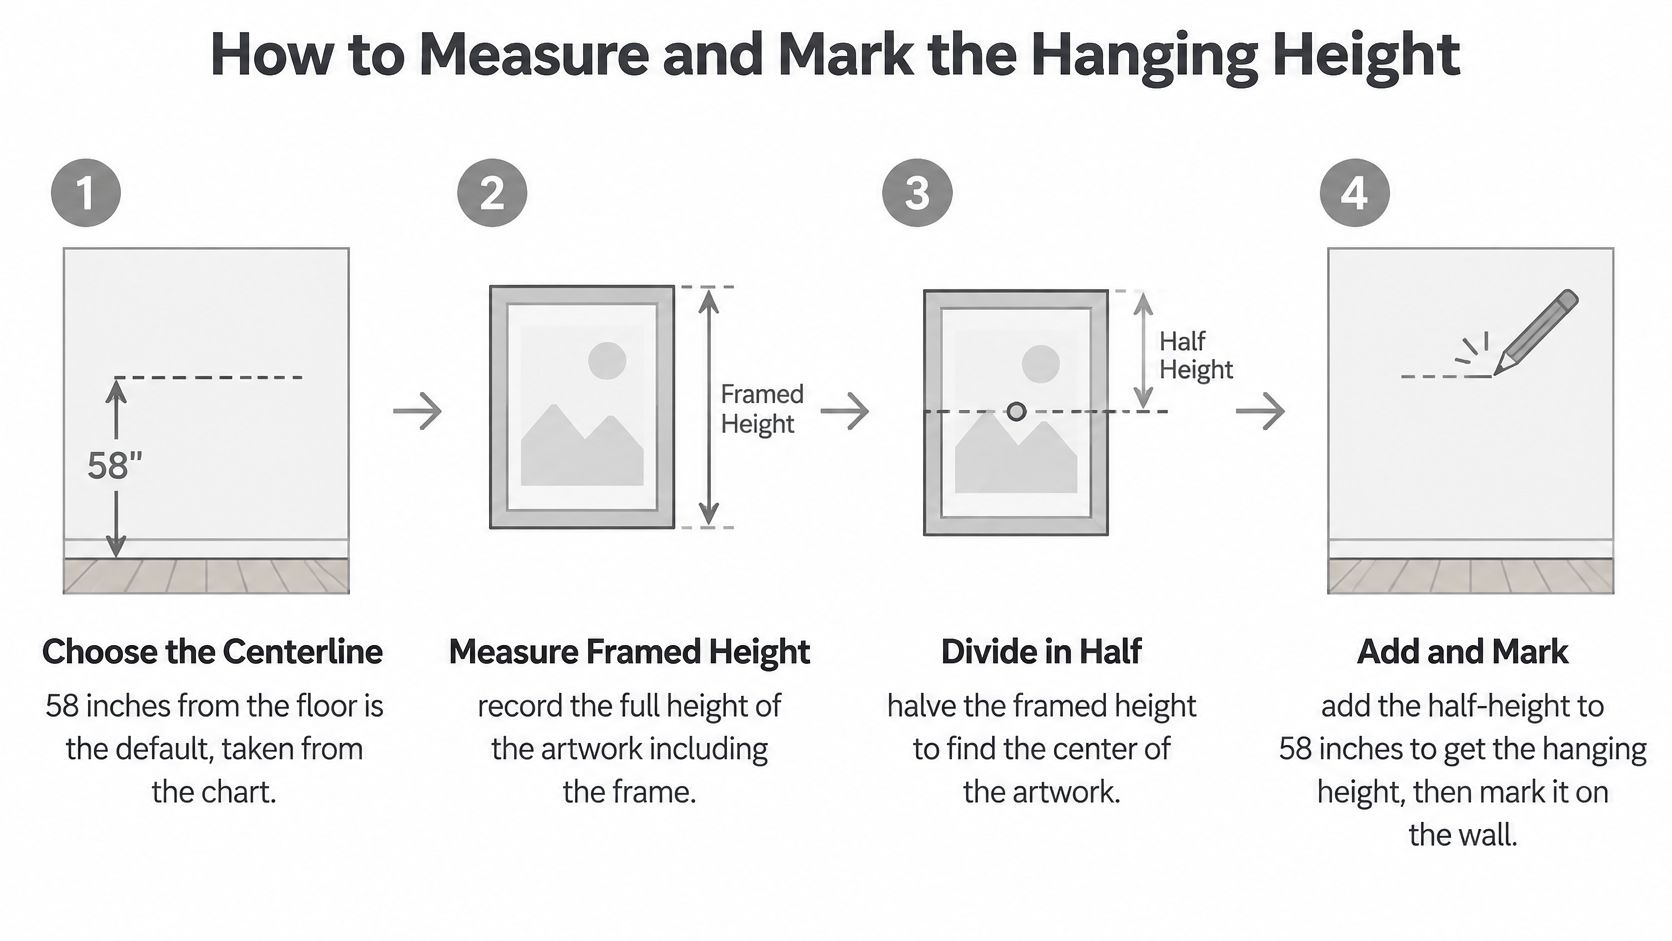
The rationale behind the whole sequence is human-centered viewing. Centering a composition near average standing eye level cuts the up-and-down head tilt and gives every room in a house a consistent sightline, which is how a lighting and display guide to gallery-worthy arrangement frames the 57–60 inch band with about 58 inches as the commonly cited middle. Hardware geometry is the variable that breaks the calculation, so the wire measurement has to happen on the actual piece, not on an assumption.
The mistake I fix most often: measuring to the slack wire instead of the taut apex. It puts the finished art an inch or two low, every time.
Multi-piece displays follow the same logic with one substitution. Find the center of the entire grouping, the visual mass of all the frames plus the space between them, and align that composite center to your chosen line. Not the center of the largest frame, which is the classic error on a gallery wall. For the drilling side of the job, from wall anchors to the right bit for plaster versus drywall, Suburban Furniture's step-by-step guide to hanging a picture with precision is a solid companion to the measuring above.
Test the Spot Before Drilling
Every number so far is a prediction. Paper is how you check it without paying for the mistake.
Cut a template at true size. Trace each frame onto craft paper, cut it out, and tape it to the wall at the calculated position. A grouping gets one template per frame, spaced as it will hang.
Mark the footprint in painter's tape. Tape the top edge, bottom edge and hook point. Now the whole occupied area is visible at a glance instead of living in your head.
Check from three places. The doorway you enter by, the main sofa or dining chair, and one standing spot in the middle of the room. The center should read within your target band from each of them.
Sit at wheelchair height. If the room serves visitors with varied mobility, take a seat at roughly wheelchair seat height and confirm small pieces sit inside the accessible band you chose and nothing forces an upward stare.
Sweep the clearance. Confirm the gap to the furniture back still reads as one composition, and that no door swing, switch plate, thermostat or cabinet door collides with the taped footprint.
Drill once. With the template confirmed, mark the hook through the paper and install.
Leave the templates up for a day. Morning daylight and evening lamplight show a position very differently, and a night's sleep makes the verdict obvious. When you do reach for the drill, match the bit to the wall: masonry for brick and block, a sharp brad point for timber, fine bits for plasterboard anchors. Drill bits for basic home repairs covers the sizes and types worth keeping on hand.
Mistakes to Avoid at Home
Hanging high to fill a tall wall. The wall isn't the reference, the viewer is. Keep the centerline where it belongs and solve the empty space with a bigger piece.
Treating the number as law in every room. A dining room, a child's bedroom and a lobby each need the adjusted band. One height for every wall guarantees several wrong ones.
Buying art that's too small for the furniture. A narrow frame over a wide sofa looks like a stamp on an envelope. Group pieces or size up before you size up the hook.
Skipping the seated check. A spot that looks right standing can sit a foot too high from the main chair. Sit down before you commit.
Scattering a gallery wall with no composite center. Align the center of the whole grouping to the chosen line and the frames will read as one object instead of five lonely ones.
Trusting your own eye level to do the measuring. Taller people hang tall, and high ceilings pull everything upward. That's exactly why the convention exists. In 2024, Bob Vila's picture-hanging guidance recommended placing the center of artwork 57 inches above the floor and described it as eye level for the average viewer, which is the same starting point a museum would give you. The number is dependable. Applying it without adjusting for the room, the furniture and the people is where it goes wrong.
When to Bring in a Professional
Run this five-point check before you decide to do it yourself.
Weight and size. A piece you can't comfortably lift onto a hook by yourself, or one wide enough to need two people on ladders, is an installation, not a quick job.
Height. Above stairwells, in two-story entries, over loft railings. High placement changes the anchors, the access and the risk.
Complexity. Grid displays, salon-style walls and mirrored pairs live or die on millimetre-level spacing.
Value or fragility. Anything insured, antique or framed behind museum glass deserves a hardware plan before a hole goes in.
Consistency across rooms. A commercial space needs the same viewing line through a dozen offices or a whole floor, not twelve individual judgment calls.
If two or more of those apply, the honest answer is that the measuring is the easy part and the installation is the job. Colorado Art Services has more than 15 years of experience in picture hanging and art handling across the greater Denver metropolitan area, and can turn your room measurements, furniture heights and main viewing posture into exact hook positions on site. The team handles artwork regardless of size, weight or delicacy, which covers everything from a single framed print to a monumental piece that needs high placement.
For a closer look at where the line sits between a weekend project and a call, DIY versus professional installation breaks down the cases. And when a job needs general repairs, patching or hardware work beyond hanging, handyman services like HoneyDo Crew can handle the wall itself before the art goes up.
Colorado Art Services provides art placement, layout and design, grid displays, mirror and sculpture hanging, heavy-piece and high-placement installs, plus local art moving, pickup and delivery and secure art storage across Denver and the Front Range. Bring the room measurements, the furniture heights and the main viewing posture, and the team will convert them into exact hook positions for a single piece or a whole building. Request a free estimate at Colorado Art Services and get the centerline right the first time.
Comments