


Picture Hanging Rod: A Practical Selection and Install Guide
You're standing in front of a wall you've already drilled twice. One frame sits a little high, another keeps tilting after the door slams, and the new piece leaning against the sofa doesn't fit either hole. That's the moment a picture hanging rod stops looking like hardware and starts looking like infrastructure. You fix the rail once, then you move hooks, cables, and frames along it without turning every layout change into patch, sand, and repaint work.
Why a Picture Hanging Rod Changes How You Display Art
A homeowner in a rental faces a familiar choice. She can add another cluster of nail holes for a growing gallery wall, or she can install one clean rail and rearrange the collection as it changes. An office manager hits the same problem at larger scale when quarterly displays rotate and facilities staff keep repairing the same drywall.
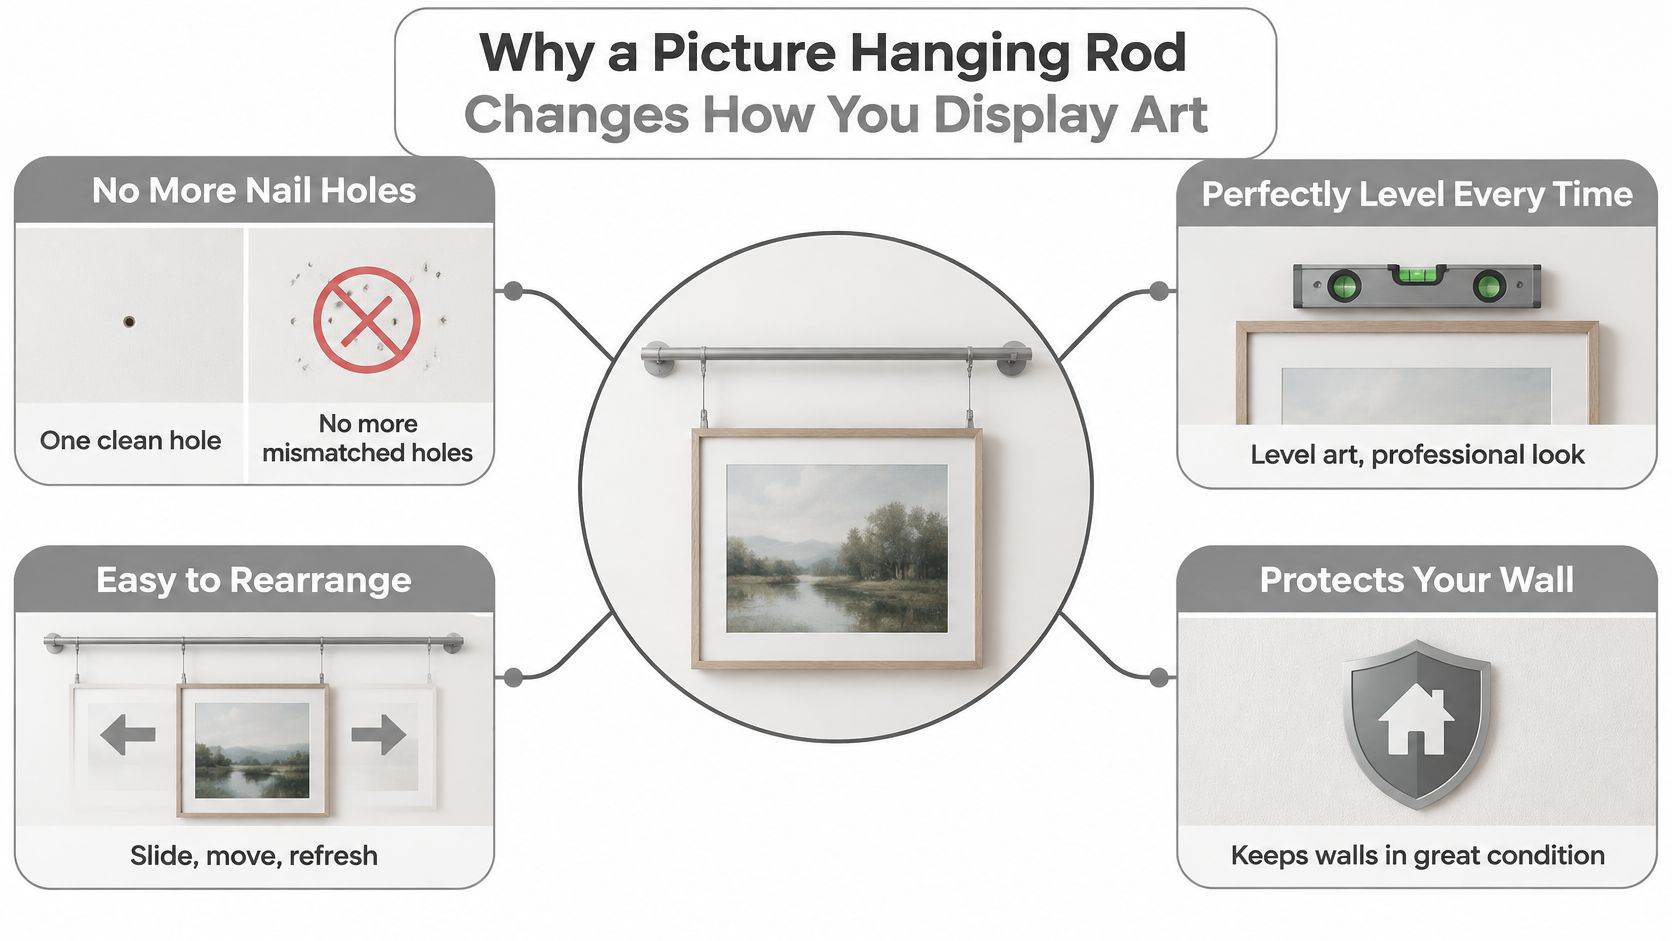
A picture hanging rod solves that repetition by separating two jobs that fixed hooks force together. The rail handles the permanent connection to the wall. Sliding hooks, cords, or rigid drops handle the artwork. You can nudge a frame left, lower it for a seated sightline, or swap it for a wider piece without creating a new penetration.
The diagram below shows why that separation changes day to day display decisions.
From Single Hooks to Adjustable Infrastructure
That idea isn't new. The June 23, 1970 U.S. picture-hanging device patent described a flat vertical rod that combined placement and wall marking in a single tool, and later systems evolved from simple fixed supports into adjustable rails. The direction matters. Installers stopped treating each frame as an isolated nail problem and started treating the wall as a reusable display system.
In practice, that gives you three advantages fixed hooks can't match:
Layout freedom: You can rebalance spacing after furniture moves, rather than living with holes that dictate the composition.
Cleaner walls: One properly planned rail line replaces repeated patching across the viewing area.
Repeatable leveling: Hooks on a straight rail give you a consistent reference, so you're not remeasuring every frame from scratch.
A rail doesn't make a bad layout good. It makes a good layout easy to adjust without punishing the wall.
There's a trade-off you should accept up front. A visible rail, rod, or cable becomes part of the room's visual language. In a historic interior with picture molding, brass rods can look intentional. In a minimal white box, you may prefer a low profile track painted to match. Flexibility is the win, but only if you choose hardware you'd still want to see when the wall is half empty between rotations.
Matching the Rod Type to Your Wall and Collection
Most buying mistakes happen when people shop by finish first. Start with wall construction, how often you will reconfigure, and what you are hanging. A lightweight print wall that changes monthly needs different hardware than a boardroom with large framed pieces that stay put for years.
Engineering history backs that range. The 2003 U.S. patent for a C-shaped picture-frame rail described drilled holes across its back, top, and lower lips so the quantity of screws could vary with frame size. In plain terms, even early modular designs assumed you'd scale fixings to the load, not trust one setup for everything.
Four Common Options Compared
Surface-mounted aluminum tracks are the workhorse for homes, offices, and galleries. They sit on the wall face, accept sliding cables or rods, and usually give the best balance of adjustability and clean appearance. They're forgiving when you need to add a drop later.
Recessed or ceiling-mounted tracks suit new construction, major remodels, or walls you shouldn't penetrate repeatedly. They look discreet, but they demand more planning. If the ceiling structure isn't where you expect it, installation gets complicated fast.
Cable-and-rod hybrids mix a wall rail with rigid vertical rods instead of flexible cable. Rods sway less and can look sharper in traditional rooms. Cables are easier to trim and store, but they can twist if you handle them carelessly.
Classic fixed-hook picture rails use molding near the ceiling with hooks and cord. They protect plaster in older homes and suit period interiors. They offer less precise micro-adjustment than modern locking hooks, and frames often tilt forward more.
Rod Type | Best For | Typical Weight Capacity | Wall Compatibility |
|---|---|---|---|
Surface-mounted track | Rotating home and office displays | Light to heavy, system dependent | Drywall with proper anchors, masonry |
Recessed or ceiling track | Minimal interiors, planned builds | Light to heavy, structure dependent | Framed ceilings, solid substrates |
Cable-and-rod hybrid | Traditional rooms, stacked arrangements | Light to medium per drop | Most walls with suitable rail fixings |
Classic picture rail | Historic homes with molding | Light to medium per hook | Plaster walls you want to preserve |
How Real Rooms Point to Different Choices
A Denver loft with heavy framed posters on brick points toward a surface track fixed into masonry, because you'll want strong, predictable anchors and easy lateral movement. A corporate boardroom often favors a discreet track painted to match, since facilities teams value quick swaps and a tidy line. A family room with children bumping furniture needs locking hooks and a rail placed so frames sit tight and don't swing freely.
Don't shortlist by appearance alone. Check ceiling clearance for lifting hooks into the track, confirm you can reach fixings at structural points, and ask how replacement hooks are sourced. A beautiful system with orphaned parts becomes a maintenance headache within a few years.
Measuring, Marking, and Planning the Layout
Bad installs usually fail before drilling. Someone eyeballs the center, drills the first hole, then spends the rest of the job compensating. Professional layout work is slower at the tape stage and much faster at the hanging stage.
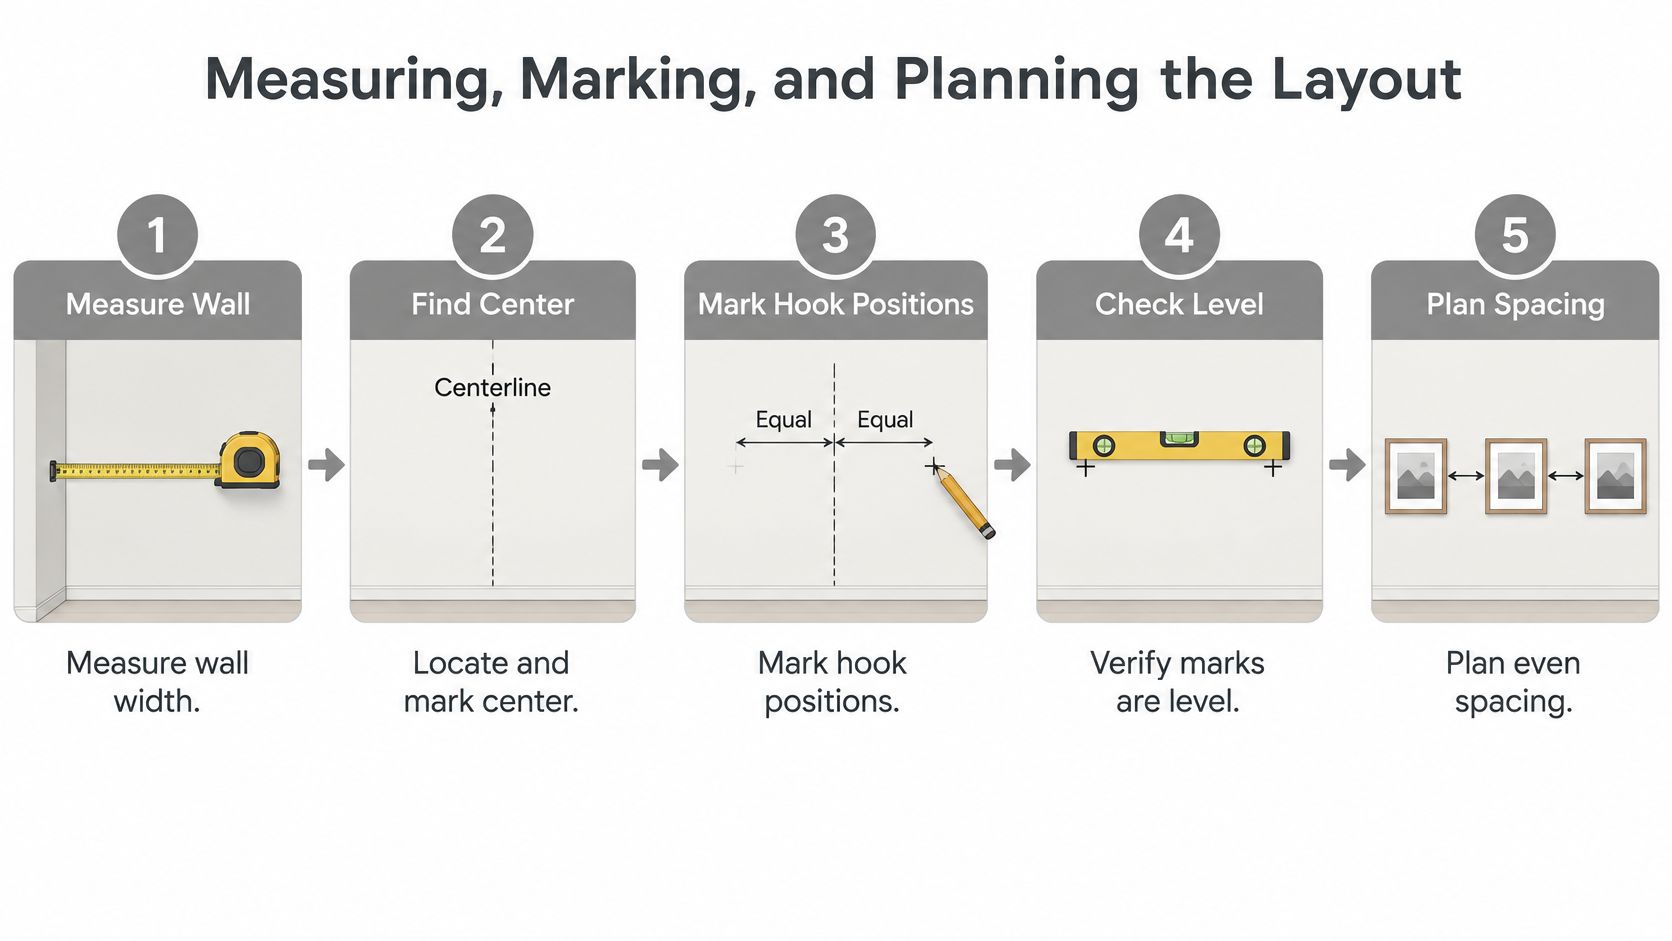
A reliable workflow starts with basics. The documented picture-rod workflow of measuring, scanning, and proof checking covers measuring the artwork and centreline, marking the intended rod elevation, scanning for studs, pipes, and electrical services, verifying the wall type, and performing a controlled proof check before hanging. Skip one step and you inherit risk you can't see.
The five-step sequence below mirrors how installers keep that planning order straight.
A Homeowner Gallery Wall Done in Order
Start with the room, not the frame. Measure the usable wall between door casing, switches, vents, and furniture. If you're working solo, it's worth having a reliable tape on hand, and you can browse the 5m tape measure as an example of the simple tool that prevents most layout guesswork. Mark the wall centerline lightly in pencil, then decide whether the composition centers on the wall, the sofa, or a credenza. Those centers rarely match.
Next, tape the rail elevation and the outer frame edges with painter's tape. Step back and check door swings and walk-by sightlines. Tape is cheap. Relocating anchors isn't.
Measure each frame: Record width, height, and where the wire or D-rings sit under tension.
Convert to hook positions: Translate frame centers into drop locations along the rail.
Scan before marking fixings: Confirm studs and services, then shift fixing points to sound structure where possible.
Dry-fit the rhythm: Hang the largest piece first on paper or tape, because it sets spacing for everything else.
Watch how layout decisions play out in motion before you commit to holes.
One final check saves headaches. Photograph your taped layout with measurements visible. If you pause the project or hand it to a helper, that photo preserves decisions you'd otherwise re-argue from memory.
Mounting the Rod Step by Step on Drywall and Masonry
Mounting is where a load-path-first mindset matters. Identify the substrate, locate studs or solid masonry, choose compatible fasteners, and keep the total load within the weakest component's capacity. Ratings vary widely between systems. Published rail benchmarks showing 175 lb and 100 kg per metre system ratings include one system rated at 175 lb (79 kg) when properly installed with eight No. 6 screws and anchors, while another specifies 100 kg per metre. Those are system ratings, not universal drywall capacities, and you shouldn't transfer them to your wall without matching the specified fixings.
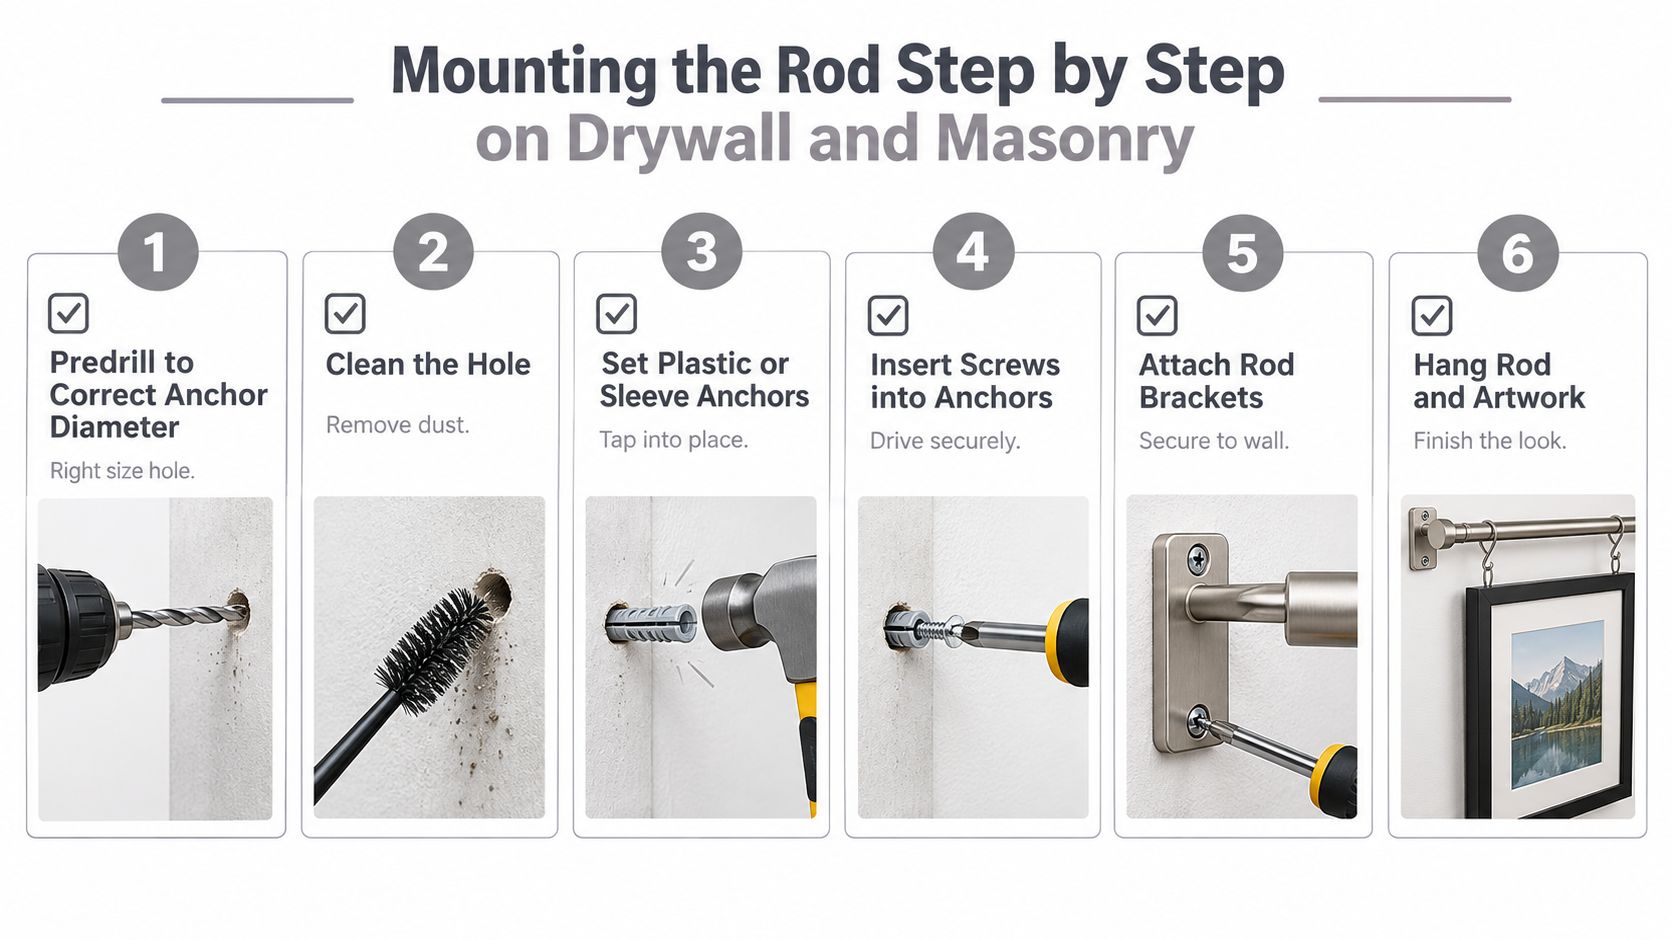
Use the checklist below as your sequence, not as a suggestion to rush.
Drywall Installation Sequence
Mark a level reference line, then mark fixings at studs or manufacturer-specified centers. Predrill to the anchor diameter, clean dust from the hole, and seat the anchor without crushing the gypsum face. If the paper face tears or the anchor spins, stop and change strategy. A spun anchor won't recover because you wish harder.
Tighten progressively along the rail. Snug one end, move to the middle, then the far end, and repeat until firm. Fully tightening one end first can bow the track and pull later fixings out of line. For a deeper breakdown of substrate matching before you drill, review this anchor selection guide for picture hanging systems alongside the manufacturer's instructions for your exact rail.
Masonry and Ceiling-Mounted Variations
On brick or concrete, use a masonry bit matched to the shield or sleeve, drill to proper embedment, and blow or brush the hole clean so the anchor grips the substrate rather than dust. Avoid weak mortar joints when the layout allows a fixing in solid unit material. If you're comparing regional wall types and fixing habits, guidance on how to secure picture frames on Australian walls is a useful reminder that hard-wall technique changes with substrate, even when the frame looks identical.
Where wall material is unsuitable, a ceiling-mounted track can move the load to joists or solid structure overhead. That only works if you find that structure. Guessing at joist locations trades one weak substrate for another.
Two-Point Hanging and Proof Loading
For wider frames, use two suspension points when hardware permits. You'll reduce rotation and spread load across hooks and rail fixings. Single-point hanging is convenient, but it lets frames pivot every time someone brushes past.
Practical rule: Proof-load gradually before artwork goes up, then watch for rail movement, fastener pull-through, cable slip, and frame tilt.
Apply a controlled test load, leave it briefly, and recheck level at the rail face and along its length. If anything creeps, fix the cause now. Artwork shouldn't be your test weight.
Understanding Real Weight Limits and Load Paths
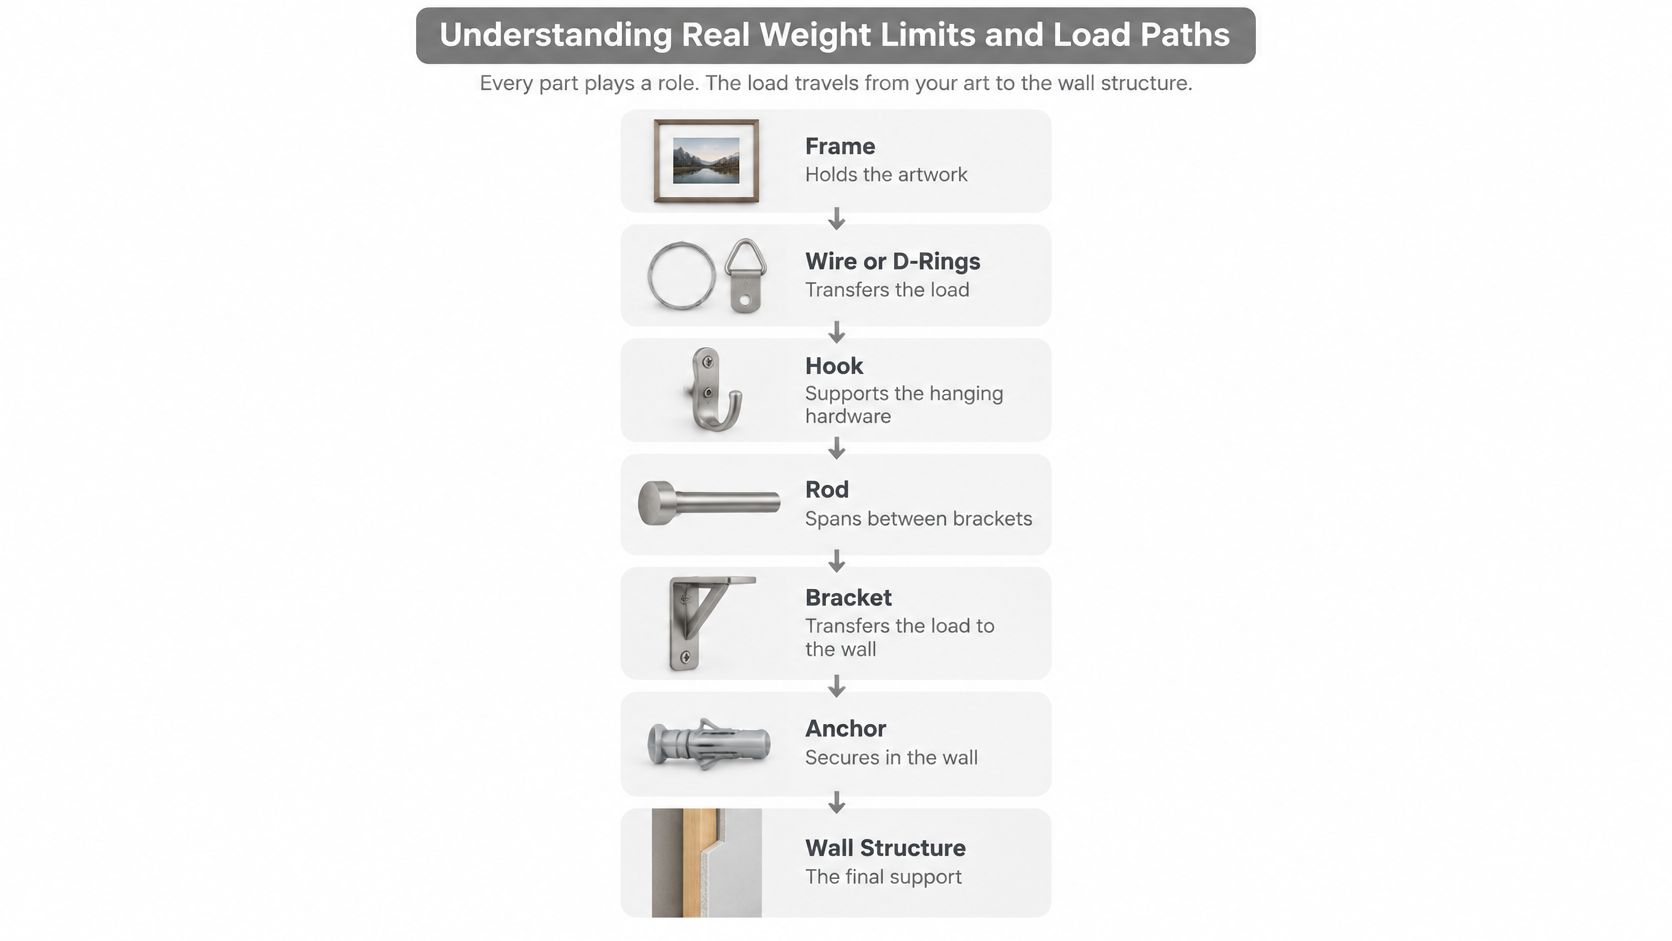
The number printed on a box answers the wrong question. You don't hang art from a rating. You hang it from a chain, and every link in that chain either carries the load or becomes the failure point.
Trace it in order:
Frame attachment: D-rings, wire, or plates screwed into the frame molding
Hook or rod connection: The locking hook, cable grip, or rigid drop that carries vertical load
Rail and brackets: The track profile and any clips transferring load to screws
Anchor and substrate: Stud, masonry, drywall anchor, or plaster that ultimately resists pull-out
The hierarchy below visualizes that path from frame to structure.
Where Systems Actually Fail
On a framed print, the wire is often the quiet limiting component. Old wire frays at the D-ring, knots slip, and a steep wire angle multiplies tension at the frame sides. The rail can be perfectly sound while the frame hardware is ready to let go.
On a heavy mirror, the anchor usually governs. Drywall alone can't be wished into structure, and that's why stud engagement is the single most valuable upgrade on framed walls. If you're unsure what your wall build-up can realistically support, consult this explanation of drywall load capacity for art hanging before you scale up frame size.
Dynamic forces widen the gap between static ratings and real life. Cleaning staff bump frames, doors vibrate walls, and someone catching a corner while moving furniture applies a short, sharp load no catalog photo simulates. Two-point suspension helps because it shares load and resists rotation, but it doesn't rescue a weak anchor.
For heavy, valuable, or public-facing work, specify a conservative working load below the published rating. Get manufacturer or engineering confirmation for unusual walls, seismic exposure, or loads that project away from the wall. If the weakest link can't be identified and verified, you don't have a weight limit. You have a guess.
Placement, Accessibility, and Room-by-Room Guidelines
Most guides hand you one hanging height and move on. That shortcut fails in dining rooms where viewers sit, corridors where people pass with bags, and galleries serving wheelchair users, children, and people with low vision. A rail gives you adjustability. It doesn't automatically give you good placement.
Neutral accessibility guidance recommends placing artwork centers around 40 to 50 inches above the floor in many situations, while other guidance identifies objects between 27 and 80 inches as potential bumping hazards and limits wall-mounted protrusion to 4 inches unless specific exceptions apply, as summarized in the Toronto Arts Council accessibility toolkit guidance on artwork placement. Treat those figures as planning constraints, not decoration trivia.
Placement by How the Room Is Used
In living and dining areas, lower centers often work better because viewers are seated. In hallways, prioritize clearance and keep deep frames out of pinch points near door swings. In offices and multifamily common areas, plan for mixed mobility from the start, rather than lowering one piece as an afterthought.
Glare belongs in the same audit. Adjustable cables let frames tilt, and a slight forward tilt can either kill a reflection or create one depending on window and fixture positions. Test placement at the time of day the room is used. For a refresher on sightlines before you set rod elevation, see this guide to eye-level art hanging placement.
A Denver-area office with a rotating display shows the payoff. One rail line lets staff rebalance a changing group of pieces without re-drilling, while keeping centers within a comfortable viewing band for standing and seated visitors. In a home dining room, a lowered rod and shorter drops keep art in the seated sightline instead of floating above everyone's heads.
Run a pre-install audit for switches, vents, furniture backs, and circulation paths. Visual accessibility and physical safety aren't the same thing. A piece can be easy to see and still project into someone's shoulder line.
Maintenance, Troubleshooting, and When to Call a Pro
Installed hardware needs inspection, especially as collections get larger and heavier. Designers surveyed for 2025 expected increased use of paintings and sculpture, with 46% planning to display more paintings and 41% more sculpture, and institutional guidance says hardware must be matched to weight and shape, studs should be used where possible, and large or heavy works may require multiple plates on each side, per the Arts Commission and Toledo Museum artwork hanging guidance. Bigger statement pieces raise the cost of neglecting small hardware changes.
Build a simple quarterly routine:
Recheck level: Confirm frames haven't crept and hooks still lock without slip.
Inspect cables and rods: Look for fraying where cable bends over hooks and for worn locking teeth.
Check fixings: Look for cracked paint around screws, rail flex on long spans, and anchors working loose.
Dust the rail: Grit inside a track makes sliders drag and encourages people to force adjustments.
Common faults have readable causes. A sagging rail on a long span usually means fixings are too far apart or missed structure. A chronically crooked frame often traces to uneven wire tension or single-point suspension. A slipping hook means wear, overload, or a mismatched cable diameter. Don't compensate by over-tightening. Replace the failing component.
Call a professional for very heavy or oversized pieces, plaster and lath walls, historic fabric, commercial code requirements, or any install where failure could injure someone or destroy irreplaceable work. Record rod type, anchor type, spacing, and artwork weights as you go. Future you, or the next installer, will work faster and safer with that history.
If your wall needs a picture hanging rod system matched to its substrate, artwork weight, and sightlines, Colorado Art Services plans and installs adjustable rails, rods, hooks, and anchors for homes, offices, and galleries across the Denver Metro and Front Range. Tell us what you're hanging and how often it will change, and we'll specify and mount a system built around the full load path. Start your project with Colorado Art Services.
Comments