


Mirror Hanging Instructions: Safe Steps for Any Mirror
The mirror is leaning against the wall, you've picked the spot, and the packet of screws looks reassuringly simple. Then you lift it and realize the central question isn't whether you can get it level. It's whether the frame, hangers, fasteners, and wall can carry that weight without anything loosening or breaking.
Good mirror hanging instructions start with the load path, not the pencil mark. Work out what you're hanging, what's behind the wall, and how the hardware connects them before you drill.
Match Hardware to Mirror Weight and Mount
Hardware and fixings by mirror weight and mount
Mirror size and weight | Mount type | Hardware and anchor | Minimum fixings |
|---|---|---|---|
Small, lightweight mirror within its hanger's published rating | Sawtooth or D-ring hanger | Rated picture hook compatible with the wall | Manufacturer's specified fixing arrangement |
Wider framed mirror within the hanging system's rating | Paired D-rings, approved wire, or keyhole hangers | Stud screws or rated cavity anchors | Separated attachment points specified by the system |
Heavy framed mirror | Hanging plates or frame-mounted brackets | Screws into studs or approved structural fixings | Both frame attachment locations supported |
Very heavy mirror or large glass assembly | French cleat or continuous support channel | Structural screws into studs or blocking | Cleat fasteners and bottom restraints specified by the system |
Frameless or bathroom mirror | Mirror clips with protective spacers | Clips anchored to the wall and overlapping the glass edge | Supporting and retaining clips specified by the manufacturer |
Mirror with pre-attached back hardware | Keyhole slots or bonded brackets | Wall screws matched to the bracket and substrate | As the manufacturer specifies |
Find the row that matches the complete installed assembly, including glass, frame, backing, and attached hardware. These are selection categories, not universal weight limits. A mirror's dimensions alone don't tell you which fixing to buy.
The Home Depot's heavy-mirror guide supports selecting hardware for the installed weight and wall material, using at least two fixing points, and avoiding the assumption that paired anchors share the load equally.
Weigh the assembly before shopping
Use the manufacturer's published weight if it includes the complete mirror. Otherwise, weigh it safely on a suitable scale. For a manageable mirror, weigh yourself holding it and subtract your own weight. Don't attempt that method with glass you can't control comfortably.
Inspect the existing back hardware too. A strong wall anchor won't compensate for a loose D-ring or a bracket screwed into thin decorative backing.
Compare the anchor's published working-load rating with your application, not an advertised maximum pull-out figure. Check wall thickness, screw requirements, and loading direction. Leave capacity margin rather than selecting hardware right at its stated limit.
Buying rule: Choose a complete compatible system, not a collection of individually strong-looking parts.
Wire allows some adjustment but can let a mirror move. Direct brackets provide more positive positioning; cleats distribute support more broadly but require compatible frame construction and clearance. Compare the options in our guide to mirror hanging accessories.
For this workflow, use mechanical support rather than improvising with adhesive alone. Write the mirror's total weight, wall material, hanger type, and chosen fasteners on a card before shopping.
Check the Wall and Hidden Utilities Before Drilling
Trusting a stud finder alone is a common mistake. Its signal is a clue, not proof that you've found suitable timber or a safe drilling route. Dense plaster, metal components, and concealed services can complicate the reading.
Identify whether you're working with wood-stud drywall, plaster and lath, tile over a backing material, concrete, masonry, or steel-stud drywall. Tapping can help distinguish hollow from solid areas, but it won't establish the wall's construction or carrying capacity.
Confirm the substrate and drilling route
Use a stud finder to map candidate locations, then check them against the wall's construction. Our instructions for finding studs in drywall explain the locating process. Only make a confirmation hole after checking for concealed services.
Scan for electrical cables, plumbing, and metal with suitable detection equipment. A non-contact voltage detector alone can't clear a wall for drilling, and a quiet reading doesn't prove the area is safe. Treat routes near outlets, switches, and plumbing fixtures cautiously.
For renovation planning, Interiors by DeX's resource on how to avoid wiring mistakes in Chennai villas provides useful context for coordinating interior work with wiring decisions. It doesn't replace checking the actual drilling location.
Gather a tape measure, pencil, painter's tape, torpedo level, stud finder, suitable detector, drill, substrate-specific bits, driver, and safe lifting help. Then follow this decision sequence:
Identify the wall: Establish what will hold the fastener.
Locate services: Resolve uncertain cable or pipe routes before drilling.
Confirm the load: Include the complete mirror assembly.
Select and verify: Match the mounting system to the substrate and test it as instructed.
A level appearance isn't proof of performance. SATRA describes a wall-hanging test that applies additional downward force for 48 hours, illustrating why sustained loading matters. That's a laboratory procedure, not a home test to reproduce with extra weights.
Stop for professional assessment if construction is unknown, wiring can't be traced, plaster is crumbling, tile is fragile, glass is difficult to control, or the installation requires awkward overhead ladder work. A stronger anchor doesn't fix an unsuitable wall.
Set Mirror Height for Real Viewing
Mirror height references by location
Location | Bottom edge height | Center or top guidance |
|---|---|---|
Vanity or sink mirror | Clear the backsplash, faucet, and cleaning area | Check the reflection from the normal standing position |
Accessible lavatory mirror | Confirm applicable accessibility requirements for the reflecting surface | Validate seated sightlines and fixture clearances |
Entryway or hallway mirror | Coordinate with furniture and circulation | Position for the regular users, not an assumed universal eye level |
Full-length or closet mirror | Set low enough for the intended full-body view | Check the tallest regular user's reflection |
Seated or wheelchair-user space | Establish with a seated viewing test | Check from the actual approach and grooming position |
A single eye-level measurement won't serve every room. A secure mirror can still be unusable if a seated person can't see themselves, a faucet blocks the reflection, or a ceiling light produces glare.
The New York State public-sector mirror specification emphasizes accurate installation without distorted reflections and fastenings that avoid point-loading the glass. For accessible work, confirm the governing requirements rather than treating a decorative spacing recommendation as a compliance rule.
Test the position with a template
Cut paper or cardboard to the mirror's exact outline and tape it at the proposed height. Have the shortest and tallest regular users check it from their usual standing positions, then repeat from a seated position where relevant.
The template establishes the outline, not the actual reflection. Use a safely held smaller mirror within that outline to assess sightlines and glare without repeatedly lifting the full assembly.
Check lighting: Look toward the proposed mirror from normal viewing positions.
Check moving parts: Open doors and cabinet fronts through their full swing.
Check fixtures: Leave practical access around faucets, outlets, and towel bars.
Allow a trial period: Keep the template up while you use the room normally.
A purpose-designed tilting mount may improve viewing angles, but it changes reflected proportions and the mounting geometry. Don't create a tilt by loosening screws or packing random material behind the frame.
Our mirror hanging height guide offers additional placement considerations. Settle the outline before transferring any fixing marks.
How to Hang a Standard Mirror Step by Step
Use the instructions supplied with your mirror and mounting system as the controlling details. The manufacturer installation guide hosted by Lowe's specifies 1/8-inch pilot holes for solid wood and 1/4-inch holes for certain drywall or concrete installations, together with outward and downward checks of the installed screws. Those hole sizes aren't universal substitutes for your anchor instructions.
Mark, fasten, and verify
Measure the actual engagement points. Measure from the mirror's top and side edges to where the screws or hooks will carry the hanger. With wire, account for its loaded position; measuring only the attachment screws on the back can put the mirror at the wrong height.
Transfer the measurements to the template. Keep the template at the approved viewing height and mark the fixing locations through it. Confirm that the pattern hasn't been reversed while transferring measurements from the mirror's back to the wall-facing layout.
Establish a level reference. Remove the template as needed and use a torpedo level to check the fixing marks. Don't assume a nearby countertop, ceiling, or door casing is level.
Align with suitable structure. Mark confirmed stud centers and compare them with the proposed fixing locations. If they don't align, use an approved cleat arrangement or a rated anchor system rather than angling screws toward a stud.
Drill and install the fixings. Use the bit, hole depth, and installation method specified for the actual substrate. Seat anchors correctly and leave only the screw-head projection the hanger requires; excessive projection increases leverage and can prevent proper engagement.
Check the hardware before lifting. Apply the manufacturer-directed outward and downward checks to the bare fixings without exceeding the system's limits. If a screw spins, an anchor shifts, or the surface breaks away, stop rather than hanging the mirror to see whether it holds.
Lift and engage every hanger. Use a helper when the mirror is large or awkward, and agree on the lifting and lowering sequence beforehand. Lower it deliberately onto the intended engagement points, keeping hands clear of pinch locations.
Check seating, level, and movement. Confirm that each hanger is fully engaged, then check the top edge with the level. Gently assess the lower frame for rocking or rotation without pushing on unsupported glass.
The graphic summarizes the installation sequence; follow your hardware's specific requirements for screw projection and final seating.
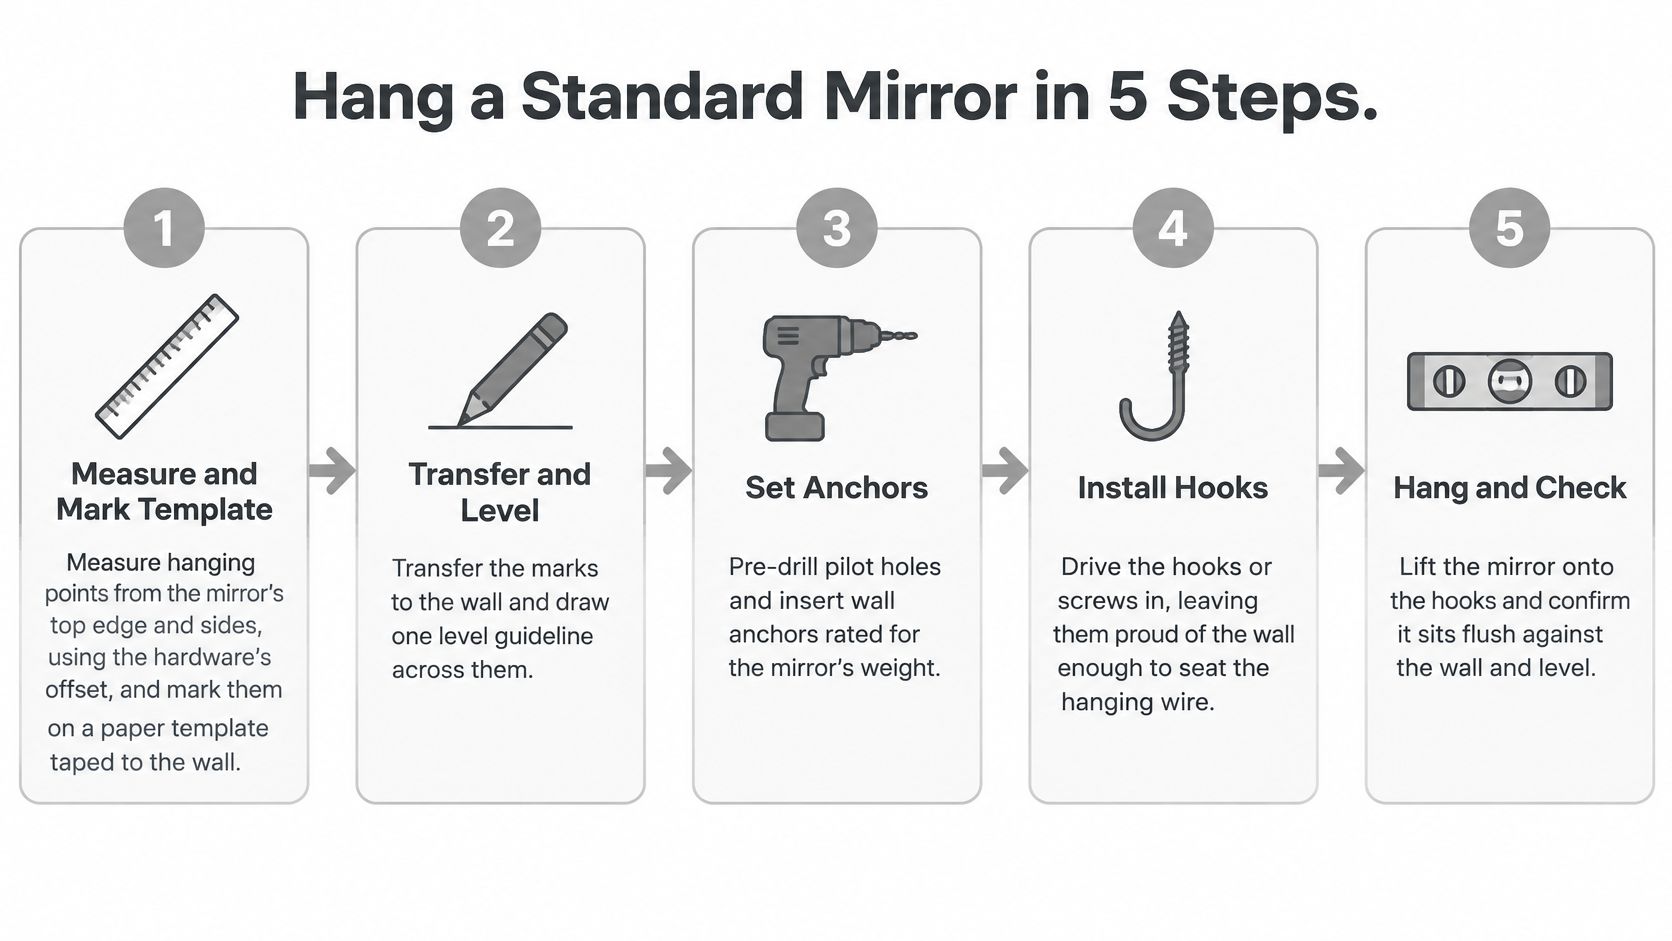
A fixing that moves during the pre-hanging check has failed the check. Don't conceal the problem behind the mirror.
How to Hang Large and Heavy Mirrors Safely
A falling mirror creates an impact hazard and a broken-glass hazard. FEMA's picture and mirror safety guidance recommends two hooks rather than one for large mirrors, specifies that long-shanked open eye-hooks penetrate the stud rather than only drywall or plaster, and identifies a minimum hook length of 1 to 2 inches where sufficient embedment is required. Select the actual fastener length for the wall build-up and mounting system, not that dimension alone.
Plan a controlled lift with clear access and somewhere safe to set the mirror down.
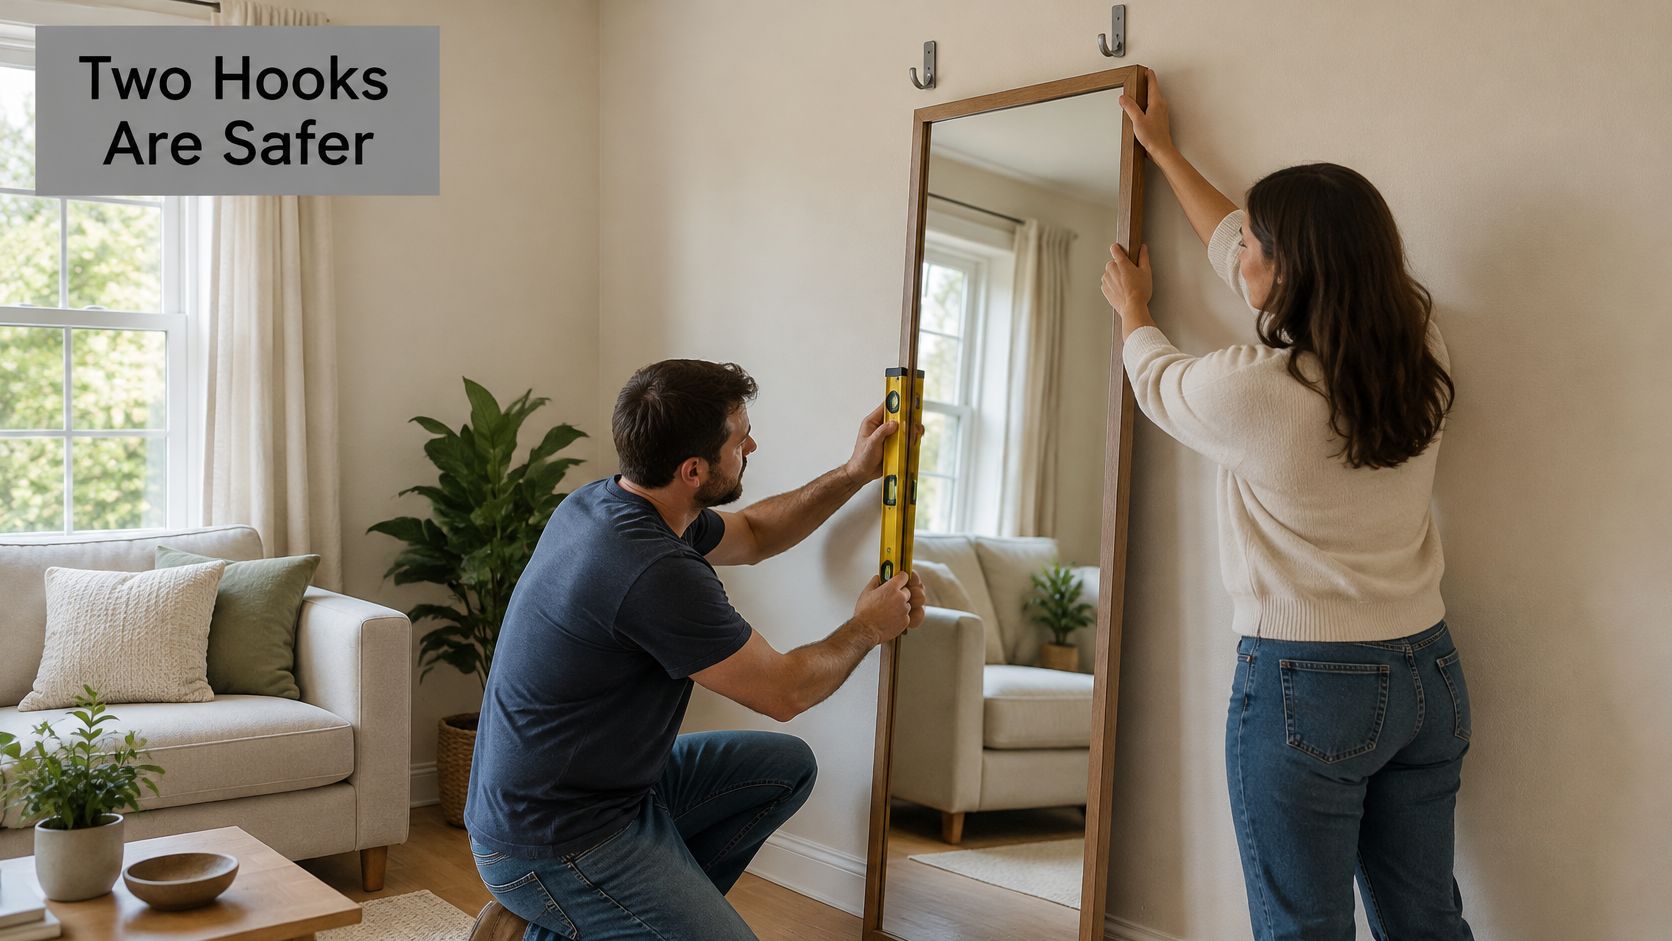
Build a continuous structural load path
A heavy mirror needs sound connections at both ends of the mounting system. Inspect the frame for loose joints, splitting, or inadequate material where the hanger attaches. Thin backing board isn't structural support just because it covers the whole back.
Use this sequence for a compatible cleat or channel installation:
Map the structural supports. Establish where the system can fasten into studs, suitable masonry, or installed blocking.
Install the wall support. Level the cleat or lower channel and fasten it using the specified structural hardware.
Secure the mirror-side component. Attach it to suitable frame material, or use the mirror manufacturer's approved factory brackets.
Fit movement restraints. Install compatible lower restraints or locking components without clamping or stressing the glass.
Lift and seat deliberately. Wear suitable handling gloves, support approved frame locations, and confirm full engagement before releasing the load.
A cleat can distribute support across a wider area and reduce localized tilting forces. It can't make a weak frame, damaged wall, or unsuitable screw connection safe.
Consider a broad framed mirror on a centered hook above a bench. Even if the hook carries the vertical load, someone brushing the frame can rotate it. The bench also puts a person directly below the glass, making both restraint and placement important.
FEMA advises avoiding large mirrors above beds, chairs, and couches. Choose a location where a failure is less likely to strike someone, rather than treating stronger hardware as permission to ignore the consequences.
This video offers an additional visual reference for planning the mounting operation.
Fix Common Problems and Confirm a Safe Hang
Mirror hanging problems, causes and fixes
Symptom | Likely cause | Fix |
|---|---|---|
Mirror tilts to one side | Uneven hook heights, incomplete engagement, or a loose anchor | Remove the mirror, remeasure from the level line, and correct the fixing or engagement |
Mirror rattles or knocks the wall | Missing spacers or movement restraint | Fit compatible bumpers or the specified lower restraint |
Screw spins or pulls out | Failed anchor or incompatible substrate | Remove the load and establish a sound fixing location; don't reuse a damaged hole |
Cleat will not seat | Insufficient clearance, debris, or misaligned components | Clean and inspect both components; correct alignment without forcing engagement |
Hairline crack after hanging | Edge damage, twisting, or concentrated support pressure | Take the mirror out of service safely, investigate the support, and replace cracked glass |
Don't adjust loaded hardware while someone steadies the glass. Take the mirror down before moving hooks, changing anchors, or correcting a cleat. Tightening harder isn't a reliable cure for movement, particularly where clips bear against glass.
Confirm the installation without stressing it
Recheck level and inspect the corners and edges under good light. Look for gaps around fasteners, crushed wall surfaces, shifting brackets, or a frame that no longer sits as intended. A change in position deserves investigation even if the mirror still looks nearly level.
Inspect again after the installation has remained loaded and after cleaning or an accidental knock. Check screw tightness only as the mounting instructions permit; don't automatically retighten clips against glass. Remove a loose installation from service instead of repeatedly adjusting it under load.
Stop condition: Cracked glass, moving anchors, or an uncertain load path calls for unloading and assessment, not a cosmetic adjustment.
Use the troubleshooting graphic as a prompt to inspect, not as permission to alter wire length or tighten hardware without checking the actual mounting system.
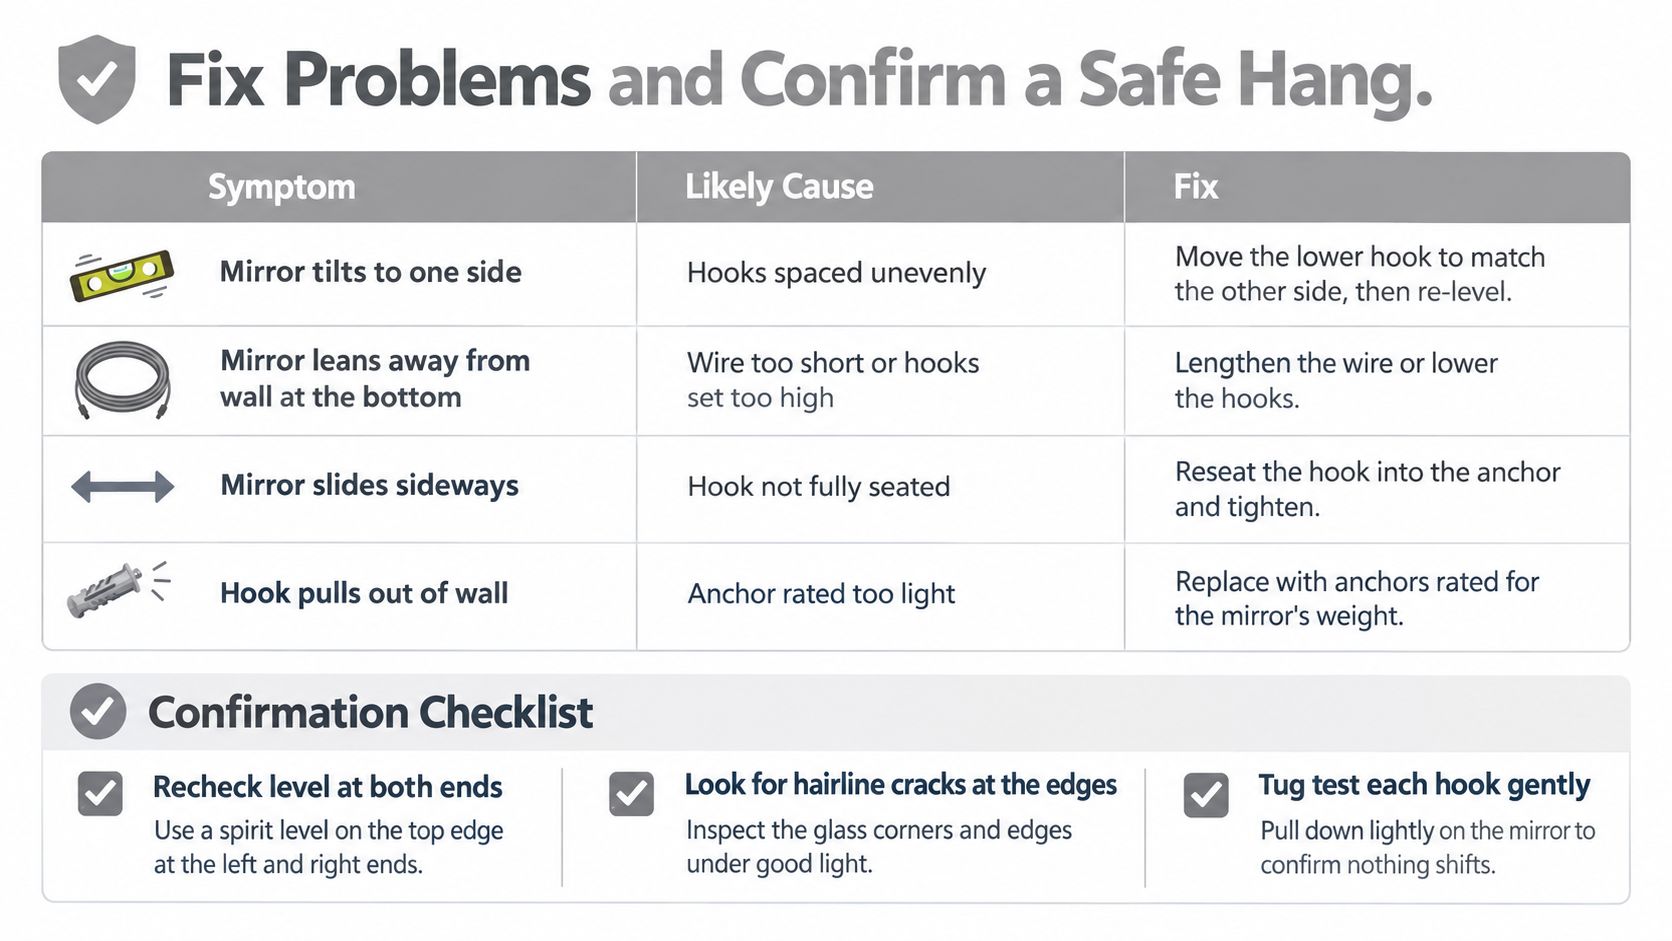
Before calling the job finished, confirm:
Level and seating: The frame is level and every hanger is fully engaged.
Rated support: Wall fixings, frame hardware, and connecting components suit the installed load.
Movement control: Required restraints are fitted and the mirror doesn't rock.
Protected glass: No unintended metal contact or concentrated pressure bears on an edge.
Safe surroundings: The placement avoids occupied fall zones and moving fixtures.
Sound wall: There's no cracking, anchor movement, or unexplained deformation.
If the wall construction, concealed services, lifting operation, or glass condition remains uncertain, stop and arrange professional assessment. For an estimate, have the mirror dimensions, installation height, wall surface, and access requirements ready. Our contact form asks about piece count, ladders or scaffolding, hard-surface drilling, and the largest piece's dimensions.
We offer Mirror Hanging, Heavy Piece Hanging, and placement services, with a free estimate for art hanging, display, and installation work. Visit Colorado Art Services to describe your mirror, wall surface, and access conditions so we can assess the installation before you commit to an improvised fixing.
Comments