


Art Mounting Techniques for Frames and Walls
You've cleared the living-room wall, but the pieces leaning against it don't need the same treatment. A paper drawing needs protection inside its frame, a framed print needs dependable hanging hardware, the hallway mirror needs structural support, and a large canvas needs a mount that won't twist its frame.
Good art mounting techniques solve three different problems: protecting the object, transferring its weight safely into the building, and placing it where people can see it without walking into it. Start with those decisions, not a packet of hooks.
Choose the Mount Before You Buy Hardware
Mount choice by object and wall
Object | Primary mount | Avoid | Capacity cue |
|---|---|---|---|
Work on paper or photograph | Reversible window mount with suitable hinges or non-adhesive supports | Tape, glue, or direct permanent adhesive | Artwork must be removable without damage |
Smaller, lighter framed print | D-rings with rated wire, or separate wall hooks | String or an unverified center hook | Check the complete hanging assembly |
Wide or heavier framed work | French cleat or security hanger | Single drywall anchor | Transfer load into suitable structural support |
Mirror or oversized panel | Substrate-rated anchors or a stud-mounted cleat | Ordinary picture hook chosen by appearance | Include glass and frame in the load |
Wall sculpture | Padded bracket, cradle, or cleat | Bare plaster contact or a lone nail | Match support to the center of gravity |
Rotating office or gallery group | Rail or cable system | New holes for every swap | Check track, sliders, cables, and individual hangers |
Very heavy or high placement | Professional blocking, cleat, and documented inspection | Manufacturer rating used alone | Allow a conservative capacity margin |
Separate the object mount from the wall mount
A drawing has an internal mount that protects the sheet and an external hanger that supports its frame. Confusing those jobs leads to mistakes such as gluing paper to backing board because the finished frame needs to feel rigid.
Weigh the finished object, including glazing, backing, and attached hardware. Then name the wall: wood stud, metal stud, plaster over lath, masonry, or hollow drywall. A screw that works in a wood stud isn't a substitute for a fixing designed for thin metal framing.
Use a scale rather than estimating from size. A large canvas may weigh less than a smaller glazed print, while a decorative mirror can hide substantial weight behind a narrow-looking frame.
Pick a route through a mixed wall
Say your drawing is going above a console, the print beside a doorway, and the mirror in the hallway. Choose the drawing's conservation package first, inspect the print's frame joints before fitting hangers, and investigate the hallway wall before committing to the mirror position.
A cleat may suit the canvas if its frame can accept the attachment safely. It isn't automatically suitable just because the wall half is strong.
For the wall-side decision, our anchor selection guide helps distinguish fixings by substrate. If you're also planning a television on the same feature wall, the wall mounting advice from Computer Daddy is a useful companion for that separate installation, not a capacity specification for artwork.
Before buying hardware: Confirm total weight, wall substrate, and how the object must come off later.
If several mount types look suitable, favor the option with a clearer load path, more capacity headroom, and less destructive removal.
Mount Works on Paper So They Can Come Out
Paper mounting is a conservation package, not a way to make a sheet permanently flat. Paper responds to moisture, and a mount must accommodate that movement without letting the artwork slip or touch the glazing.
This visual summarizes the protective sequence.
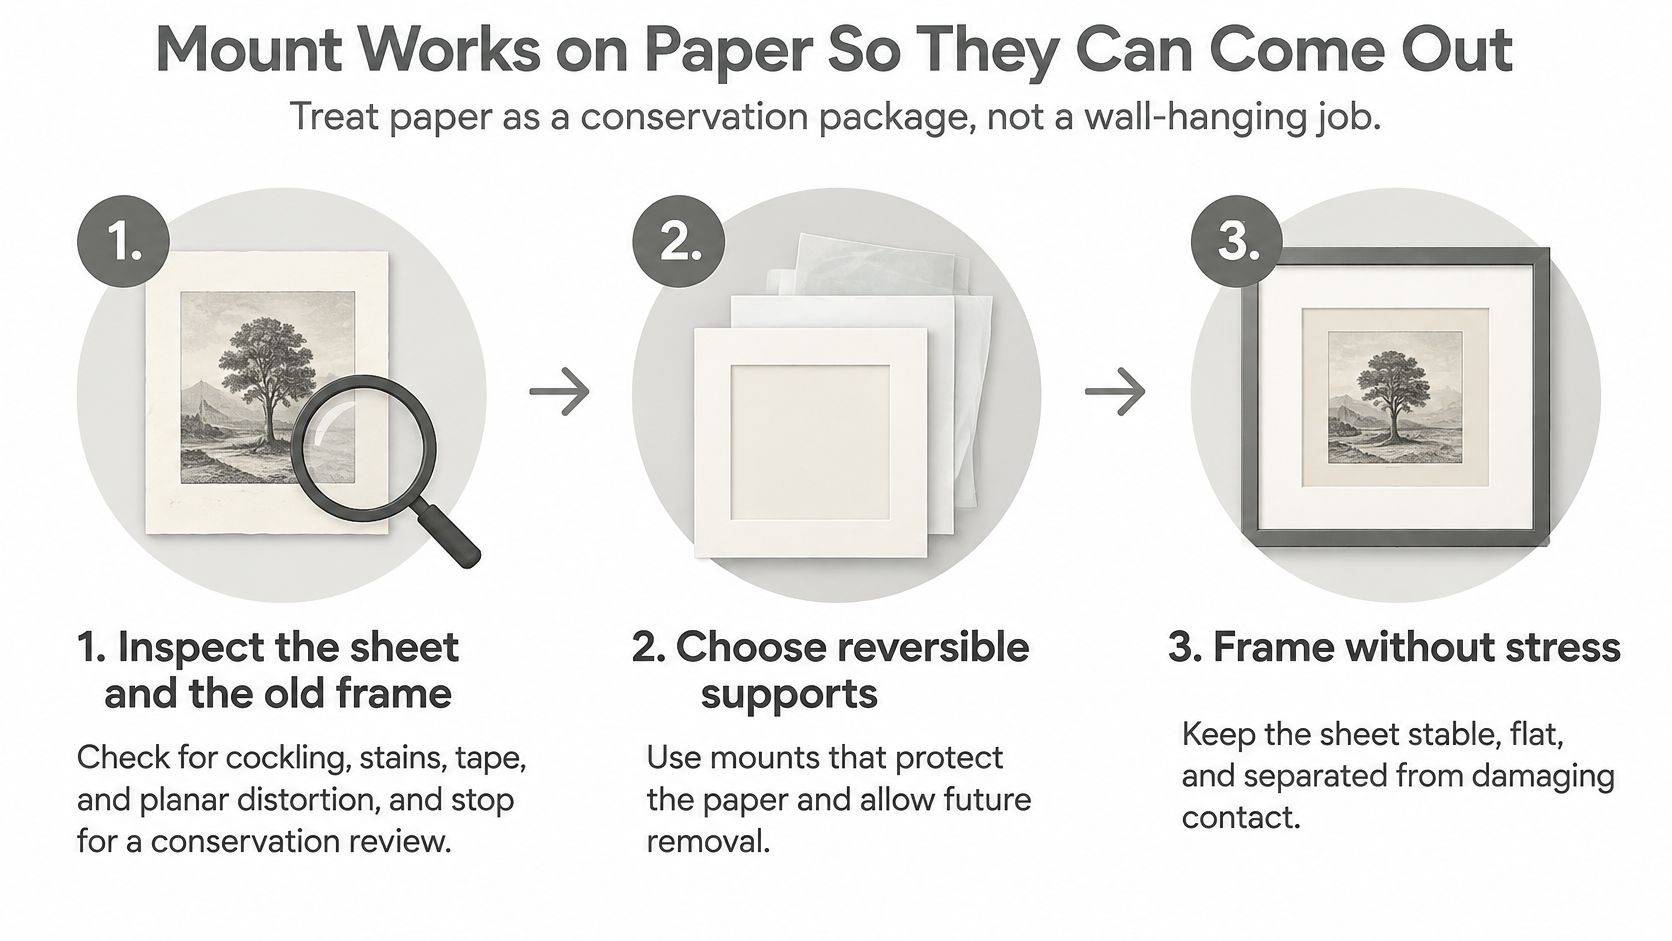
Inspect and build the package
Inspect before dismantling. Work on a clean, dry table with enough space to support the entire frame. Look for cockling, stains, brittle edges, loose media, old tape, and distortion. Stop for a conservator if the sheet is valuable, stuck to glass, actively flaking, or difficult to release.
Choose appropriate boards. The Library of Congress matting and hinging guide specifies a minimum 4-ply mat board, a target matboard pH of approximately 8.5, and backing board at least 3 millimeters thick, while preferring non-adhesive attachment for many works on paper. These are material-selection criteria, not permission to use the same board against every photographic process or sensitive medium.
Create separation from glazing. Use a window mat, suitable spacers, or a combination that keeps the artwork away from the glass or acrylic. Check the highest part of the surface, not just the sheet's edges. Raised pigment and textured paper need clearance too.
A window mat covers part of the sheet's perimeter. A float presentation exposes the edges, but it still needs concealed support and adequate space inside the frame.
Attach without trapping the sheet
Select the least intrusive attachment. Paper corners, edge strips, channels, or suitable polyester supports can hold a sheet without adhesive on the artwork. Where hinges are appropriate, Japanese mulberry tissue and refined wheat-starch paste allow controlled attachment. Don't attempt paste hinging on an unfamiliar or moisture-sensitive object.
Close the frame without pressure. Fit a strong backing and corrosion-resistant fasteners. Close the package against dust and reduce air exchange, but don't describe an ordinary dust seal as humidity control. The frame shouldn't bow because its contents have been forced into a shallow rebate.
Check movement and document removal. Make sure the edges aren't compressed and the attachment can be released appropriately. Record the sheet dimensions, board specifications, support locations, and opening method on a job card stored with the package, not stuck to the artwork.
Reversible doesn't always mean lift-off. A non-adhesive support may release directly; a pasted hinge may require controlled softening by someone who understands the paper and medium. Don't pull a hinge free to prove it can be removed.
Pressure-sensitive tape can migrate, stain, and become difficult to release. Excess moisture during hinging can cause cockling, while glazing contact can leave an artwork vulnerable to sticking or surface damage.
For a moving demonstration of the framing process, use the video alongside the inspection and material checks.
The package is ready when it supports the sheet without stress and can be reopened for examination or rehousing with minimal intervention.
Hang Frames Mirrors and Sculpture Safely
A frame hits the floor for one of two reasons: the wall fixing failed, or the object failed around a fixing that held. A load path is the route weight takes from the object through its fittings into the wall structure, and every link on that route has to carry the load. A strong anchor cannot compensate for a split frame rail, a poorly attached D-ring, or a screw that barely engages the wall fixing. A good mount is also a reversible one: the piece should come back down without damage, so leave room to disengage fittings and keep a record of the hardware you used.
The Washington State University Museum collections-care resource brings together guidance on matching hardware to wall composition and checking the assembly. As a working rule, place the hanging hardware at the sides of the frame and use appropriately rated framing wire rather than string or fishing line, which stretch, fray, and fail unpredictably.
Start with the complete object and the actual wall, not the hardware aisle.
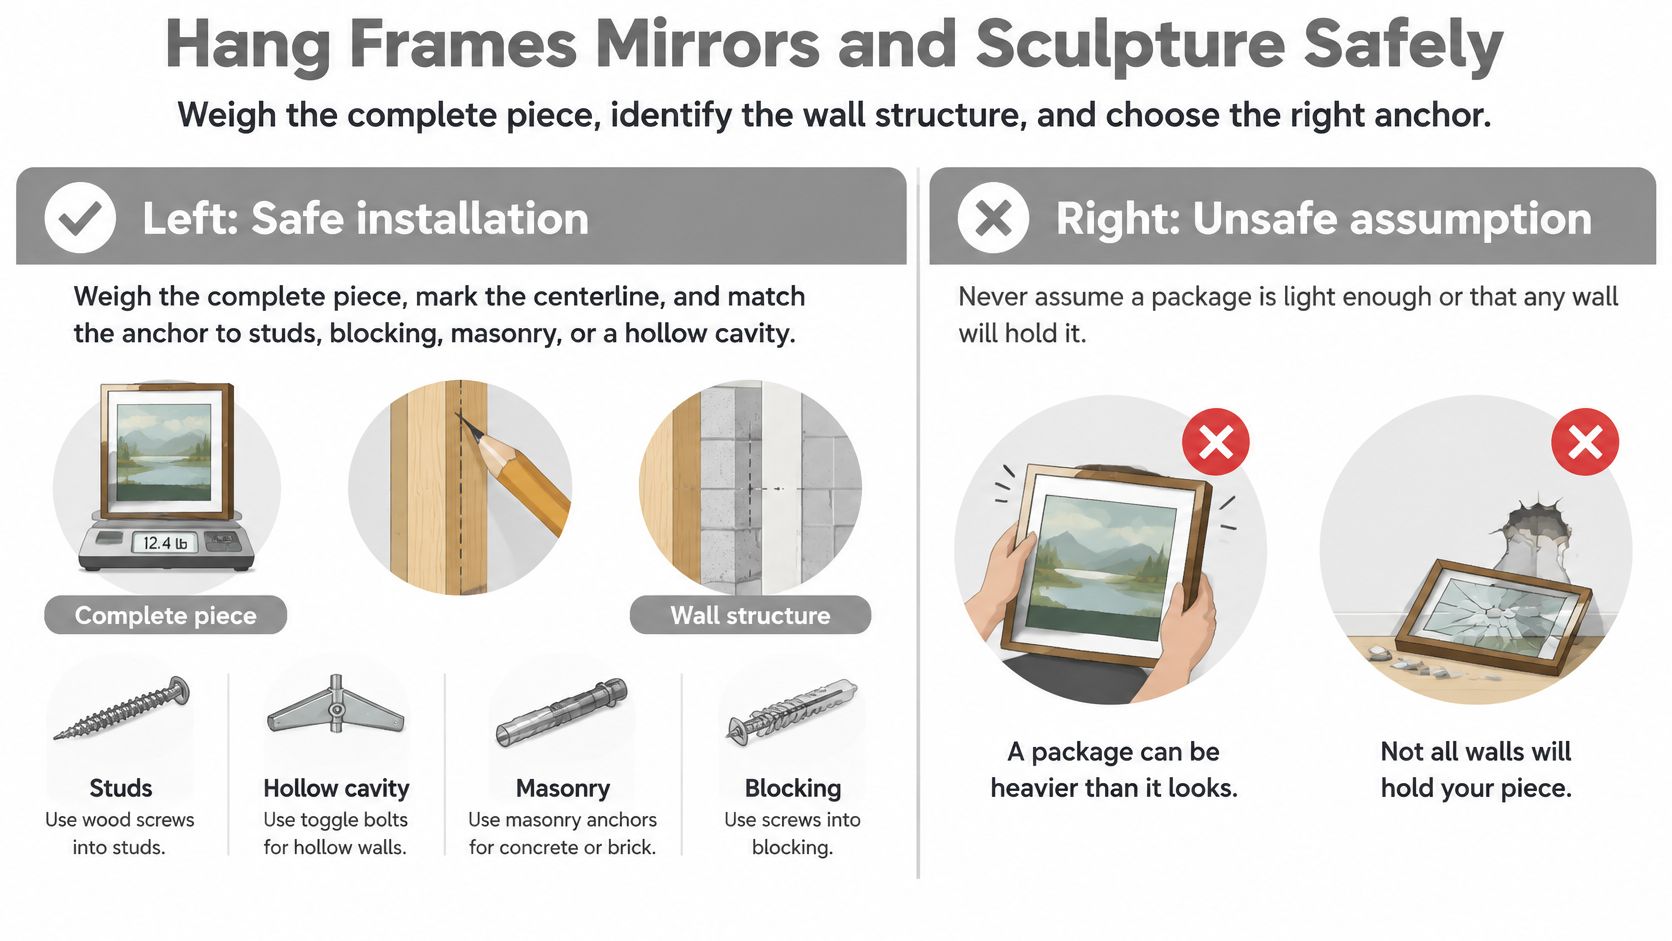
Establish the load and wall structure
Weigh and map the object. Include glass, backing, frame, and any attached stand-off hardware, because the object on the hook is often heavier than the canvas you lifted. Record the outside dimensions and the location of suitable attachment areas. Mark the intended position with low-tack painter's tape only after checking that the wall finish tolerates it.
Identify what's behind the finish. Use a stud finder, a magnet where appropriate, and available construction information. Scanner readings need interpretation, especially around metal lath, foil-backed insulation, pipes, and wiring. If you can't establish a safe drilling location, stop rather than making exploratory holes.
Select a fixing for that substrate. In wood studs or blocking, use suitable structural screws with adequate engagement. Thin metal studs require a system designed for that construction, not an ordinary wood screw. Masonry anchors must match the actual material, since brick, concrete, mortar, and hollow block don't behave alike.
Plaster is a finish, not a reliable description of the structure behind it. A sound-looking surface can conceal crumbling material, detached plaster, or a cavity where you expected timber.
For hollow drywall, choose a rated cavity fixing and follow its hole-size, board-thickness, and clearance requirements. A toggle needs space to deploy; an expansion fixing needs intact material around it. Spread attachment points where the frame and hanging system permit.
Match the attachment to the object
Fit lighter frames without weakening them. Attach D-rings to sound frame members using screws that won't emerge through the face. Position them symmetrically and use framing wire compatible with the fittings. Avoid pulling the wire drum-tight: the steeper the angle, the higher the forces at the rings and wall hooks.
For a delicate or narrow frame, direct engagement with separate hangers may be preferable to wire. Examine the joints first. If the frame is opening at its corners, repair it before choosing stronger wall hardware.
Use cleats for appropriate wide or heavy frames. A French cleat consists of mating beveled sections, with one attached to the object and the other to the wall. The object half must fasten into a structural part of the frame, not merely a thin dust cover or loose backing panel.
Keep the cleat concealed within the frame width and leave room above for engagement and later removal. Fit lower spacers where necessary so the frame sits as intended rather than leaning on its bottom edge. Add anti-lift restraint when accidental dislodging is a realistic concern, and choose a restraint the next person can release.
Treat mirrors as glass assemblies. Use the mirror manufacturer's intended fittings or have a suitable mounting system specified. Don't drill an unfamiliar mirror frame or assume decorative trim can carry the load. Large mirrors may need structural blocking and controlled lifting equipment, particularly where access is cramped.
Keep the glass away from door swings, furniture movement, and places where someone could strike an exposed edge. A mounting location that works on an elevation drawing may fail when people use the hallway.
Support sculpture around its center of gravity. A wall sculpture projects outward, creating tipping force that a flat frame does not. Design its cradle or bracket to resist tipping, rotation, and sliding as well as downward weight. Use stable, compatible padding at contact points, without pressing on fragile finishes or projections.
A ceramic relief with an irregular back needs a different support from a metal sculpture with engineered fixing holes. Don't improvise by tightening a bracket until the object stops moving.
Specify rail systems as complete assemblies. Check the track attachment, cable or rod, slider, hook, and object fitting as one chain. Account for all pieces sharing a rail rather than considering each hanger in isolation, and plan how future changes happen without climbing over furniture or handling artwork above other objects.
Verify without shock-loading
Allow for the actual setting. Door slams, vibration, outward projection, damaged plaster, and seasonal building movement can make a nominal rating misleading. Don't add together unrelated package ratings and assume the result is the assembly's safe capacity. The weakest connection still governs.
Inspect and record the completed installation. With the object controlled and supported during placement, confirm full engagement, secure fasteners, sound frame attachments, and final level. Use gentle hand checks where appropriate, not a hard tug that shock-loads glass or brittle artwork. Record the weight, substrate, hardware, attachment locations, and any anti-lift provision so a future installer can release and reuse the fittings instead of guessing.
A test pull isn't proof that a hidden anchor was installed correctly. Verification starts before the object goes on the wall.
Reinspect after the installation has settled and whenever the piece is moved or the wall shows change. Monumental objects, uncertain substrates, difficult lifting, and installations requiring access equipment belong with a qualified installer.
Set Heights for Sightlines and Safe Paths
Centerline and protrusion by room
Situation | Centerline | Protrusion | If it must stay high |
|---|---|---|---|
Public or workplace small objects | Use accessible-display guidance | Meet applicable projection and cane-detection requirements | Keep interpretation accessible |
Gallery or civic room | Provide a comfortable seated viewing band | Preserve a clear circulation route | Add a high-contrast duplicate image |
Home sofa or dining wall | Assess from seated eye level | Clear heads when people stand | Lower only where furniture permits |
Corridor or stair | Choose for approach and changing floor level | Keep objects outside head and cane swing | Relocate projecting pieces where necessary |
Layered salon hang | Maintain a readable band among varied centers | Keep low glass away from traffic edges | Light upper works separately |
Use guidance without turning it into a universal rule
The Smithsonian Guidelines for Accessible Exhibition Design limit many small wall-mounted objects to a 40-inch centerline and restrict protrusions to 4 inches unless they're cane-detectable or mounted above 80 inches. Treat these as accessible-exhibition design criteria, not a substitute for checking the building's applicable requirements.
Centerline alone doesn't establish accessibility. A visitor must be able to approach, stop, read, and leave without blocking circulation or colliding with a projecting frame.
Use this visual as a reminder to consider the room rather than follow a fixed hanging habit.
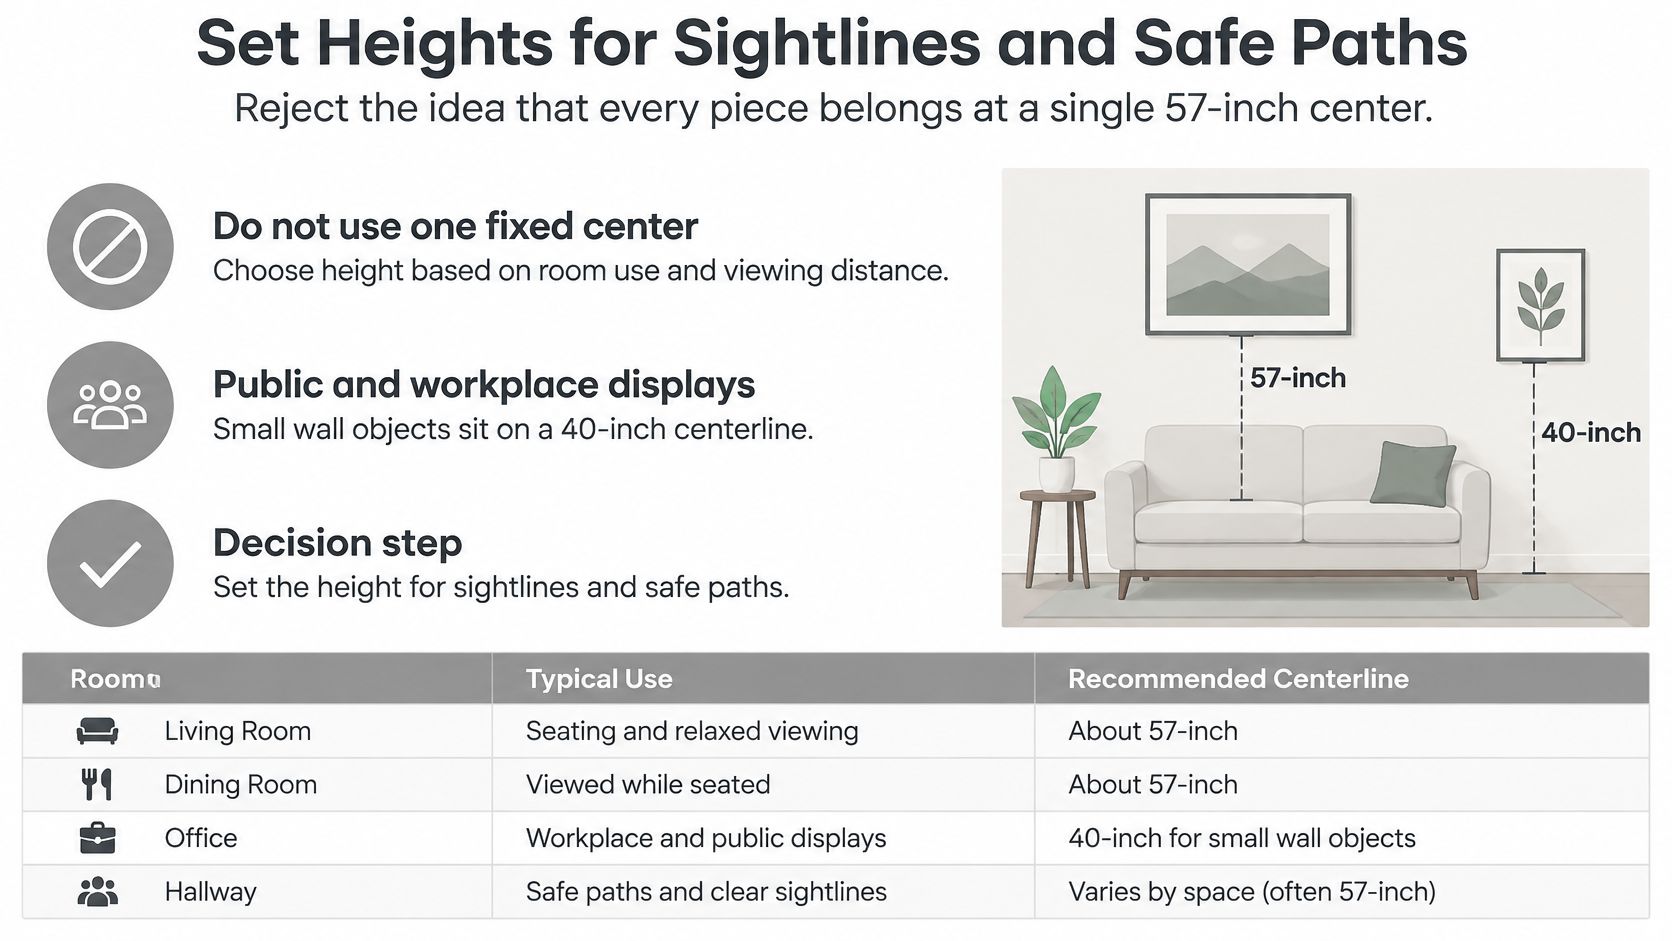
Test the view and the route
At home, a painting above a sofa should relate to the seated viewer and the furniture beneath it. Make a paper template, sit down, then stand and walk past it. A position that looks balanced from across the room can leave a projecting corner close to someone's head.
A public lobby presents a different problem. A large work may need to stay high for security or architectural reasons, but visitors still need a useful way to experience it. A nearby high-contrast image, accessible interpretation, or digital alternative can help without lowering the original into a busy route.
Our guide to eye-level art hanging can help with visual placement, but circulation and viewer needs should determine whether that starting position works.
Lower isn't automatically more accessible. A low projecting object can create a hazard while still being difficult to view.
Check glare from seated and standing positions. For children's routes, avoid exposed low glass edges and unstable objects within reach.
Before marking holes, ask:
Who is seated? Check the view from wheelchairs, benches, dining chairs, and sofas.
Who is walking? Include people carrying bags, using mobility aids, or moving through a stair landing.
What sticks out? Assess frames, brackets, sculpture, and nearby furniture together.
Avoid Damage and Reuse Hardware Wisely
Blu-Tack, sticky tape, plasticine, and adhesive applied directly to an object are tempting shortcuts. They can slip, leave residues, stain surfaces, or make later treatment harder.
The Western Australian Museum conservation manual warns against unsuitable adhesive products and ordinary nails for object mounting, emphasizing appropriate supports, inert materials, and padding. An ordinary nail driven wherever it's convenient isn't a mounting design.
Replace shortcuts with serviceable supports
Choose non-adhesive supports or appropriate tissue hinges for paper. Use rated frame fittings instead of string, and shape padded supports around sculpture rather than wedging it against the wall.
Then ask a separate question: must every part be new? A reusable cleat, rail, or bracket can reduce discarded materials when a show closes or an office rearranges its collection.
Reusable Versus New Archival Mounts
Option | Reversible | Reusable across installs | Best use | Pre-use test |
|---|---|---|---|---|
Reusable French cleat or rail | Yes, with suitable attachment | Yes, after inspection | Temporary shows, rotating walls, moving frames | Load, wear, compatibility, and wall check |
New custom archival mount | Yes, if appropriately designed | Usually object-specific | Unstable paper and prolonged contact | Material compatibility, emissions, and humidity response |
Bio-based exhibition mount | Must be demonstrated | Only if designed and validated for reuse | Prototype evaluation before valuable-object contact | Off-gassing, load, abrasion, humidity, and release testing |
Compare the whole service life
Reuse isn't automatically safe. Reject bent rails, damaged threads, cracked components, and padding that has hardened or become tacky. A sound cleat may serve again while its wall anchors need replacement.
Likewise, a bio-based label doesn't establish conservation suitability. A material can have appealing environmental credentials yet release harmful compounds, abrade a finish, creep under load, or change shape with humidity.
Compare expected service life, repairability, packing, transport, and disposal, not just the purchase decision. Repeatedly shipping a bulky custom support may undermine the practical benefit of reusing it.
The useful rule: favor inspected reusable hardware for changing mechanical installations, and tested archival materials for sensitive surfaces and prolonged contact. Have a conservator assess unfamiliar contact materials before they touch valuable artwork.
Decide When the Install Needs a Pro
DIY is reasonable when the object is manageable, the wall structure is known, the frame and paper package are stable, and you can work safely from the floor. Stop if you're relying on a guess about either the artwork or the building.
Call an installer for heavy mirrors, awkward lifting, high placement, uncertain masonry, scaffolding, and room-wide layouts that must align precisely.
Call a conservator for unstable paper, flaking surfaces, historical attachments, and artwork stuck to glazing or backing.
Resolve wall finishes first if decorating is part of the project. For an Auckland property, you can find trusted wallpaper installers through Painters North Shore before planning the art installation.
Our DIY versus professional installation guide helps clarify that boundary. At Colorado Art Services, we have over 15 years of picture hanging and art handling experience throughout the greater Denver metropolitan area, and we handle artwork regardless of its size, weight, or delicacy.
For Denver and nearby Front Range projects, we offer a free estimate. Have the piece count, largest dimensions, hard-surface drilling requirements, and likely ladder or scaffold needs ready so we can assess the installation rather than guess at anchor ratings.
Colorado Art Services provides placement and installation for framed art, mirrors, sculpture, heavy pieces, and high displays in residential and commercial spaces. Visit Colorado Art Services to request an estimate and plan a mount around your artwork, wall construction, and viewing space.
Comments