


Hanging Pictures on Stucco Walls: Safe Anchor Choices
Your framed print is leaning against the wall, the pencil mark is in place, and the surface feels as hard as concrete. It's tempting to reach for a masonry anchor and start drilling. But that hard surface might cover brick, wood framing, or foam, and the same screw won't behave the same way in each.
Hanging pictures on stucco walls starts with identifying the support behind the finish. Choose hardware afterward, and treat an exterior hole as a change to the wall's weather protection, not just a place to put a hook.
Find What Lies Behind the Stucco First
Guessing at the wall assembly can leave you with a firmly seated screw that has almost nothing dependable to hold onto. Traditional stucco has a scratch coat, brown coat, and finish coat, but those layers aren't a substitute for structural backing.
Check the assembly and finish
Start by distinguishing interior decorative finishes from exterior cladding. Traditional stucco may cover framing, sheathing, and a weather-resistive barrier, or it may cover masonry. An exterior insulation and finish system, called EIFS, introduces foam and requires a different attachment detail.
SuperiorPRO's overview of exterior stucco installation is useful context when you're discussing the existing cladding with a builder. Don't identify the assembly from texture alone.
Moisture behavior also differs. Building Science Corporation gives the vapor-permeance ranges below, which describe vapor movement, not anchor strength.
Stucco permeability and what it means for a hole
Stucco type | Vapor permeance | What it means for a hole |
|---|---|---|
Traditional lime-based | Greater than 20 perms | Most vapor-open; choose a compatible sealing detail that respects the lime assembly |
Lime-Portland cement | 5–10 perms | Moderate vapor movement; seal the penetration carefully |
Portland-cement | 1–5 perms | Less vapor-open; don't assume moisture entering a hole will dry readily |
Polymer-modified | Less than 1 perm | Least vapor-open; prevent water entry rather than relying on drying |
Permeance alone doesn't specify a sealant. Compatibility with the finish, backing, and wall manufacturer's requirements matters more than a general-purpose “breathable” label.
Check the intended location
Use the stud finder as a screening tool, not proof of structural support.

Check records first. Review plans or ask the builder where framing and backing sit.
Scan the area. Mark apparent stud edges, recognizing that metal lath can confuse readings.
Tap gently. Hollow or changed sounds warrant investigation; they don't establish load capacity.
Inspect the finish. Avoid cracks, staining, soft areas, corners, window heads, and existing penetrations.
If a check raises doubt, hold off. Choose an anchor-table row only after you've verified the substrate.
Anchor Choices by Wall Type and Picture Weight
The same stucco finish can cover wood framing, masonry, or foam, and each needs different hardware. For a light picture on stucco over confirmed wood framing, a screw reaching a verified stud is the straightforward choice. A short screw gripping only the finish is not a reliable substitute.
Match the hardware to both the backing and the complete framed piece. “Light” is a selection category, not a weight rating. The actual limit depends on the hardware manufacturer's allowable capacity in the specific substrate.
Hardware by wall type and picture weight
Wall behind the finish | Light picture | Heavy framed art or mirror | Large or heavy piece |
|---|---|---|---|
Stucco over wood framing | Stud-mounted screw or rated hook; a cavity anchor only with verified suitable backing and clearance | Structural screw into confirmed framing; independent attachments for mirrors | Cleat or rail spanning confirmed studs, with an attachment check |
Stucco over masonry | Masonry anchor rated for the identified brick, block, or concrete | Corrosion-resistant masonry anchor with specified embedment | Independent structural masonry attachments designed for the complete load |
Stucco over EIFS or foam | Adhesive hanger only when explicitly approved for that finish and exposure; otherwise use a freestanding display | Rail fixed to framing through a system-compatible mounting detail | No drilling without an installer's assessment |
Unknown or damp substrate | Freestanding display; don't attach to damp or unsound material | Stop and identify or assess the substrate | Stop and get a professional assessment |
Why the backing changes the choice
A wood screw needs enough engagement in sound wood. A masonry anchor must suit the identified masonry, hole geometry, and embedment. A toggle needs a suitable panel and enough room behind it to open. Foam does not provide that panel.
A plastic plug or toggle is not an automatic fallback if you miss a stud. The backing must match the anchor's tested application. Use this anchor selection guide to compare hardware categories before choosing one.
A package labeled for masonry doesn't establish that your stucco wall is masonry.
For interior decorative stucco over another finish, identify the underlying wall before selecting an anchor. Exterior work also requires a penetration detail suited to weather exposure, not just hardware with adequate holding capacity.
Adhesive hangers call for caution. Texture reduces contact, coatings can detach, and a hidden-spot test checks finish compatibility, not long-term load capacity. If you can't confidently identify the backing or match the hardware to the piece, don't drill until those questions are settled.
How to Drill and Seal a Stucco Hanging Point
This procedure assumes a light-to-moderate load already matched to rated hardware. For an exterior assembly, it also assumes you've established a compatible penetration detail; a bead of sealant isn't permission to drill through an unidentified wall.
Use this visual as a reminder of the sequence, not a replacement for the anchor's installation instructions.
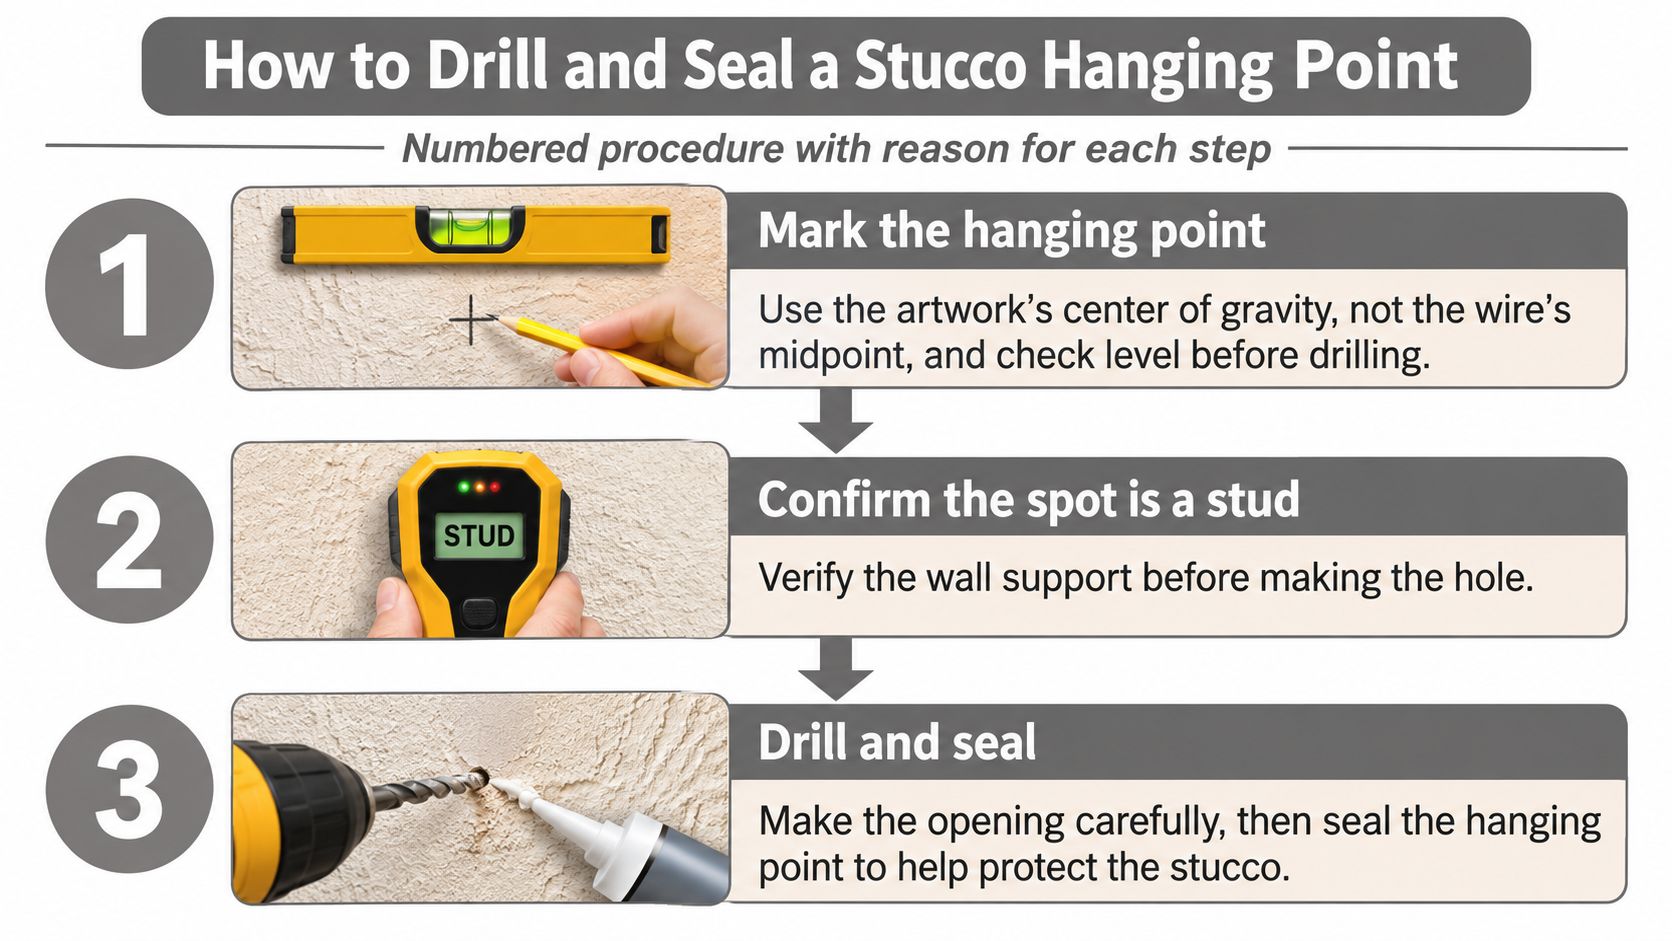
Prepare and drill
Mark from the actual hanging geometry. Find the artwork's balance point, then measure the loaded wire or fixed hangers relative to the frame. Don't assume the wire's unloaded midpoint gives the correct hole position, and check level before making a mark permanent.
Verify support and check for services. Confirm the intended stud or backing, then scan for wiring and other concealed services with appropriate detection equipment. A non-contact voltage detector is an additional warning tool, not proof that a wall cavity is clear.
Cut through the finish carefully. Start with a masonry bit at low speed, using the anchor maker's specified hole diameter, depth, and orientation. Don't use hammer action on an unidentified assembly; fast or aggressive drilling can chip the entry.
Clean the hole. Remove dust with the specified brush and vacuum or other manufacturer-approved cleaning method. If compressed air is required, control dust and wear eye and respiratory protection.
The Builders Ontario moisture-behind-stucco guide reinforces the importance of matching the attachment to the backing and sealing penetrations rather than treating the finish as solid masonry.
Seat and inspect
Apply compatible exterior sealant where required. Follow the established wall-system detail before seating the fastener, without contaminating anchor surfaces that must remain clean for grip or bonding. If the required weather-barrier seal can't be achieved through the proposed opening, stop and revise the detail.
Set the specified embedment. Tighten to the hardware's installation requirements without crushing the finish or using the screw to pull an uneven bracket flat. Unexpected spinning, movement, or cracking means the attachment isn't ready to carry artwork.
Hang and examine. Seat the frame, check level, and look for movement or gaps in the seal. Reinspect after the piece has settled and after weather exposure on an exterior installation.
If marking reveals cracks in an interior plaster finish, Premier Builders on hairline plaster cracks offers repair context. Don't transfer an interior plaster repair method to exterior stucco.
This video provides a supplementary visual reference for the mounting process.
A sound installation has a clean opening, correctly seated hardware, and an intact sealing detail. Skipping sealant, treating initial hardness as confirmed backing, or covering a questionable hole with surface caulk doesn't meet that standard.
Heavy Mirrors, Sculpture and Large Frames
Use allowable working capacity, not published ultimate strength. Ultimate strength describes a failure threshold under specified test conditions, not an acceptable everyday load. Select an allowable rating with reserve for installation uncertainty rather than inventing your own conversion from a breaking-strength number.
Count the complete assembly: artwork, frame, glass, mounting hardware, and any later additions. Also consider how far it projects from the wall, because a projecting object can pull on its upper attachments rather than loading them downward.
Work through the complete attachment
As a hypothetical example, suppose a framed mirror and its hardware weigh 30 pounds. A symmetric, properly balanced arrangement might place 15 pounds on each of two attachment points, but that arithmetic alone doesn't make the installation safe.
For a redundant design, specify each independent attachment to support the full mirror load with the required reserve, and verify the frame hardware too. Unequal wire geometry, an off-center hanger, or movement can prevent an even load split.
A lower restraint or suitable cleat helps stop rotation and separation from the wall. For projecting pieces, our wall-mounted sculpture guidance provides additional planning context.
The PROSOCO Stucco-Tie specification illustrates why attachment details are product-specific: published installation geometry and material properties aren't a universal picture-hanging capacity. Don't transfer masonry-related values to wood-framed walls or EIFS.
Proof-check boundary: Don't improvise an overload test by pulling on valuable artwork. A professional should define the test method and acceptance criteria for the attachment.
For a designed proof check, apply load gradually using a controlled test arrangement, keep the area below clear, and inspect for displacement or cracking. Any test above working load needs a specified test load and duration, not a guess.
Watch the principal failure modes
Substrate mismatch: Hardware engages material it wasn't rated to hold.
Insufficient embedment: Too little effective engagement reaches sound backing.
Edge-distance violations: An anchor sits too close to a vulnerable edge.
Tension overload: Projection or hanging geometry pulls the attachment outward.
Water entry: An unsealed penetration exposes concealed layers.
Record the anchor type and location. A wet, cracked, loose, or unidentified wall means no heavy installation until it's assessed.
What Renters and Historic Owners Can Change
A freestanding easel or a picture supported on stable furniture is often the cleanest rental solution. It avoids both a new hole and the uncertain bond between an adhesive hanger and textured paint.
An existing picture ledge can also work, provided it's secure and suitable for the piece. Installing a new ledge isn't a no-hole solution, and leaning a heavy mirror still requires appropriate restraint against tipping.
Get permission and choose reversible methods
Read the lease. Obtain written approval before drilling, and keep dated photographs of the original condition.
Check adhesive compatibility. Use a hanger only when its manufacturer approves the texture, coating, exposure, and load. Remove stretch-release products by their specified pull direction, not by yanking the hook outward.
Agree on repairs beforehand. Ask the landlord how approved holes should be repaired and document the agreed method.
Use existing supports carefully. Confirm that an old rail, ledge, or mounting point is secure rather than assuming previous use proves capacity.
Preserve the historic wall
For historic lime stucco, plan repairs around compatible lime-based materials and the existing assembly. Don't default to a hard Portland-cement patch or a coating that changes how the repaired area handles moisture; obtain conservation advice when the finish or building is protected.
Keep approved attachment points away from windows, doors, flashing, and other transitions. A Canadian building-envelope review reports that 90% of investigated problems in a cited survey involved component interfaces or penetrations, a reason to treat those locations cautiously rather than a prediction that your picture hole will leak.
Reversible display is preferable to a repair that permanently changes a historic finish.
Don't hammer-drill an unknown wall. Don't treat surface caulk as a complete exterior repair, and don't test an anchor by loading a loose or crumbling finish. Permission to hang art doesn't establish that the proposed location can support it.
Decide Whether to Drill or Call an Installer
Proceed only when you can answer the practical questions confidently. A piece fitting a weight category isn't enough without matching hardware and verified backing.
Go ahead: The assembly is identified, the location is sound and dry, the attachment is rated for the complete load, and required property approvals are documented.
Stop for assessment: You find staining, softness, loose finish, uncertain backing, or an exterior location near windows, doors, or flashing.
Choose professional installation: The piece is valuable, oversized, projecting, or requires coordinated attachment points or difficult access.
Use this checklist at the wall before taking out the drill.
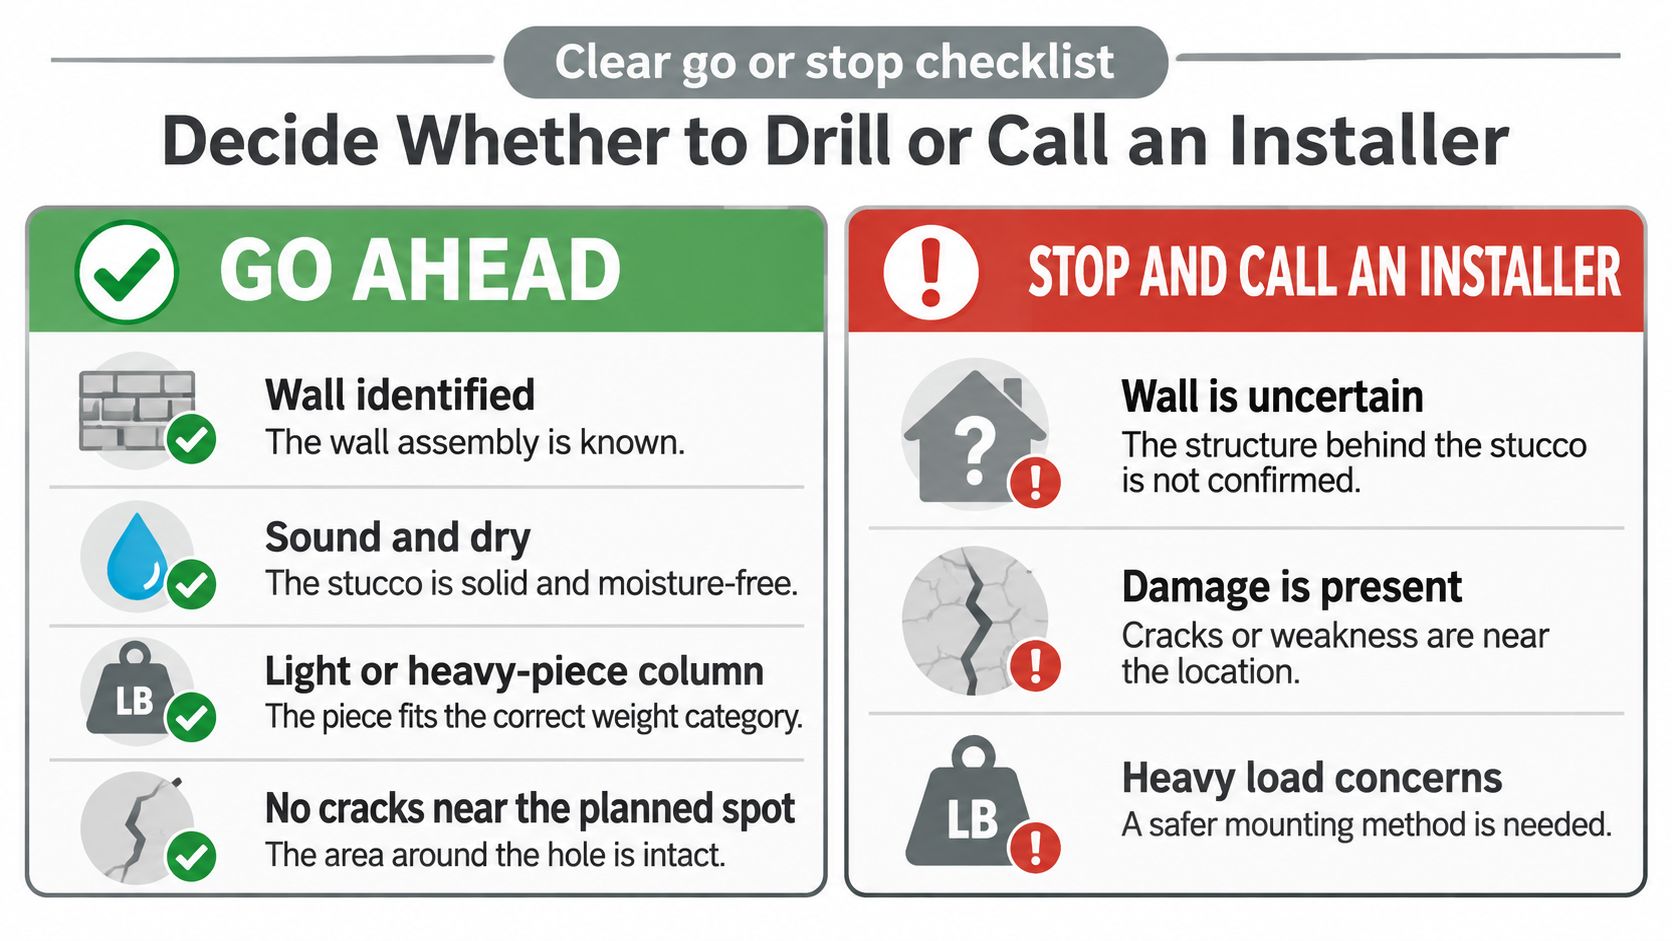
Ask about support and weather protection
Structure Tech's stucco inspection guidance cautions that penetrations can compromise the drainage plane and that surface caulk may not fully restore it; sheathing moisture readings around 20% or higher can indicate excessive moisture and potential structural damage. Those readings require appropriate testing and interpretation, not a surface check with a household meter.
For exterior displays, prefer a suitable existing attachment or nonpenetrating arrangement where possible. Monitor an installed point for staining, seal separation, or movement.
Use Home Pro's Remodeling & Repairs' contractor interview questions to prepare questions about responsibility and methods, and consider our DIY versus professional installation guide when weighing access and artwork risk.
We have over 15 years of picture-hanging and art-handling experience throughout the greater Denver metropolitan area. Before contacting us, gather the piece count, largest dimensions, ladder or scaffolding needs, and whether hard-surface drilling is required.
Colorado Art Services offers picture hanging, mirror and sculpture installation, and heavy-piece mounting, with a free estimate for your project. Visit Colorado Art Services with your artwork dimensions and wall details so we can help plan an appropriate installation rather than leave the hardware choice to guesswork.
Comments