


Hanging Art in Bathroom: A Practical Moisture-Safe Guide
You've just stepped out of a long shower, wiped the mirror clear, and noticed the canvas on the opposite wall has started to ripple at the corners. The artwork may have looked perfect when it went up, but a bathroom doesn't behave like a hallway or living room. Every shower creates another cycle of heat, vapor, condensation, and drying.
That's why hanging art in a bathroom starts with placement and material decisions, not with choosing a pretty frame. The installer's mental map includes moisture zones, splash geometry, wall construction, ventilation, and the load rating of every fixing. Get those decisions right and a bathroom can hold durable, well-placed artwork. Ignore them and the frame, backing, hardware, or artwork may fail long before anyone notices the damage.
Why the Bathroom Is a Different Animal for Artwork
A bathroom creates one of the harshest indoor microclimates for artwork. During and after a shower, relative humidity can spike to 80–100%, while most molds begin germinating at about 65% relative humidity (Austin Art Gallery explains the moisture risks for framed art in bathrooms). That short exposure can be enough to make paper buckle, mats separate, and unsealed canvas change shape.
The damage often starts around the frame rather than at the image. Wood absorbs moisture and swells. Paper-based materials take on vapor and lose their flatness. Adhesives soften, backing boards wick dampness from the wall, and metal fittings can corrode. By the time the artwork visibly ripples, the framing package may already have been stressed through repeated humidity cycles.
What an installer notices first
When I assess a bathroom, I don't begin by asking where the empty wall looks nicest. I look at the shower door, the direction of spray, the nearest cold surfaces, the exhaust fan, and the route that warm air takes toward the ceiling. A wall opposite a shower may seem dry, yet the frame can still collect condensation if air circulation is poor.
The glazing, mat, backing, frame, and hanging system also respond at different speeds. A sealed acrylic face may protect the image while an exposed wood back continues to absorb moisture. A stainless hook may resist corrosion while a cheap wire stretches or rusts behind the frame.
Installer's rule: Treat the bathroom as a controlled environment before treating it as a design opportunity.
Ventilation is part of the artwork protection system, not merely a comfort feature. Practical bathroom moisture prevention tips can help reduce the amount of time that steam remains suspended in the room. If the bathroom stays damp after every shower, no glazing choice can fully compensate for poor placement and weak air movement.
Reading the Moisture Map of a Bathroom
A frame can sit opposite the shower and still receive daily moisture. Before drilling, map the room by spray direction, condensation paths, airflow, and the load the wall and hardware must support. The placement decision starts with those conditions, not with the emptiest-looking wall.
Measure 60 cm out from the tub rim or shower door track and mark that boundary on the wall. Porous artwork placed inside it accepts regular splash stress, so use the line to test each possible position rather than treating it as a universal design rule. The guidance on bathroom artwork placement and humidity control provides a useful reference for this check.
Relative humidity should stay below 60% for bathroom art, with a preferred indoor range of 30–50% when conditions allow. After a shower, having humidity fall back to 50–60% within about 30 minutes reduces the time available for condensation and material stress. Put a hygrometer near the proposed wall and record readings at different times, especially after bathing. A practical humidity monitoring guide for artwork spaces helps interpret changing conditions.
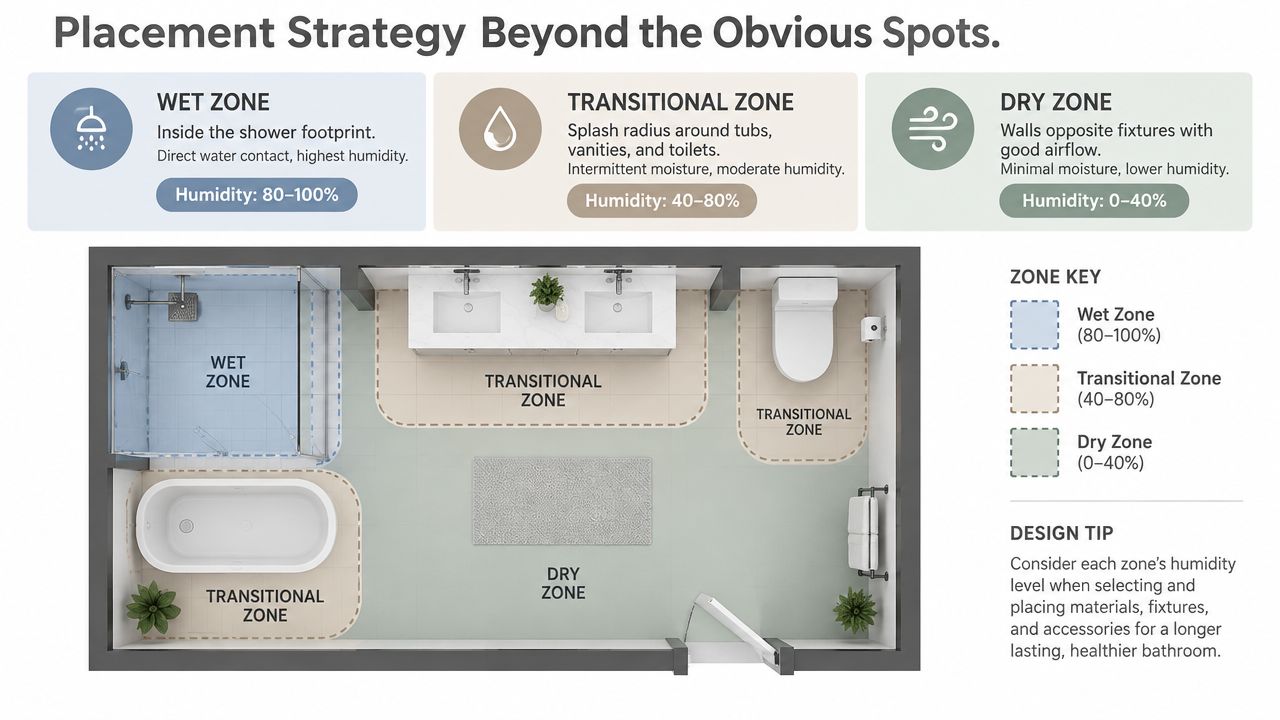
Three zones to mark before drilling
Wet zone: The shower footprint and any surface exposed to direct spray. Keep paper, raw canvas, unsealed wood, and ordinary framed artwork out.
Transitional zone: The splash radius around tubs, vanities, and toilets. Droplets and condensation create repeated exposure even without a direct hit.
Dry zone: Walls away from fixtures, with good airflow and a clear route toward the exhaust fan. Moisture-tolerant framed pieces are better suited here.
Steam rises, cools, and condenses on the first colder surface it reaches. That may be glazing, a tile edge, or the frame itself.
Check airflow before choosing the final wall. A working exhaust fan helps only when humid air can reach it. In a sealed room, vapor lingers around upper walls and ceilings, while a frame may show condensation before the surrounding wall does. The map identifies a workable location; material selection and hardware load ratings determine whether the installation remains secure.
Choosing Materials That Survive Steam
Material selection follows the moisture map, not personal taste. In a relatively dry position, several framing systems can work. In a steam-heavy bathroom, the margin for error becomes much smaller, and the back of the piece deserves as much attention as the front.
Acrylic glazing is often the practical choice because it weighs less than glass, won't shatter into sharp fragments, and handles bathroom placement with fewer breakage concerns. It does scratch more easily and can build a static charge that attracts dust to a print. Glass offers excellent visual clarity and useful long-term UV filtering, but it adds weight and needs a properly sealed frame rather than an open back.
Compare the complete framing package
Material | Moisture Tolerance | Durability | Cost |
|---|---|---|---|
Acrylic glazing | High when paired with a sealed frame | Resists breakage, but scratches more easily | Moderate |
Glass glazing | Moderate to high with gasketed construction | Clear and rigid, but heavier and breakable | Moderate to high |
Sealed canvas | Moderate for light steam | Can perform well when coated and properly supported | Moderate |
Raw canvas | Low | Absorbs moisture and can deform | Moderate |
Paper print | Low unless thoroughly protected | Vulnerable to buckling and moisture marks | Low to moderate |
Metal print | High | Rigid, cleanable, and suitable for humid locations | Moderate to high |
Powder-coated aluminum frame | High | Resists swelling and corrosion when finished correctly | Moderate to high |
Solid wood frame | Moderate | Can swell or move without sealing | Moderate to high |
A sealed or giclée-coated canvas can tolerate light steam, but raw canvas remains a poor choice for a room that stays humid. Paper prints and photographs belong behind protective glazing, inside a frame with a sealed back. Open backs allow moisture to reach the image from behind, where homeowners rarely inspect it.
Frame construction matters as much as the artwork. Powder-coated aluminum, sealed composite, and marine-grade stainless steel generally make more dependable choices than MDF or untreated softwood. If you're comparing moisture-resistant wall substrates during a renovation, a practical explanation of greenboard and cementboard differences provides useful context, although neither substrate removes the need for appropriate framing.
Material decision: Choose the most moisture-tolerant package that still gives the artwork the visual clarity and weight your wall can support.
Backing boards should be acid-free and sealed against the frame. The archival storage materials guide also illustrates the broader principle, materials that protect art must be selected as a system, not as isolated components.
Placement Strategy Beyond the Obvious Spots
Use the moisture zones and clearance line mapped above, then judge each wall by how the room is used. A location can be technically dry yet still fail if steam collects there, towels brush the frame, or the open door blocks the view.
Tape the artwork's outer dimensions on the wall before drilling. Check three sightlines, from the doorway, the vanity, and the tub. A piece that reads well from one angle but disappears from another is in the wrong spot. Mark the mirror, door swing, light fixtures, and nearby fittings on the tape as well.
Practical locations and their compromises
Above the toilet: This often provides the longest uninterrupted wall for a larger work. Keep enough visual breathing room below the ceiling, and confirm that the open door does not hide the piece.
Above a towel bar: Towels release moisture and can touch the lower frame when removed. Reserve this position for a sealed, moisture-tolerant piece with a finish that can be wiped clean.
Opposite a mirror: The artwork may remain visible from more parts of the room, but glossy glazing can reflect the mirror or vanity light directly toward the viewer. Shift the angle or choose low-reflection glazing if glare dominates.
Corner returns and alcoves: These spots suit smaller pieces and may sit outside the main splash path. Inspect airflow first. A recess that stays damp can shorten the life of even a well-sealed frame.
Vanity-adjacent walls: Measure the sink's splash arc and leave room for wet hands, toiletries, and cleaning access. Artwork should not become the surface people grab while reaching for a towel or cabinet.
Height also depends on the room's sightlines. A low placement may work beside a tub but feel crowded above a toilet, while a high piece can clear splashes yet disappear behind a wall cabinet. Check the final position under the room's normal lighting before committing.

The strongest location combines a clear view, limited splash exposure, moving air, and a wall area that does not interfere with doors or daily routines. Placement comes before decoration. Test the geometry first, then choose the artwork that suits the surviving position.
Mounting Hardware for Wet Environments
A secure bathroom installation begins with identifying the wall substrate. Tile, drywall, plaster, and masonry each require a different fixing method, and the frame's finished weight must include glazing, backing, hardware, and any decorative components.
On tile, use a diamond-tipped bit at slow speed and avoid hammer action until the bit has passed through the tile. Rushing this step can crack porcelain or ceramic and leave an oversized hole that won't hold an anchor properly. For drywall, use a rated plastic anchor for lighter work, and use a toggle bolt or stud fixing when the load demands more support.
Hardware choices by substrate
Wall Substrate | Hardware | Max Safe Load | Corrosion Resistance |
|---|---|---|---|
Drywall | Rated plastic anchor or toggle bolt | Use the manufacturer's stated load rating | Choose plated or stainless hardware |
Wood stud | Screw into stud, D-rings, or cleat | Determined by screw, stud, and hanging system | Good with stainless or plated parts |
Ceramic or porcelain tile | Diamond bit with suitable anchor | Determined by anchor and substrate behind tile | Good with stainless hardware |
Masonry | Masonry anchor and screw | Determined by anchor specification | Good with stainless or coated parts |
Plaster over lath | Appropriate plaster anchor or stud fixing | Varies with wall condition | Choose corrosion-resistant hardware |
The table's Max Safe Load column should never be treated as a universal number. Use the manufacturer's rating for the exact anchor, reduce the working load when the wall is damaged, and distribute substantial loads across two structural points. For a heavy piece near a tub, a French cleat fixed into studs is safer than leaving the frame cantilevered from one small point.
Bare steel hooks and wire are poor bathroom choices. Stainless steel or zinc-plated D-rings, hooks, screws, and cleats resist corrosion better. Picture wire should be doubled and knotted securely at both D-rings rather than run as a single, lightly tensioned strand across a humid span.
Use a level longer than the artwork's width. Bathroom walls often have small variations that become obvious across a wide frame, so a thin shim behind one side may be necessary. Leave a small air gap behind the piece, using suitable spacers where appropriate, so the wall and frame can dry instead of trapping moisture.
For tile-specific methods, tile wall art hanging guidance offers a useful reference before you select a bit, anchor, or cleat.
Lighting That Works With Humidity and Glare
A bathroom can make a well-framed piece look wrong in seconds. Steam softens surfaces, mirrors throw back hard reflections, and a bright fixture can turn glazing into a visible white rectangle. Map the light alongside the moisture zones before choosing fixture locations.
Fixtures near water sources should carry an IP44 rating or higher. More exposed positions may require greater protection. The exact location, local electrical rules, and manufacturer instructions still determine whether a fixture is suitable. Keep connections and junction boxes protected from splash paths and condensation.
Warm-white LEDs in the 2700–3000K range with 90+ CRI render artwork naturally and preserve subtle colour relationships (bathroom lighting design guidance from Jennifer Gilmer Kitchen & Bath). Cool or inexpensive sources can make a painting appear flat, greenish, or harsher than it looks in daylight.
Control the angle before increasing brightness
Place framed art perpendicular or slightly angled to the mirror, rather than directly in the path of reflected light. A picture light above the frame should aim down and remain clear of the glazing. Pressing it against the frame traps heat and condensation at the most vulnerable point.
Recessed fixtures need the same scrutiny. Sealed, IC-rated housings with appropriate clearances help limit heat around the artwork. Use a dimmer to reduce glare and avoid running the fixture harder than necessary. Motion sensors also reduce switch handling with wet hands, provided their placement does not leave the artwork abruptly overlit.
Layer ambient, task, and accent circuits separately so the picture light can be dimmed without darkening the mirror. This approach also lets you test the artwork at different brightness levels before finalising the installation.
Before setting the hanging height, turn on every relevant light and stand at the main viewing position. A hard reflection from the mirror requires a change in angle or fixture position. Extra brightness will not correct a geometric reflection.
A Real Bathroom Art Installation Walkthrough
A recent master bathroom project had a glass walk-in shower, a freestanding tub, and a windowless vanity wall. The room measured 5 by 8 feet, so every placement decision affected both circulation and sightlines. The client wanted several pieces, but the shower and tub created a narrow moisture map with little room for error.
The large abstract received acrylic glazing and went over the tub, positioned outside the direct splash path rather than centred only for symmetry. A pair of stainless-framed pieces went beside the vanity mirror, where they benefited from the room's lighting but avoided the sink's immediate splash arc. A moisture-tested metal print occupied the wall above the toilet, the driest uninterrupted location available.
Hardware followed the wall, not the artwork
The tile was porcelain, so the installation used anchors selected for tile and the substrate behind it, with slow drilling to protect the finished surface. Each frame received 4 mm standoff spacers at the back. Those spacers kept the pieces off the wall enough to allow airflow and reduced the chance that a damp wall would transfer moisture directly into the backing.
The lighting specification also changed during the layout review. Instead of placing a hot picture light tight against each frame, the installation used LED picture lights positioned to avoid heat buildup and direct glare. The final sightline was checked from the doorway, the vanity, and the tub before the holes were drilled.
The useful lesson: A bathroom installation succeeds when the artwork, wall, light, ventilation, and hardware are planned as one system.
The project didn't rely on a single “bathroom-safe” product. It combined acrylic glazing, metal and stainless framing, tile-appropriate anchors, airflow behind the pieces, and deliberate placement outside the most exposed splash paths. That combination is what made the design workable.
Care Habits That Keep Bathroom Art Looking New
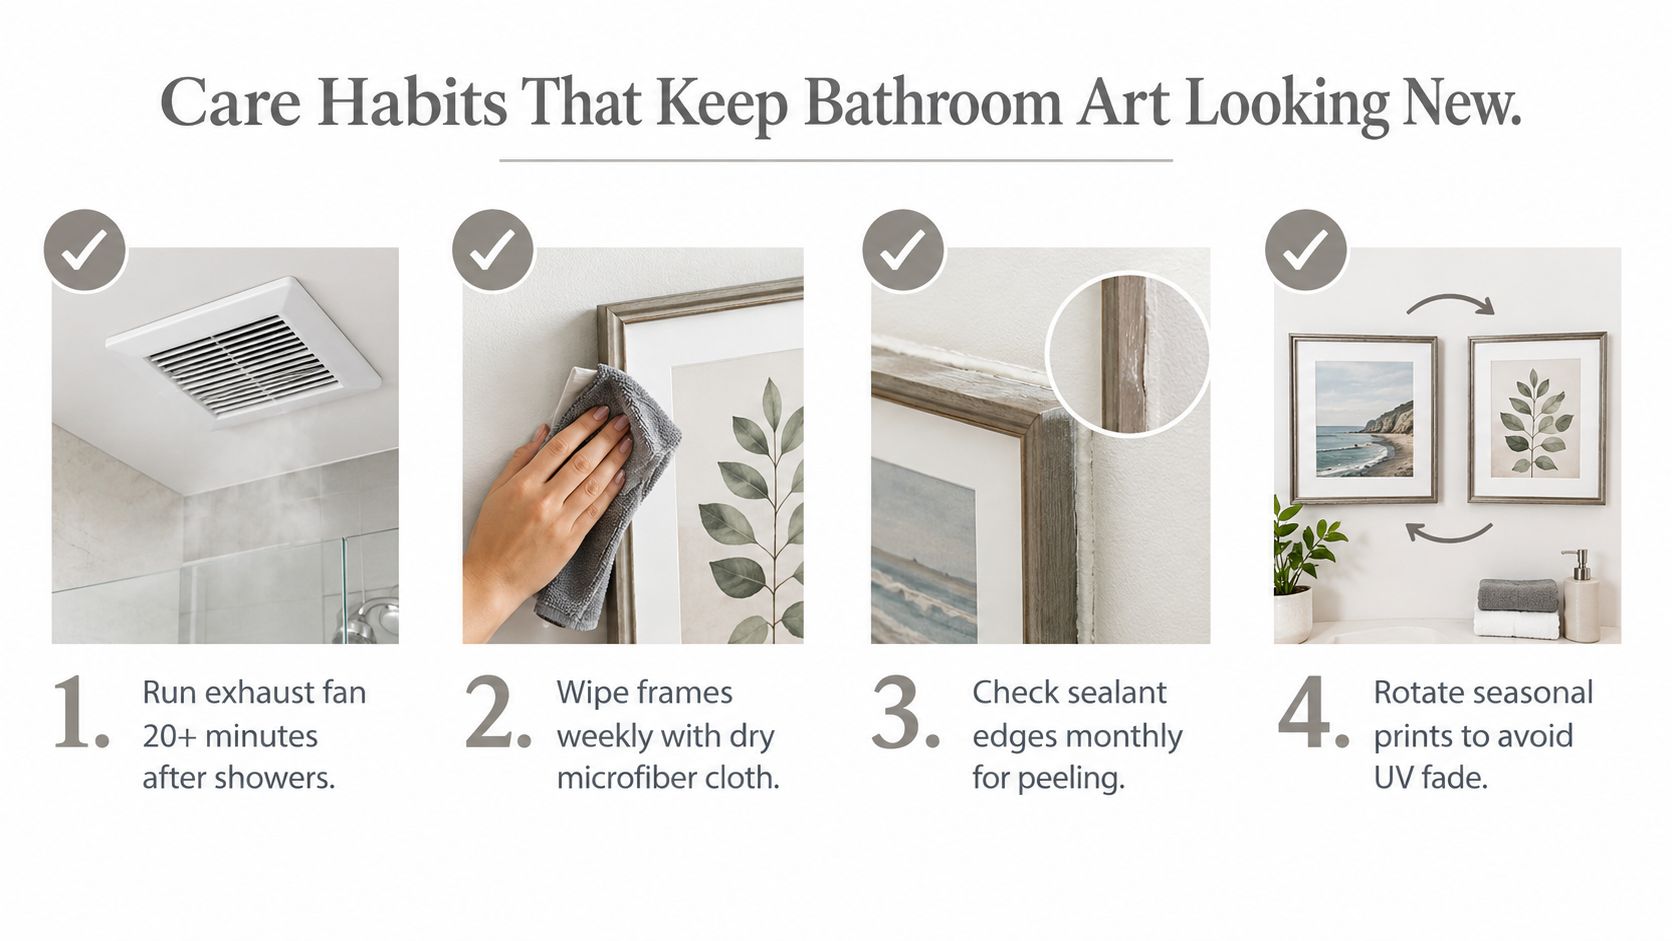
Even well-selected bathroom art needs a maintenance routine. Run the exhaust fan for 15–30 minutes after a shower, following commonly cited bathroom ventilation guidance (Design Dash's bathroom art recommendations). If the room permits it, leave the door slightly open so humid air can escape rather than settle around the frame.
Clean the glazing according to its material. Acrylic should be wiped with a clean, dry microfiber cloth or a cleaner approved for acrylic, since abrasive paper towels and household scrapers can create fine scratches. Glass tolerates more standard cleaning methods, but keep liquid away from the frame joints, backing, and wall.
Build a short inspection routine
After showers: Check whether the frame, glazing, or wall feels damp. Persistent fogging indicates that ventilation or placement needs attention.
During regular cleaning: Wipe dust from the frame with a dry microfiber cloth and avoid saturating wood, backing, or fabric.
At sealant edges: Look for peeling, gaps, or softened joints where moisture could enter the frame package.
At lower corners: Watch for darkening on canvas, tide lines on paper, or any change in the mat's flatness.
On metal hardware: Treat rust spotting as a warning, not a cosmetic defect. Replace affected hardware and investigate the source of moisture.
A piece that fogs between glazing layers, develops foxing on paper, or darkens at the lower canvas corners is telling you that the current location or enclosure isn't adequate. Remove it before the damage spreads, then inspect the back, mat, frame joints, and hanging points.

Seasonal checks should include the wall behind the frame, the condition of spacers, the tightness of D-rings, and the performance of the exhaust fan. A well-ventilated bathroom with a moisture-tolerant frame can support artwork for many years, but only if the homeowner treats humidity as an ongoing condition rather than a one-time installation detail.
Colorado Art Services provides professional picture hanging and art installation for homes, offices, galleries, and other spaces across the Denver Metro area and Front Range. For a bathroom project, the team can help assess placement, wall conditions, mirrors, lighting, and secure mounting, so visit Colorado Art Services to discuss your artwork and installation needs.
Comments