


Mirror Hanging Decoration: How to Hang and Style a Mirror Safely
You’re standing in the hallway with a mirror in one hand and a drill in the other. The wall looks suitable, but the mirror feels heavier than expected. Where should you begin?
A successful mirror hanging decoration project depends on three things: where the mirror belongs, how the wall will support it, and what the mirror will reflect. A beautiful position is useless if the hardware pulls out of the wall, while a secure installation can still disappoint if the mirror creates glare or reflects clutter.
Start With Three Questions
Before drilling, consider:
Position: Does the mirror suit the furniture, sightline, room function, and available wall space?
Support: Can the wall and hardware safely carry the mirror’s full weight?
Reflection: Will the mirror reflect useful light or an attractive view instead of glare, clutter, or an awkward doorway?
Identify Your Wall Type
Wall construction determines which fasteners you should use. Drywall, plaster, brick, concrete, and hollow block all require different hardware.
Drywall over wood studs: A screw driven securely into a stud provides strong support. Use a stud finder or magnet to locate the framing. If the desired position falls between studs, use a drywall anchor rated for the mirror’s weight and wall thickness.
Lath-and-plaster: Plaster can crack or crumble around standard anchors. Whenever possible, secure the mirror to a stud or use hardware specifically designed for plaster walls.
Solid brick or concrete: Use a masonry bit and anchors rated for the specific material and load. Clear dust from the drilled hole before installing the anchor.
Hollow concrete block: Choose fasteners made for hollow masonry. Heavy mirrors may require a mounting system that spreads the load across multiple secure points.
For more help, see this anchor selection guide.
Choose Hardware Based on Weight
Always weigh the finished mirror before selecting hardware. As a conservative rule, choose a mounting system rated for at least twice the mirror’s weight.
D-rings: A good option for light to moderately heavy framed mirrors. Two D-rings attached to separate wall fixings are generally more stable than a single wire and hook.
French cleats or Z-bars: Ideal for large or heavy mirrors because they distribute weight across several mounting points. The wall-mounted section must be level and secured to studs, masonry, or other reliable structural points.
Adhesive: Appropriate only when the surface, product instructions, cure time, and weight limit have all been verified. Do not rely on adhesive alone for a heavy mirror unless the system is specifically designed for that use.
Mirrors over approximately 50 pounds should generally be mounted into studs or masonry, preferably with a French cleat or Z-bar. When the wall type or weight is uncertain, professional installation is the safer choice.
Measure, Mark, and Hang
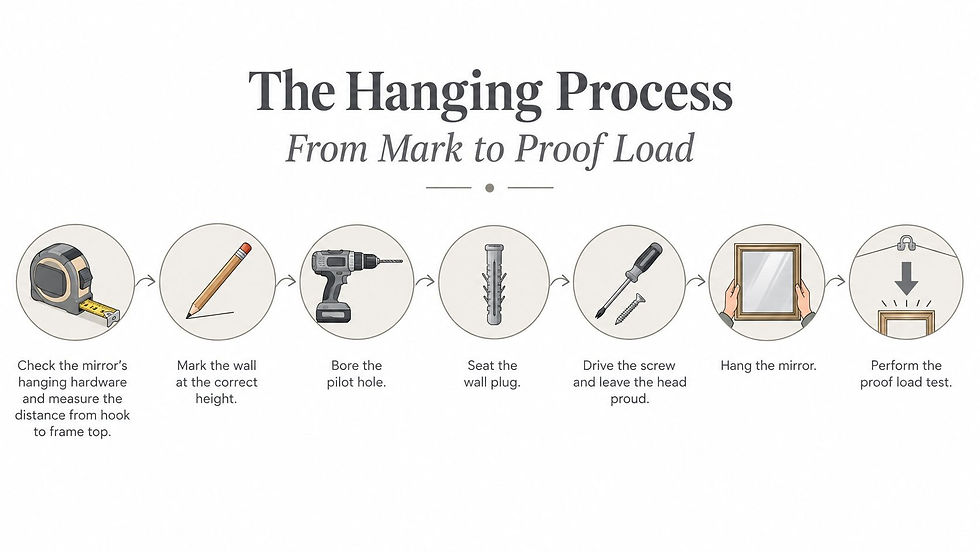
Place the mirror face down on a padded surface and measure the actual hanging hardware rather than the frame alone. Measure the distance between D-rings and their position below the top edge, or where the two sections of a cleat will engage.
Transfer the measurements to the wall with a pencil and level. Mark both fixing points and confirm the spacing before drilling. Frames are not always perfectly square, so do not assume the top edge is an accurate guide.
Drill pilot holes to the specified size, then install the anchors and screws according to the manufacturer’s directions.
Use a second person to lift anything heavier than a small decorative mirror. Confirm that both D-rings are seated or the cleat is fully interlocked. Check the level, then apply gentle downward and slightly outward pressure to the lower edge. If an anchor moves, remove the mirror and change the mounting method.
For additional guidance, visit this heavy mirror hanging guide.
Place the Mirror for Light and Function
Above a console, vanity, or other furniture, begin with the lower edge about 4 to 6 inches above the surface. Adjust the height so the mirror relates visually to the furniture and remains useful to the people in the home.
The reflection matters as much as the frame. A mirror can redirect natural light and make a room feel larger, but it can also create glare. Before drilling, tape the mirror’s outline onto the wall and inspect it from the room’s main standing and seated positions.
Whenever possible, reflect something worth seeing—artwork, greenery, a pendant light, architectural detail, or an outdoor view. Avoid reflecting clutter, a blank wall, or a busy doorway.
Room-by-room placement tips
Entryway: Center the mirror over a console or bench at a practical eye level. A width near two-thirds of the furniture often feels balanced.
Living room: A horizontal mirror can make a narrow room feel wider, while a tall mirror adds depth.
Dining room: Judge the position while seated. Aim to reflect decorative lighting without shining it directly into diners’ eyes.
Bathroom: Center the mirror with the vanity and coordinate it with the sink, backsplash, lighting, and wall clearances.
Bedroom or office: Keep the mirror out of distracting sightlines. In an office, check what appears behind you during video calls.
Final Safety Check
Before walking away, confirm that:
The mirror is level and does not rock or tilt.
Every anchor remains firmly seated during a gentle stability test.
Both D-rings, clips, or cleat sections are fully engaged.
The frame has proper clearance and the reflection works from the room’s main viewpoints.
The glass and frame show no cracks or structural damage.
A mirror can be perfectly centered and still be poorly installed. Secure support comes first; appearance is the final check.
For large, high, ornate, or difficult installations, Colorado Art Services provides residential and commercial mirror hanging, precise placement, and secure anchoring throughout the Denver Metro area and Front Range. Visit Colorado Art Services to discuss your mirror and wall conditions before you drill.


Comments