


Office Wall Art Design: A Practical Planning Guide

A blank reception wall and a stack of framed prints may look like a simple decorating project. In reality, successful office wall art design requires planning around scale, sightlines, wall construction, lighting, and safety. The art matters, but the preparation determines whether the finished space feels intentional.
Read the Space Before Buying Art
Walk the office with a tape measure and phone camera. Record wall widths, ceiling heights, furniture dimensions, door swings, outlets, windows, vents, and other obstacles. Photograph each location with the furniture in place so you can judge the art in context.
Also consider how people experience the room. Art behind a monitor may technically be visible but functionally ignored. A piece across from a conference table can become a focal point, while artwork near a busy walkway may require extra clearance and more secure mounting.
Before selecting art, note:
Wall construction: Drywall, steel or wood studs, plaster, brick, and concrete require different fasteners.
Building rules: Confirm restrictions involving wall penetrations, access, and after-hours work.
Safety zones: Avoid sprinklers, HVAC equipment, wiring, access panels, and required pathways.
Viewing direction: Consider whether people will see the piece while seated, standing, or passing by.
Brand details: Make sure the art complements the furniture, finishes, and lighting.
Measuring early also exposes hidden costs. Large or heavy pieces may require special glazing, two mounting points, a French cleat, or lift access.
Connect the Art to the Brand and Room
A logo palette is a starting point, not a complete art direction. Choose a dominant accent, a supporting color, and a neutral for frames or mats. This creates consistency without making the office feel like an advertisement.
Match the artwork to the room. Reception areas can support memorable, brand-forward pieces. Conference rooms benefit from engaging art that does not distract, while creative spaces can carry bolder work.
Materials matter too. Photography can feel precise and modern, natural wood frames can soften a technical space, and work from Colorado artists can communicate local investment. Before approving a piece, request a mockup showing it above the actual furniture.
For additional ideas, review this guide to corporate office art.
Use Reliable Scale and Spacing Rules
Office art most often feels wrong because it is too small or hung too high. These measurements provide a dependable starting point:
Artwork should fill roughly two-thirds to three-quarters of the furniture or wall area it serves.
Center a single piece approximately 57 to 60 inches from the floor.
Above a desk, leave at least eight inches between the monitor and the bottom of the frame.
Space paired pieces about two to three inches apart so they read as one composition.
Treat a gallery wall as one large unit rather than centering each frame separately.
Reception walls are viewed from farther away, so they need more scale than art near a workstation. For gallery walls, repeat at least one element—such as frame color, subject matter, or tonal range—to keep the arrangement cohesive.
Test the Layout and Lighting
Before drilling, cut paper templates to the exact dimensions of each frame. Tape them to the wall and view the arrangement from the reception desk, conference table, hallway, and nearest workstation.
Plan lighting at the same time. Aim track lights to minimize glare from the viewer's position. Colorado's strong sunlight can fade sensitive artwork, especially on south-facing walls, so consider UV-filtering glazing, window film, or shades.
See this guide to art installation lighting for more planning tips.
Choose Hardware for the Wall and Weight
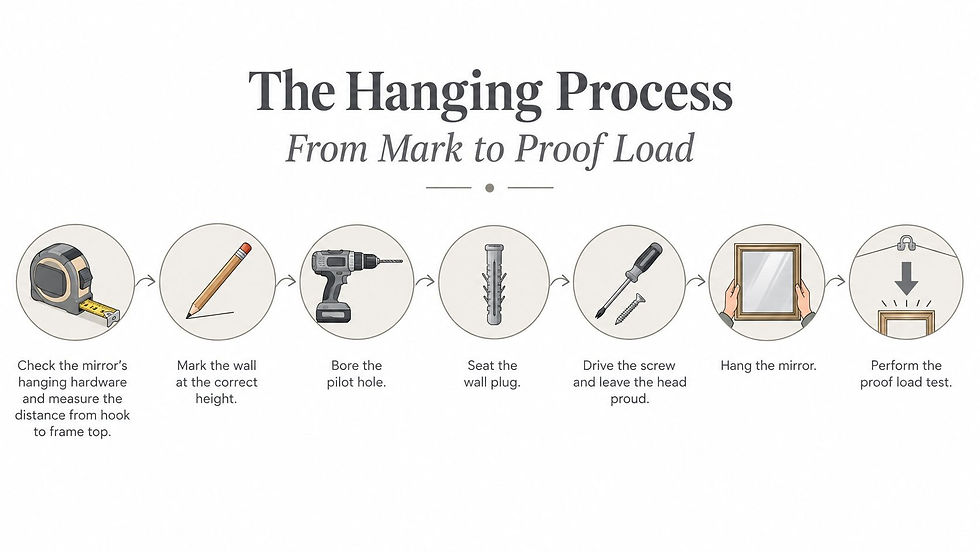
Calculate the total weight of the artwork, frame, glazing, and mounting system. Drywall over steel studs often requires toggles or a cleat, while concrete and masonry need properly rated anchors. Plastic drywall anchors are not masonry hardware.
Before drilling, check for electrical wiring, plumbing, HVAC routes, sprinkler clearances, and access panels. Pieces wider than 24 inches—and any art installed above seating—should generally use two attachment points to prevent shifting. Heavy, oversized, valuable, or elevated pieces are best handled by an experienced professional.
DIY may be appropriate for a lightweight frame on familiar drywall. Mixed wall types, gallery walls, high placements, and commercial liability requirements usually justify a professional art installer. This DIY versus professional installation comparison can help you decide.
Maintain the Finished Installation
Keep a record of each piece, including its location, glazing, wall material, mounting hardware, installation date, and a finished photo. Dust frames quarterly with a soft microfiber cloth. Apply non-ammonia cleaner to the cloth—not directly to the frame.
Check for fading on sun-exposed walls and re-level frames after construction, nearby vibration, or HVAC changes. If a frame repeatedly shifts, inspect the mounting system rather than simply adjusting it again.
Thoughtful office art installation begins long before the first hole is drilled. By measuring carefully, connecting the artwork to the room, testing the layout, and matching the hardware to the wall, you can create a workspace that feels polished, safe, and intentional.
Colorado Art Services can help with office layouts, gallery walls, heavy-piece mounting, storage, and local art transport throughout the Denver Metro area and Front Range. Visit Colorado Art Services to discuss your space and installation needs.


Comments